本文主要是介绍activiti学习(二十)——流程虚拟机源码分析(二)——从开始节点离开到下个节点前,希望对大家解决编程问题提供一定的参考价值,需要的开发者们随着小编来一起学习吧!
简述
《activiti学习(十九)——流程虚拟机源码分析(一)——流程启动源码分析》一文中最后,流程从startEvent节点执行takeAll准备离开。本文我们分析一下从开始节点到下一个节点之前虚拟机做了什么。由于流程虚拟机条件分支情况很多,一一叙述非常繁琐(有些我自己理解也不透彻),所以我会用最简单的模型去跟踪其流转,如下图:
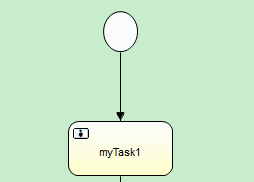
我们假设起点startEvent的下一个节点是一个普通的userTask,本文跟踪其在流程虚拟机的代码走向。
跟踪源码
上一篇文章我们跟踪到ExecutionEntity的takeAll方法。startEvent活动类通过调用这个方法离开startEvent节点。
public class ExecutionEntity extends VariableScopeImpl implements ActivityExecution, ExecutionListenerExecution, Execution, PvmExecution, ProcessInstance, InterpretableExecution, PersistentObject, HasRevision {//......public void takeAll(List<PvmTransition> transitions, List<ActivityExecution> recyclableExecutions) {fireActivityCompletedEvent();transitions = new ArrayList<PvmTransition>(transitions);recyclableExecutions = (recyclableExecutions!=null ? new ArrayList<ActivityExecution>(recyclableExecutions) : new ArrayList<ActivityExecution>());if (recyclableExecutions.size()>1) {for (ActivityExecution recyclableExecution: recyclableExecutions) {if (((ExecutionEntity)recyclableExecution).isScope()) {throw new PvmException("joining scope executions is not allowed");}}}ExecutionEntity concurrentRoot = ((isConcurrent && !isScope) ? getParent() : this);List<ExecutionEntity> concurrentActiveExecutions = new ArrayList<ExecutionEntity>();List<ExecutionEntity> concurrentInActiveExecutions = new ArrayList<ExecutionEntity>();for (ExecutionEntity execution: concurrentRoot.getExecutions()) {if (execution.isActive()) {concurrentActiveExecutions.add(execution);} else {concurrentInActiveExecutions.add(execution);}}if ( (transitions.size()==1)&& (concurrentActiveExecutions.isEmpty())&& allExecutionsInSameActivity(concurrentInActiveExecutions)) {List<ExecutionEntity> recyclableExecutionImpls = (List) recyclableExecutions;recyclableExecutions.remove(concurrentRoot);for (ExecutionEntity prunedExecution: recyclableExecutionImpls) {Context.getCommandContext().getHistoryManager().recordActivityEnd(prunedExecution);prunedExecution.remove();}concurrentRoot.setActive(true);concurrentRoot.setActivity(activity);concurrentRoot.setConcurrent(false);concurrentRoot.take(transitions.get(0), false);} else {
//......}public void take(PvmTransition transition, boolean fireActivityCompletionEvent) {if (fireActivityCompletionEvent) {fireActivityCompletedEvent();}if (this.transition!=null) {throw new PvmException("already taking a transition");}if (transition==null) {throw new PvmException("transition is null");}setActivity((ActivityImpl)transition.getSource());setTransition((TransitionImpl) transition);performOperation(AtomicOperation.TRANSITION_NOTIFY_LISTENER_END);}//......
}
第8行fireActivityCompletedEvent方法会触发全局事件转发器转发ACTIVITY_COMPLETED事件。11行由于入参recyclableExecutions为空,所以为recyclableExecutions新建一个空的数组。22行isConcurrent默认为false,isScope默认是true,因此concurrentRoot赋值为this。32-34行判断假设startEvent的“出线”只有一条,则此时判断为true。48行通过take离开startEvent节点。66行设置当前活动为startEvent的ActivitiImpl,67行设置当前的连线,68行调用原子操作performOperation(AtomicOperation.TRANSITION_NOTIFY_LISTENER_END)。这个原子操作的调用我们上一篇文章分析过,这里不再细述。看看AtomicOperation.TRANSITION_NOTIFY_LISTENER_END对应的AtomicOperationTransitionNotifyListenerEnd类:
public class AtomicOperationTransitionNotifyListenerEnd extends AbstractEventAtomicOperation {//......protected String getEventName() {return org.activiti.engine.impl.pvm.PvmEvent.EVENTNAME_END;}protected void eventNotificationsCompleted(InterpretableExecution execution) {execution.performOperation(TRANSITION_DESTROY_SCOPE);}
}
这里原子操作首先会触发实行监听器的end事件,然后执行原子操作performOperation(TRANSITION_DESTROY_SCOPE)。即调用AtomicOperationTransitionDestroyScope类
public class AtomicOperationTransitionDestroyScope implements AtomicOperation {//......@SuppressWarnings("unchecked")public void execute(InterpretableExecution execution) {InterpretableExecution propagatingExecution = null;ActivityImpl activity = (ActivityImpl) execution.getActivity();if (activity.isScope()) {
//......} else {propagatingExecution = execution;}ScopeImpl nextOuterScopeElement = activity.getParent();TransitionImpl transition = propagatingExecution.getTransition();ActivityImpl destination = transition.getDestination();if (transitionLeavesNextOuterScope(nextOuterScopeElement, destination)) {propagatingExecution.setActivity((ActivityImpl) nextOuterScopeElement);propagatingExecution.performOperation(TRANSITION_NOTIFY_LISTENER_END);} else {propagatingExecution.performOperation(TRANSITION_NOTIFY_LISTENER_TAKE);}}public boolean transitionLeavesNextOuterScope(ScopeImpl nextScopeElement, ActivityImpl destination) {return !nextScopeElement.contains(destination);}
}
执行execution方法,第10行的if判断为false,注意execution的isScope为true,但是ActivityImpl的isScope为false,所以这里执行13行的代码。16行获取activity.getParent(),即startEvent的parent,是Process对象。18行获取连线终点的活动。19行判断Process中是否含有下一个节点的活动,因此28行函数判断为false(!符号取了相反的值),因此走23行performOperation(TRANSITION_NOTIFY_LISTENER_TAKE),会调用AtomicOperationTransitionNotifyListenerTake类。
public class AtomicOperationTransitionNotifyListenerTake implements AtomicOperation {//......public void execute(InterpretableExecution execution) {TransitionImpl transition = execution.getTransition();List<ExecutionListener> executionListeners = transition.getExecutionListeners();int executionListenerIndex = execution.getExecutionListenerIndex();if (executionListeners.size()>executionListenerIndex) {execution.setEventName(org.activiti.engine.impl.pvm.PvmEvent.EVENTNAME_TAKE);execution.setEventSource(transition);ExecutionListener listener = executionListeners.get(executionListenerIndex);try {listener.notify(execution);} catch (RuntimeException e) {throw e;} catch (Exception e) {throw new PvmException("couldn't execute event listener : "+e.getMessage(), e);}execution.setExecutionListenerIndex(executionListenerIndex+1);execution.performOperation(this);} else {execution.setExecutionListenerIndex(0);execution.setEventName(null);execution.setEventSource(null);ActivityImpl activity = (ActivityImpl) execution.getActivity();ActivityImpl nextScope = findNextScope(activity.getParent(), transition.getDestination());execution.setActivity(nextScope);if(Context.getProcessEngineConfiguration() != null && Context.getProcessEngineConfiguration().getEventDispatcher().isEnabled()) {Context.getProcessEngineConfiguration().getEventDispatcher().dispatchEvent(ActivitiEventBuilder.createSequenceFlowTakenEvent(ActivitiEventType.SEQUENCEFLOW_TAKEN, transition.getId(),activity.getId(), (String) activity.getProperties().get("name") ,(String) activity.getProperties().get("type"), activity.getActivityBehavior().getClass().getCanonicalName(),nextScope.getId(), (String) nextScope.getProperties().get("name"), (String) nextScope.getProperties().get("type"), nextScope.getActivityBehavior().getClass().getCanonicalName()));}execution.performOperation(TRANSITION_CREATE_SCOPE);}}/** finds the next scope to enter.  the most outer scope is found first */public static ActivityImpl findNextScope(ScopeImpl outerScopeElement, ActivityImpl destination) {ActivityImpl nextScope = destination;while( (nextScope.getParent() instanceof ActivityImpl)&& (nextScope.getParent() != outerScopeElement)) {nextScope = (ActivityImpl) nextScope.getParent();}return nextScope;}
}
8-23行嵌套调用,遍历每一个执行监听器触发take事件。30-32行把execution的当前活动设置为下一个活动节点。34-38行触发全局事件转发器SEQUENCEFLOW_TAKEN事件。从此execution进入下一个节点。
小结
普遍来说,流程从一般的活动离开,就是通过ExecutionEntity的take方法,然后经历数个原子操作,触发执行监听器和全局事件转发器对应的事件,如果涉及子流程、网关形成的分支流程等,则情况会更复杂一些。最后把该触发的事件都触发完毕之后,把ExecutionEntity当前的活动设置为下一个节点,就此进入下一个节点相关的活动中。
这篇关于activiti学习(二十)——流程虚拟机源码分析(二)——从开始节点离开到下个节点前的文章就介绍到这儿,希望我们推荐的文章对编程师们有所帮助!


