本文主要是介绍20.0加密文件,ca证书申请实验,希望对大家解决编程问题提供一定的参考价值,需要的开发者们随着小编来一起学习吧!
介绍:对称加密和非对称加密,CA证书申请实验
目录
gpg工具
gpg工具对称加密命令
gpg工具非对称加密命令
openssl:开源项目成果
对称加密算法enc命令
生成密码passwd命令
随机数生成设备
非对称加密算法genrsa命令
CA证书的搭建
1、服务器自签名证书
2、客户端软件申请证书
3、吊销证书:
gpg工具
gpg工具对称加密命令
[root@centos7:app]# cp /etc/fstab .[root@centos7:app]# lsfstab[root@centos7:app]# gpg -c fstab #对称加密文件[root@centos7:app]# lsfstab fstab.gpg[root@centos7:app]# cat fstab.gpg #加密后的文字如下(◔㊀a@ Ѭba↑yۘ&>ձ¢¬µˮ㒄\®,¦Rб¤Ȗ£»І&6Wϰ.·ƝAU=TϋϟÔX,¯5<»ӗƦK$ʑuߩ~떘Z¨˖D.긚´;QG룯Pҟ3¾2~ґ}i Wv3뒓ª$微2-=¦}ę±IbqG㻾糍槅ߨ¯Jjt²²¨Oar²ا|5姎ւn캛[root@centos7:app]# scp fstab.gpg 172.18.119.213:/app[root@centos6:app]# file fstab.gpgfstab.gpg: data[root@centos6 app ]#gpg -d fstab.gpg #输入密码,输出到终端gpg: CAST5 encrypted data***省略***[root@centos6 app ]#gpg -o fstab -d fstab.gpg #输入密码,解开文件fstab.gpg为fstab,[root@centos6 app ]#gpg -d fstab.gpg > fstab #同上gpg工具非对称加密命令
gpg --gen-key
[root@centos7 app ]#gpg --gen-keygpg (GnuPG) 2.0.14; Copyright (C) 2009 Free Software Foundation, Inc.This is free software: you are free to change and redistribute it.There is NO WARRANTY, to the extent permitted by law.[root@centos7:app]# gpg --list-keys/root/.gnupg/pubring.gpg------------------------pub 1024R/32F67C1F 2018-07-10uid zhaoliying (yingbaobao)sub 1024R/E8F9B8C9 2018-07-10[root@centos7:.gnupg]# gpg -a --export -o zhaoliying.pubkey #生成公钥[root@centos7:.gnupg]# cat zhaoliying.pubkey-----BEGIN PGP PUBLIC KEY BLOCK----mI0EW0RpsQEEAKj+M9wEq/FYic64o5SaqDtTaqo+Hywg6dLklBKVIV1Hvg8nZRVd***省略***[root@centos7:.gnupg]# gpg --helpa, --armor create ascii armored output***省略***[root@centos7:.gnupg]# scp zhaoliying.pubkey 172.18.119.213:[root@centos6 app ]#cp /root/zhaoliying.pubkey .[root@centos6 app ]#lszhaoliying.pubkey[root@centos6 app ]#gpg --gen-key # 如图1生成一个非对称密钥gpg (GnuPG) 2.0.14; Copyright (C) 2009 Free Software Foundation, Inc.This is free software: you are free to change and redistribute it.There is NO WARRANTY, to the extent permitted by law.Please select what kind of key you want:(1) RSA and RSA (default)(2) DSA and Elgamal(3) DSA (sign only)(4) RSA (sign only)Your selection?
图1

[root@centos6 app ]#gpg --list-keys/root/.gnupg/pubring.gpg------------------------pub 1024R/C27FA3BD 2018-07-10uid dhyhahasub 1024R/84AE51FE 2018-07-10[root@centos6 app ]#gpg --import zhaoliying.pubkey #复制公钥到centos6,并导入centos7生成的非对称密钥的公钥gpg: key 32F67C1F: public key "zhaoliying(yingbaobao)" importedgpg: Total number proce确定ssed: 1gpg: imported: 1 (RSA: 1)[root@centos6 app ]#gpg --list-keys #列出centos6上的两个公钥/root/.gnupg/pubring.gpg------------------------pub 1024R/C27FA3BD 2018-07-10uid dhyhahasub 1024R/84AE51FE 2018-07-10pub 1024R/32F67C1F 2018-07-10uid zhaoliying (yingbaobao)sub 1024R/E8F9B8C9 2018-07-10[root@centos6 app ]#gpg -e -r zhaoliying /etc/fstab #利用centos7上生成的zhaoliying公钥加密文件/et/fstabgpg: E8F9B8C9: There is no assurance this key belongs to the named userpub 1024R/E8F9B8C9 2018-07-10 zhaoliying (yingbaobao)Primary key fingerprint: FBA4 2689 9797 0B65 B0D2 2C57 DD56 F4C7 32F6 7C1FSubkey fingerprint: D165 9324 44CC 8811 453E F9CE 7F55 CD40 E8F9 B8C9It is NOT certain that the key belongs to the person namedin the user ID. If you *really* know what you are doing,you may answer the next question with yes.Use this key anyway? (y/N)[root@centos6 app ]#cp /etc/fstab.gpg . #利用centos7上的公钥加密后的fstab.gpg[root@centos6 app ]#lsfstab.gpg zhaoliying.pubkey[root@centos6 app ]#scp fstab.gpg 172.18.119.212: #把centos6加密的文件fstab.gpg复制到centos7家目录下root@172.18.119.212's password:fstab.gpg 100% 646 0.6KB/s 00:00 [root@centos[root@centos7:~]# gpg -d fstab.gpg #利用centos7的私钥解密[root@centos7:~]# lsanaconda-ks.cfg Downloads fstab.gpg phone.sh Public VideosDesktop findresults initial-setup-ks.cfg phone.txt secureDocuments fs [root@centos6 app ]#gpg --delete-keys zhaoliying #centos6上删除centos7复制过来的公钥gpg (GnuPG) 2.0.14; Copyright (C) 2009 Free Software Foundation, Inc.This is free software: you are free to change and redistribute it.There is NO WARRANTY, to the extent permitted by law.pub 1024R/32F67C1F 2018-07-10 zhaoliying (yingbaobao)Delete this key from the keyring? (y/N) y[root@centos6 app ]#gpg --delete-keys dhyhaha #删除centos6上生成的公钥gpg (GnuPG) 2.0.14; Copyright (C) 2009 Free Software Foundation, Inc.This is free software: you are free to change and redistribute it.There is NO WARRANTY, to the extent permitted by law.gpg: there is a secret key for public key "dhyhaha"!gpg: use option "--delete-secret-keys" to delete it first.[root@centos6 app ]#gpg --delete-secret-keys dhyhahagpg (GnuPG) 2.0.14; Copyright (C) 2009 Free Software Foundation, Inc.This is free software: you are free to change and redistribute it.There is NO WARRANTY, to the extent permitted by law.sec 1024R/C27FA3BD 2018-07-10 dhyhahaDelete this key from the keyring? (y/N) yThis is a secret key! - really delete? (y/N) y
openssl:开源项目成果
openssl包
[root@centos7:~]# rpm -qi openssl
[root@centos7:~]# rpm -ql openssl
openssl --help
salt 盐 ,enc加密命令
对称加密算法enc命令
#对称加密算法des加密fstab,并且加入盐salt,输出文件起名为fstab.des3[root@centos7:app]# openssl enc -e -des3 -a -salt -in fstab -out fstab.des3enter des-ede3-cbc encryption password:Verifying - enter des-ede3-cbc encryption password:[root@centos7:app]# lsfstab fstab.des3 fstab.gpg#解密用对称加密算法des3加密的文件fstab.des3,解密后的文件名为fstab2[root@centos7:app]# openssl enc -d -des3 -a -salt -in fstab.des3 -out fstab2enter des-ede3-cbc decryption password:[root@centos7:app]# lsfstab fstab2 fstab.des3 fstab.gpg#用Openssl 的命令dgst加密(算法有sha1,md5)[root@centos7:app]# openssl dgst -sha1 fstabSHA1(fstab)= cbdc030fee1ee7abdfc7b1793dcd7a35a9919722[root@centos7:app]# sha1sum fstabcbdc030fee1ee7abdfc7b1793dcd7a35a9919722 fstab生成密码passwd命令
[root@centos7:app]# openssl --help[root@centos7:app]# man sslpasswd#openssl中的命令passwd用户生成密码,1表示md5加密算法[root@centos7:app]# openssl passwd -1Password:Verifying - Password:$1$Kc/klHcV$x6RxdAOD6ULF5XRwELDr50#$1 表示MD5[root@centos6 ~ ]#grub-crypt #sha512加密算法,生成的密码中$6表示sha512算法Password:Retype password:$6$lvBKG2qZI6zLU8wY$/62YiF2Uc3qNymNP9HCERE/7w8xFo8NsxR8UAWQo09rMRsO7K/POC3ONNeV6OT7ZyYvwEqYd8X.myemcCTYXX/[root@centos7:app]# openssl rand -hex 2ad16随机生成口令,不太好[root@centos7:app]# openssl rand -base64 6QFK9Atiz只要后面跟的是3的倍数,则不会有=号 base64转换对照表可以百度[root@centos7:app]# openssl rand -base64 40JL8VA==[root@centos7:app]# openssl rand -base64 20 | tr -d '+=/' | head -c8|xargsvM9F7ue7随机数生成设备
[root@centos7:data]# ll /dev/random /dev/urandom
crw-rw-rw-. 1 root root 1, 8 Jul 10 09:05 /dev/random
crw-rw-rw-. 1 root root 1, 9 Jul 10 09:05 /dev/urandom
[root@centos7:data]# cat /dev/urandom | tr -dc '[:alnum:]'|head -c8
非对称加密算法genrsa命令
#rsa算法生成一个私钥test.key[root@centos7:data]# openssl genrsa -out test.key 2048Generating RSA private key, 2048 bit long modulus.......................................................+++............................................................................+++e is 65537 (0x10001)#rsa算法生成一个私钥test2.key,并用des加密私钥[root@centos7:data]# openssl genrsa -out test2.key -des 1024Generating RSA private key, 1024 bit long modulus................++++++...++++++e is 65537 (0x10001)Enter pass phrase for test2.key:Verifying - Enter pass phrase for test2.key:#生成私钥文件的权限为600,且是在子shell中运行,不影响当前shell的umask值[root@centos7:data]# ( umask 066 ;openssl genrsa -out test3.key 1024)Generating RSA private key, 1024 bit long modulus..............++++++...........++++++e is 65537 (0x10001)[root@centos7:data]# lltotal 12-rw-r--r--. 1 root root 958 Jul 10 21:05 test2.key-rw-------. 1 root root 891 Jul 10 21:06 test3.key-rw-r--r--. 1 root root 1679 Jul 10 21:05 test.key#私钥test2.key被加密了,此处解密私钥test2.key ,并起名为test22.ky[root@centos7:data]# openssl rsa -in test2.key -out test22.kyEnter pass phrase for test2.key:writing RSA key[root@centos7:data]# lltotal 16-rw-r--r--. 1 root root 887 Jul 10 21:07 test22.ky #test22.ky与test2.key内容相同-rw-r--r--. 1 root root 958 Jul 10 21:05 test2.key-rw-------. 1 root root 891 Jul 10 21:06 test3.key-rw-r--r--. 1 root root 1679 Jul 10 21:05 test.key#导出公钥[root@centos7:data]# openssl rsa -in test22.ky -pubout -out test22.pubkeywriting RSA key[root@centos7:data]# openssl rsa -in test.key -pubout -out test.pubkeywriting RSA key
CA证书的搭建
实验:实现证书的申请
1 在CA主机:CA建立
cd /etc/pki/CA
(umask 066;openssl genrsa -out private/cakey.pem 2048)
openssl req -new -x509 -key private/cakey.pem -out cacert.pem -days 3650
touch index.txt
echo 01 > serial
2 在客户端主机上:申请
cd /app
(umask 066;openssl genrsa -out app.key 2048)
openssl req -new -key app.key -out app.csr
3 在CA主机上:颁发证书
cd /etc/pki/CA
openssl ca -in app.csr -out app.cer -days 300
1、服务器自签名证书
[root@centos7:tls]# pwd/etc/pki/tls[root@centos7:tls]# lscert.pem certs misc openssl.cnf private#配置文件[root@centos7:tls]# cat openssl.cnf####################################################################[ CA_default ]dir = /etc/pki/CA # Where everything is keptcerts = $dir/certs # Where the issued certs are keptcrl_dir = $dir/crl # Where the issued crl are keptdatabase = $dir/index.txt # database index file. 存放颁发证书的信息#unique_subject = no # Set to 'no' to allow creation of一个主题是否允许申请多个证书,默认不允许 # several ctificates with same subject.new_certs_dir = $dir/newcerts # default place for new certs.certificate = $dir/cacert.pem # The CA certificate#CA的顶级证书serial = $dir/serial # The current serial number ;颁发的证书编号,显示的是下一个申请的证书编号crlnumber = $dir/crlnumber # the current crl number ;要被吊销证书编号,与颁发证书的编号没有关系# must be commented out to leave a V1 CRLcrl = $dir/crl.pem # The current CRL#吊销证书的路径private_key = $dir/private/cakey.pem# The private keyRANDFILE = $dir/private/.rand # private random number file 随机文件x509_extensions = usr_cert # The extentions to add to the cert 证书标准格式***省略***# For the CA policy[ policy_match ] #匹配规则可改 policy =plicy_anythingcountryName = match #国家stateOrProvinceName = match #省,州 ,可改为optional不匹配也可以(客户申请信息和此处不同)organizationName = match #组织organizationalUnitName = optionalcommonName = supplied #主机名称emailAddress = optional #邮箱------------------------------------------------------#生成私钥,并对私钥用des3加密,生成的2048位私钥cakey.pem[root@centos7:CA]# openssl genrsa -out private/cakey.pem -des3 2048#x509表示自签名证书,用私钥cakey.pem签名证书生成cacert.pem[root@centos7:CA]# openssl req -new -x509 -key private/cakey.pem -out cacert.pem -days 365Enter pass phrase for private/cakey.pem:You are about to be asked to enter information that will be incorporatedinto your certificate request.What you are about to enter is what is called a Distinguished Name or a DN.There are quite a few fields but you can leave some blankFor some fields there will be a default value,If you enter '.', the field will be left blank.-----Country Name (2 letter code) [XX]:CNState or Province Name (full name) []:beijingLocality Name (eg, city) [Default City]:dhyduOrganization Name (eg, company) [Default Company Ltd]:dhyduorg Organizational Unit Name (eg, section) []:optCommon Name (eg, your name or your server's hostname) []:www.baidu.comEmail Address []:#查看生成的证书cacert.pem有专门的命令[root@centos7:CA]# openssl x509 -in cacert.pem -noout -textCertificate:Data:Version: 3 (0x2)Serial Number:89:33:f9:89:39:b7:2f:dfSignature Algorithm: sha256WithRSAEncryptionIssuer: C=CN, ST=beijing, L=dhydu, O=dhyduorg, OU=opt, CN=www.baidu.comValidityNot Before: Jul 10 14:08:12 2018 GMTNot After : Jul 10 14:08:12 2019 GMT*******省略[root@centos7:CA]# sz cacert.pem
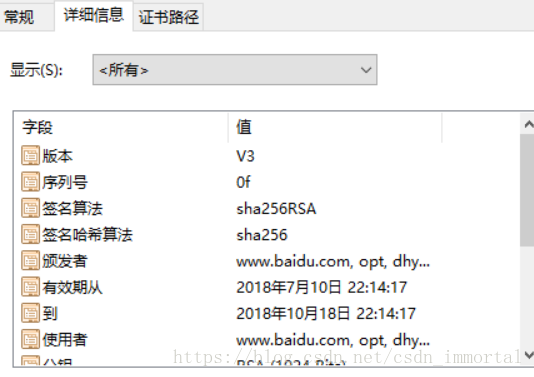
导出到windows10桌面,更改后缀为cer ,如图2

图2
2、客户端软件申请证书
#生成1024位私钥app.key[root@centos6 app ]#(umask 066;openssl genrsa -out app.key 1024)Generating RSA private key, 1024 bit long modulus...............++++++..........................................................++++++e is 65537 (0x10001)[root@centos6 app ]#lltotal 4-rw-------. 1 root root 887 Jul 10 22:33 app.key#生成向CA机构申请证书的文件app.csr[root@centos6 app ]#openssl req -new -key app.key -out app.csrYou are about to be asked to enter information that will be incorporatedinto your certificate request.What you are about to enter is what is called a Distinguished Name or a DN.There are quite a few fields but you can leave some blankFor some fields there will be a default value,If you enter '.', the field will be left blank.-----Country Name (2 letter code) [XX]:CNState or Province Name (full name) []:beijingLocality Name (eg, city) [Default City]:dhyduOrganization Name (eg, company) [Default Company Ltd]:dhyduorg Organizational Unit Name (eg, section) []:optCommon Name (eg, your name or your server's hostname) []:www.baidu.comEmail Address []:Please enter the following 'extra' attributesto be sent with your certificate requestA challenge password []:centosAn optional company name []:[root@centos6 app ]#[root@centos6 app ]#lltotal 8-rw-r--r--. 1 root root 619 Jul 10 22:36 app.csr-rw-------. 1 root root 887 Jul 10 22:33 app.key#把申请证书文件传到centos7上[root@centos6 app ]#scp app.csr 172.18.119.212:/etc/pki/CAroot@172.18.119.212's password:app.csr 100% 619 0.6KB/s 00:00 #centos7颁发证书,需要事先准备两个文件index,否则会报错,可根据报错解决[root@centos7:CA]#touch index.txt[root@centos7:CA]#echo 0F > serial#颁发证书,有效期100天[root@centos7:CA]# openssl ca -in app.csr -out app.cer -days 100Using configuration from /etc/pki/tls/openssl.cnfEnter pass phrase for /etc/pki/CA/private/cakey.pem:Check that the request matches the signatureSignature okCertificate Details:Serial Number: 15 (0xf)ValidityNot Before: Jul 10 14:14:17 2018 GMTNot After : Oct 18 14:14:17 2018 GMTSubject:countryName = CNstateOrProvinceName = beijingorganizationName = dhyduorgorganizationalUnitName = optcommonName = www.baidu.com
[root@centos7:CA]# tree.├── app.cer├── app.csr├── cacert.pem├── certs确定├── crl├── index.txt├── index.txt.attr├── index.txt.old 旧证书的备份├── newcerts│ └── 0F.pem 新颁发的证书文件,和app.cer一样├── private│ └── cakey.pem├── serial└── serial.old 旧证书序列号的备份4 directories, 10 files[root@centos7:CA]# diff app.cer newcerts/0F.pem[root@centos7:CA]# cat index.txtV 181018141417Z 0F unknown /C=CN/ST=beijing/O=dhyduorg/OU=opt/CN=www.baidu.com#下一个证书的编号[root@centos7:CA]# cat serial10[root@centos7:CA]# cat serialold0F同一个申请文件app.csr是否可以申请多个证书[root@centos7:CA]# cat index.txt.attrunique_subject = yes 唯一证书,可以把配置文件改了vim index.txt.attr 改为no但申请的多个证书是一样的,只是证书编号不一样,一般没此需求3、吊销证书:
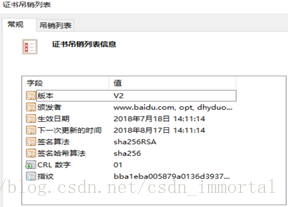
[root@centos7:CA]# openssl ca -revoke newcerts/0F.pemUsing configuration from /etc/pki/tls/openssl.cnfEnter pass phrase for /etc/pki/CA/private/cakey.pem:Revoking Certificate 0F.Data Base Updated[root@centos7:CA]# cat index.txtR 181018141417Z 180718060447Z 0F unknown /C=CN/ST=beijing/O=dhyduorg/OU=opt/CN=www.baidu.com[root@centos7:CA]# openssl ca -status 0FUsing configuration from /etc/pki/tls/openssl.cnf0F=Revoked (R)[root@centos7:CA]#证书吊销后发到互联网上[root@centos7:CA]# openssl ca -status 0FUsing configuration from /etc/pki/tls/openssl.cnf0F=Revoked (R)[root@centos7:CA]# pwd/etc/pki/CA#创建吊销序列号,此处从01开始编号[root@centos7:CA]# echo 01 > crlnumber[root@centos7:CA]# cat crlnumber01#生成吊销文件内容[root@centos7:CA]# openssl ca -gencrl -out /etc/pki/CA/crl.pemUsing configuration from /etc/pki/tls/openssl.cnfEnter pass phrase for /etc/pki/CA/private/cakey.pem:[root@centos7:CA]# cat crl.pem-----BEGIN X509 CRL-----MIIB1zCBwAIBATANBgkqhkiG9w0BAQsFADBoMQswCQYDVQQGEwJDTjEQMA4GA1UECAwHYmVpamluZzEOMAwGA1UEBwwFZGh5ZHUxETAPBgNVBAoMCGRoeWR1b3JnMQwwCgYDVQQLDANvcHQxFjAUBgNVBAMMDXd3dy5iYWlkdS5jb20XDTE4MDcxODA2MTExNFoXDTE4MDgxNzA2MTExNFowFDASAgEPFw0xODA3MTgwNjA0NDdaoA4wDDAKBgNVHRQEAwIBATANBgkqhkiG9w0BAQsFAAOCAQEAaGsUOodT0WFT/ckcNCpsSgWXf7U+25BcqOMigSuwmju00FdvNA3AXsozfJzt2UCWM8Eu7vUsnjZaN9jxmOqv8Fv4BSz/y+31zknqHjryC9A+fFj1y50vyXObJtr0rjL2kmOE26ZQXtnUBguqQLVihxnXtbvGMkODJRslVKJlAg+EcqXMWMWiZJPRkMOjhEyF97Yh3RJOcrB0TI/XH4Yusrq1ysyG3CYaEge4TsysKOydncJw9zs9DIkTv9zhULwKrmZ8u0tYiaRETsKI9oFrM1mmhMxkLkBLo2hNyFQ8ml/Vi4xzq8vz3Qw3aH9z7vB4g5MygaUdEEbSeZ0oOQDgSw==-----END X509 CRL-----[root@centos7:CA]# #传到windows上,更改后缀为.crl;如下图


这篇关于20.0加密文件,ca证书申请实验的文章就介绍到这儿,希望我们推荐的文章对编程师们有所帮助!


