本文主要是介绍tinkerCAD案例:33. 在 Tinkercad 中使用标尺工具,希望对大家解决编程问题提供一定的参考价值,需要的开发者们随着小编来一起学习吧!
在 Tinkercad 中使用标尺工具
Using the Ruler Tool in Tinkercad
在 Tinkercad 中使用标尺工具
Introduction: Using the Ruler Tool in Tinkercad
简介:在 Tinkercad 中使用标尺工具

For those that may not know Tinkercad is a web based 3D modeling tool. I use Tinkercad almost exclusively for all of my 3D designs that I plan to 3D print. I say almost exclusively because I have uploaded some 2D outlines to extrude.
I have made things such as, cookie cutters, robot platforms, robot wheels, and figurines.
I have been using Tinkercad for almost a year and only just now discovered the full use of the ruler tool. Discovering this has changed the way I design things on Tinkercad forever. I figured I couldn’t be the only one who didn’t know about these features so I thought I’d compile them all into an Instructable.
What you’ll need:
- A computer with access to internet (Tinkercad is web-based)
- A tinkercad or autodesk account (it’s free!)
Add TipAsk QuestionCommentDownload
对于那些不了解 Tinkercad 的人来说,它是一款基于网络的 3D 建模工具。我几乎只使用 Tinkercad 来完成我计划进行 3D 打印的所有 3D 设计。之所以说 “几乎全部”,是因为我上传了一些二维轮廓来挤出。
我做过的东西包括饼干切割器、机器人平台、机器人轮子和小雕像。
我使用 Tinkercad 已经快一年了,直到现在才发现标尺工具的全部用途。这个发现彻底改变了我在 Tinkercad 上设计东西的方式。我想我不可能是唯一一个不知道这些功能的人,所以我想我应该把它们全部编译到一个 Instructable 中。
你需要什么?
-
一台能上网的电脑(Tinkercad 基于网络)
-
Tinkercad 或 autodesk 账户(免费)
Step 1: Find the Ruler Tool in Tinkercad

The ruler tool is in the helpers section on the right hand side of the Tinkercad window.
Drag an object and a ruler onto the Workplane. I use rectangles, which may or may not be cubes, in this Instructable to demonstrate.
标尺工具位于 Tinkercad 窗口右侧的辅助工具部分。
拖动一个对象和一把标尺到工作平面上。在本教程中,我使用矩形(可能是立方体,也可能不是)进行演示。
Step 2: 测量距离 Measuring Distances: Negative Distances
The ruler tool is like an axis. If you click on an object near the ruler it will show distances from the ruler in two directions. Like an axis the ruler has a positive and negative side.
As you can see in the image my shape is to the left of the ruler, so it shows a negative horizontal distance.
Also note that the arrow for the distance points across the shape. This means that the width of the object is included in the distance.
标尺工具就像一个轴。如果你点击标尺附近的一个物体,它就会显示两个方向与标尺的距离。和坐标轴一样,标尺也有正负两面。
如图所示,我的形状位于标尺的左侧,因此显示的水平距离为负数。
另外请注意,距离的箭头指向形状的另一侧。这意味着距离中包含了物体的宽度。
Step 3: 测量距离:正距离
Measuring Distances: Positive Distances

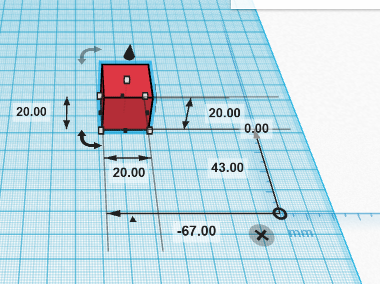
As you can see in this image, the object is to the right of the ruler so it shows a positive distance.
Since the arrow does not cross the width of the shape, this time the width of the object is not included in the distance. This is a very important factor to remember when using the ruler tool.
如图所示,物体位于标尺的右侧,因此显示的是正距离。
由于箭头没有穿过形状的宽度,因此这次的距离不包括物体的宽度。这是使用标尺工具时需要记住的一个非常重要的因素。
Step 4: 步骤 4:输入尺寸(Typing in Dimensions)

Quite possible the best feature of the ruler tool is that once you have a ruler on your Workplane, you can now type in dimensions. Simply click on the dimension you want to change, type in the new dimension, and hit enter.
Gone are the minutes wasted trying to drag your shape to the exact dimensions. This is life-changing if you often create objects that can’t use the lock grid tool.
Not only can you type in dimensions, but you can also type in distances, so no need to drag your objects around willy nilly.
标尺工具的最大特点可能就是,一旦在工作平面上有了标尺,就可以输入尺寸了。只需点击要更改的尺寸,输入新尺寸,然后按回车键即可。
再也不用浪费几分钟来拖动形状,使其达到精确的尺寸了。如果您经常创建无法使用锁定网格工具的对象,那么这将改变您的生活。
你不仅可以输入尺寸,还可以输入距离,这样就不必费力拖动对象了。
Step 5: 使用多个对象Using Multiple Objects

The ruler tool can be handy for dimensions when using one object, but how often do you do a 3D design with only one object, probably never. So lets move on to using multiple objects.
Drag another rectangle on to the Workplane.
当使用一个对象时,标尺工具可以方便地标注尺寸,但你经常只使用一个对象进行 3D 设计吗?因此,让我们继续使用多个对象。
将另一个矩形拖到工作平面上。
Step 6: 放大形状查看二维效果Zoom Into the Shape to See 2D

Something that I only recently discovered was incredibly useful is the fact that you can zoom into an object to see the 2D projection of the object on the Workplane. This come in handy when trying to line up an object exactly with the ruler tool, especially if you aren’t using the lock to grid function, which sometimes you cannot use.
我最近才发现一个非常有用的功能,那就是可以放大对象,查看对象在工作平面上的二维投影。这在使用标尺工具精确对齐对象时非常有用,尤其是在不使用锁定网格功能的情况下,因为有时无法使用锁定网格功能。
Step 7: 将尺子与形状对齐Line Up the Ruler With the Shape


For the next demonstration one of the objects will need to be lined up with the ruler. Only one side of the ruler should be touching the object. If two sides are touching then the measurement will include the width of the box, which would be okay, but require some math.
在接下来的演示中,其中一个物体需要与直尺对齐。尺子只能有一边接触到物体。如果两边都接触,那么测量结果将包括盒子的宽度,这也没问题,但需要一些数学计算。
Step 8: View Distances

Now if you zoom out and click on the other object you can view the distance between the two objects. Really what you are seeing is the distance of the second object to the ruler, but we aligned the first object with the ruler.
现在,如果您放大并点击另一个物体,就可以查看两个物体之间的距离。实际上,你看到的是第二个物体到标尺的距离,但我们将第一个物体与标尺对齐了。
Step 9: Change the Distance Between the Objects

You can also change the distance by typing in a new distance, as you changed dimensions. Remember that whatever shape you are clicked on is the one that will move. That seems simple now, but may not be so when you have a few objects that you are trying to align.
您还可以通过输入新的距离来更改距离,就像更改尺寸一样。记住,无论你点击哪个形状,它都会移动。现在看来很简单,但当你要对齐几个对象时,可能就不那么简单了。
Step 10: Distance Can Include Width of Object

This is an example of if the ruler touches two edges of the first object. Note that the distance now includes the width of the object.
这是标尺触及第一个对象两个边缘的示例。请注意,现在的距离包括对象的宽度。
Step 11: Making Holes

The ruler tool can also be handy when making holes in objects. If you line up the tool with two edges of a shape, you can see the distance of the holes from those edges.
在物体上打孔时,标尺工具也能派上用场。如果将该工具与形状的两条边对齐,就可以看到孔与这两条边的距离。
Step 12: Vertical Distances
The ruler tool itself can only give measurements in two dimensions. If you need to do something vertical simply rotate everything 90 degrees so it is horizontal and you can use the ruler tool.
标尺工具本身只能进行二维测量。如果需要垂直测量,只需将一切旋转 90 度,使其水平,就可以使用标尺工具了。
这篇关于tinkerCAD案例:33. 在 Tinkercad 中使用标尺工具的文章就介绍到这儿,希望我们推荐的文章对编程师们有所帮助!


