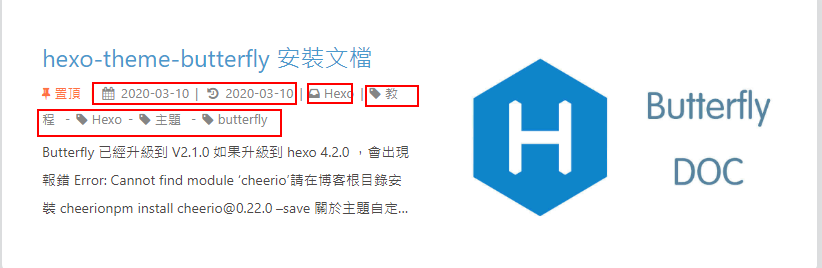
本文主要是介绍Butterfly安装文档(三)主题配置-1,希望对大家解决编程问题提供一定的参考价值,需要的开发者们随着小编来一起学习吧!
语言
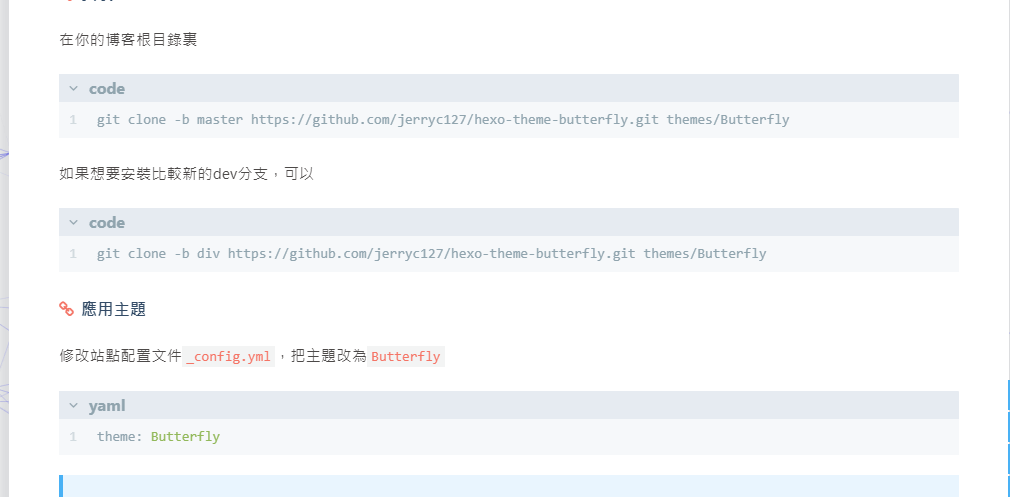
修改站点配置文件 _config.yml
默认语言是 en
主题支持三种语言
- default(en)
- zh-CN (简体中文)
- zh-TW (繁体中文)
网站资料
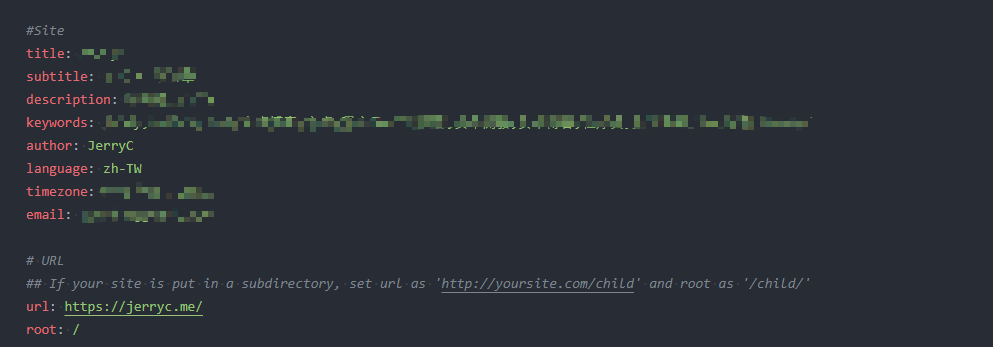
修改网站各种资料,例如标题、副标题和邮箱等个人资料,请修改博客根目录的_config.yml
导航栏设置 (Navigation bar settings)
参数设置
主题配置文件中
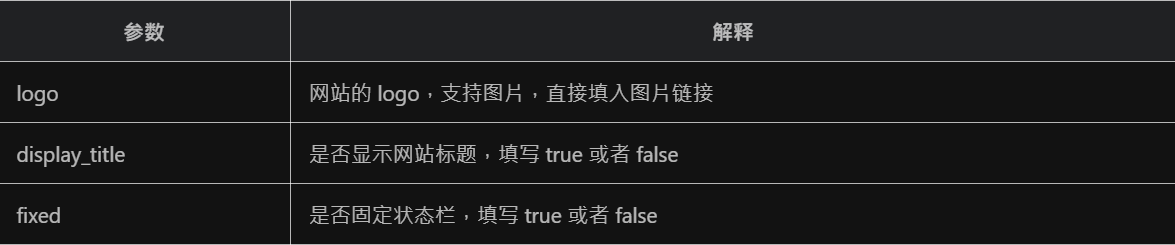
nav:logo: #imagedisplay_title: truefixed: false # fixed navigation bar
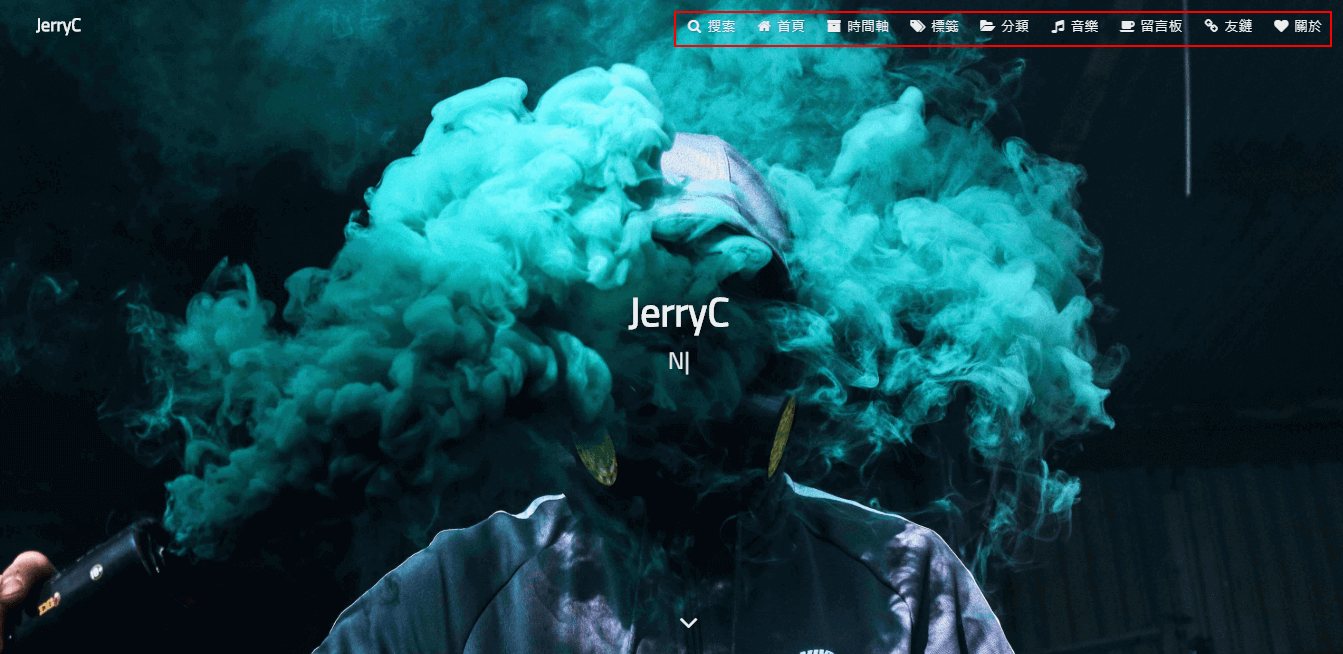
菜单/目录
Home: / || fas fa-home
Archives: /archives/ || fas fa-archive
Tags: /tags/ || fas fa-tags
Categories: /categories/ || fas fa-folder-open
List||fas fa-list:Music: /music/ || fas fa-musicMovie: /movies/ || fas fa-video
Link: /link/ || fas fa-link
About: /about/ || fas fa-heart
必须是 /xxx/,后面||分开,然后写图标名。
如果不希望显示图标,图标名可不写。
默认子目录是展开的,如果你想要隐藏,在子目录里添加 hide 。
List||fas fa-list||hide:Music: /music/ || fas fa-musicMovie: /movies/ || fas fa-video
注意: 导航的文字可自行更改
menu:首页: / || fas fa-home时间轴: /archives/ || fas fa-archive标签: /tags/ || fas fa-tags分类: /categories/ || fas fa-folder-open清单||fa fa-heartbeat:音乐: /music/ || fas fa-music照片: /Gallery/ || fas fa-images电影: /movies/ || fas fa-video友链: /link/ || fas fa-link关于: /about/ || fas fa-heart
代码 (Code Blocks)
代码块中的所有功能只适用于 Hexo 自带的代码渲染
如果使用第三方的渲染器,不一定会有效
代码高亮主题
Butterfly 支持6种代码高亮样式:
- darker
- pale night
- light
- ocean
- mac
- mac light
修改 主题配置文件
highlight_theme: light
darker
pale night
light
ocean
mac
mac light
代码复制
highlight_copy: true
代码框展开/关闭
在默认情况下,代码框自动展开,可设置是否所有代码框都关闭状态,点击>可展开代码
- true 全部代码框不展开,需点击>打开
- false 代码框展开,有>点击按钮
- none 不显示>按钮
highlight_shrink: true #代码框不展开,需点击 '>' 打开
你也可以在post/page页对应的markdown文件front-matter添加highlight_shrink来独立配置。
当主题配置文件中的 highlight_shrink 设为true时,可在front-matter添加highlight_shrink: false来单独配置文章展开代码框。
当主题配置文件中的 highlight_shrink 设为false时,可在front-matter添加highlight_shrink: true来单独配置文章收缩代码框。
highlight_shrink: true
highlight_shrink: false
highlight_shrink: none
代码换行
在默认情况下,Hexo 在编译的时候不会实现代码自动换行。如果你不希望在代码块的区域里有横向滚动条的话,那么你可以考虑开启这个功能。
code_word_wrap: true
如果你是使用 highlight 渲染,需要找到你站点的 Hexo 配置文件_config.yml,将line_number改成false:
highlight:enable: trueline_number: false # <- 改这里auto_detect: falsetab_replace:
如果你是使用 prismjs 渲染,需要找到你站点的 Hexo 配置文件_config.yml,将line_number改成false:
prismjs:enable: falsepreprocess: trueline_number: false # <- 改这里tab_replace: ''
设置code_word_wrap之前:
设置code_word_wrap之后:
代码高度限制
3.7.0 及以上支持
可配置代码高度限制,超出的部分会隐藏,并显示展开按钮。
highlight_height_limit: false # unit: px
注意:
- 单位是 px,直接添加数字,如 200
- 实际限制高度为 highlight_height_limit + 30 px ,多增加 30px 限制,目的是避免代码高度只超出highlight_height_limit 一点时,出现展开按钮,展开没内容。
- 不适用于隐藏后的代码块( css 设置 display: none)
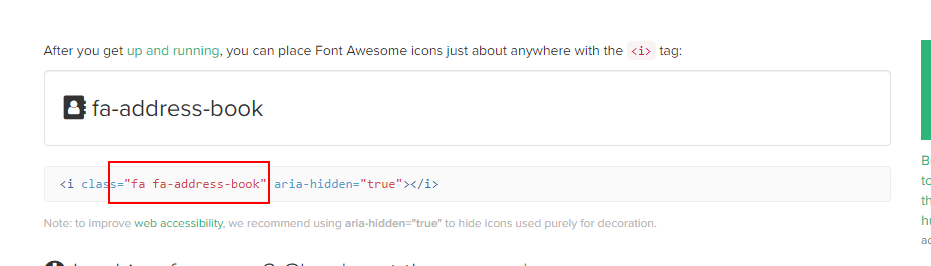
社交图标 (Social Settings)
Butterfly支持 font-awesome v6 图标.
书写格式 图标名:url || 描述性文字 || color
social:fab fa-github: https://github.com/xxxxx || Github || "#hdhfbb"fas fa-envelope: mailto:xxxxxx@gmail.com || Email || "#000000"
PC:
Mobile:

头像
avatar:img: /img/avatar.pngeffect: true # 头像会一直转圈
顶部图
如果不要显示顶部图,可直接配置 disable_top_img: true
顶部图的获取顺序,如果都没有配置,则不显示顶部图。
页面顶部图的获取顺序:
各自配置的 top_img > 配置文件的 default_top_img
文章页顶部图的获取顺序:
各自配置的 top_img > cover > 配置文件的 default_top_img
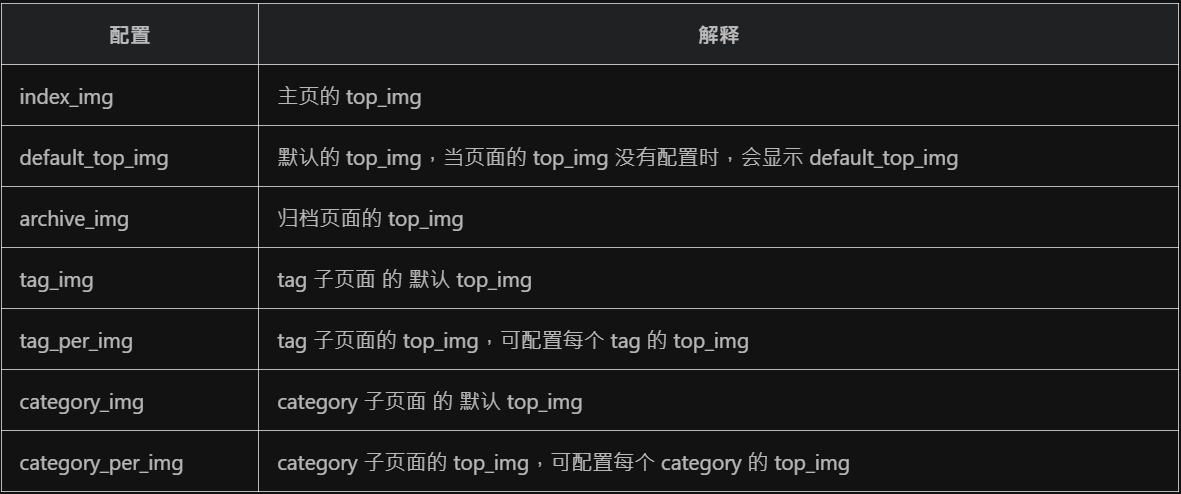
其它页面 (tags/categories/自建页面)和 文章页 的 top_img ,请到对应的 md 页面设置front-matter中的top_img
以上所有的 top_img 可配置以下值
3.2.0 以下版本的配置只支持
- 留空,true 和 false - 显示默认的顔色
- img链接 - 显示所配置的图片
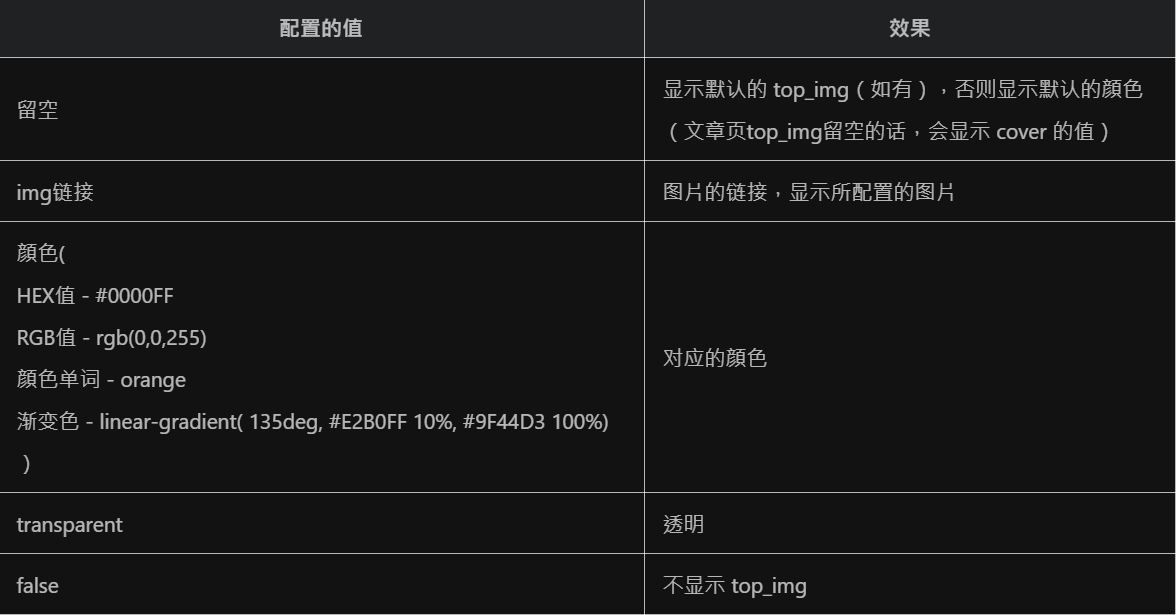
tag_per_img 和 category_per_img 是 3.2.0 新增的内容,可对 tag 和 category 进行单独的配置
并不推荐为每个 tag 和每个 category 都配置不同的顶部图,因为配置太多会拖慢生成速度
tag_per_img:aplayer: https://xxxxxx.pngandroid: ddddddd.pngcategory_per_img:随想: hdhdh.png推荐: ddjdjdjd.png
top_img: false

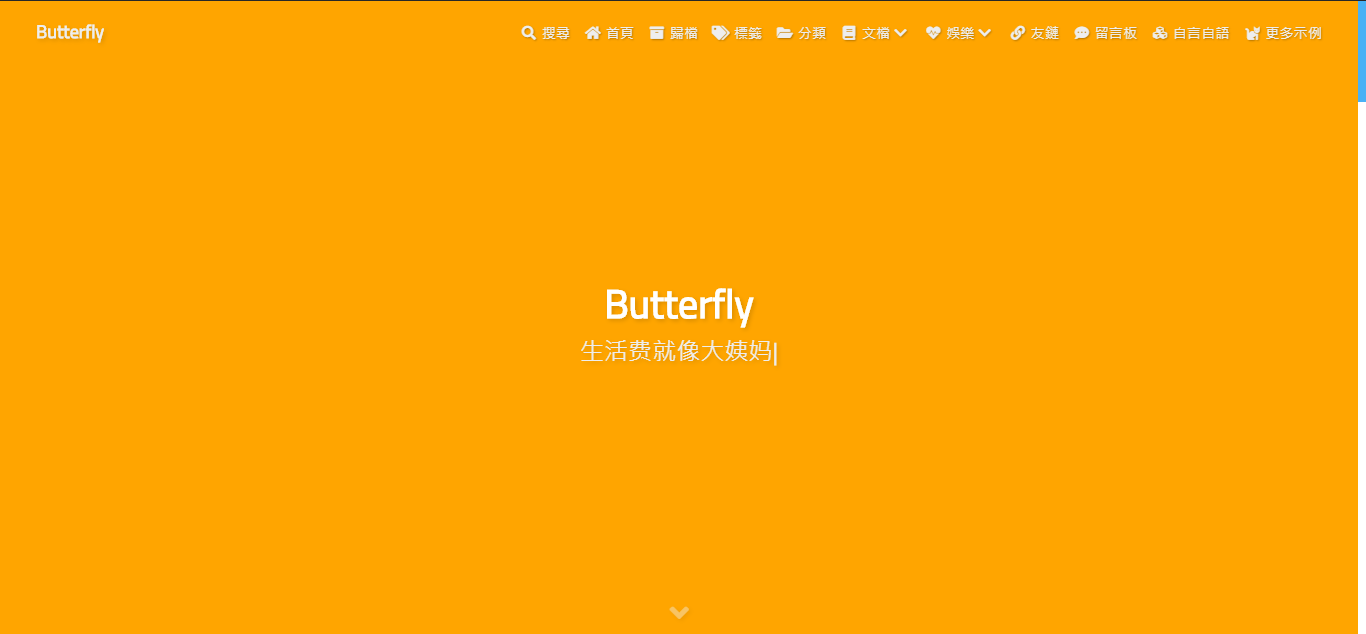
top_img: orange
top_img: ‘linear-gradient(20deg, #0062be, #925696, #cc426e, #fb0347)’

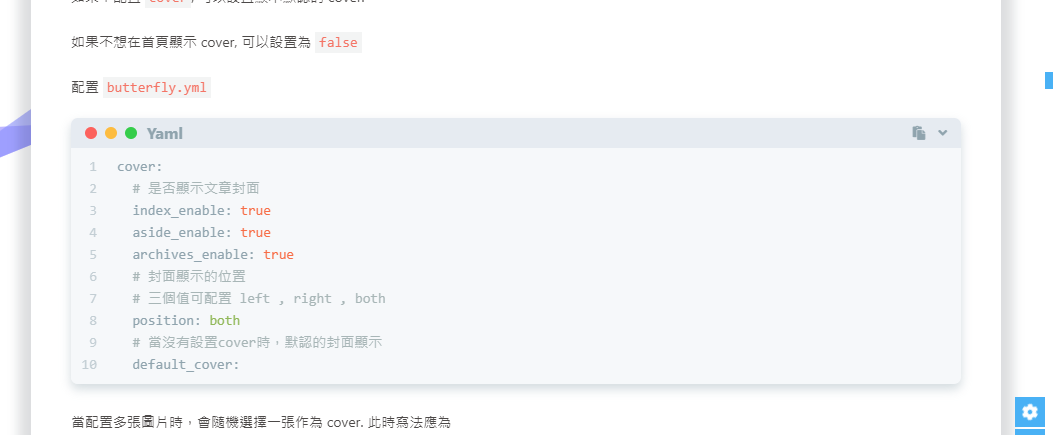
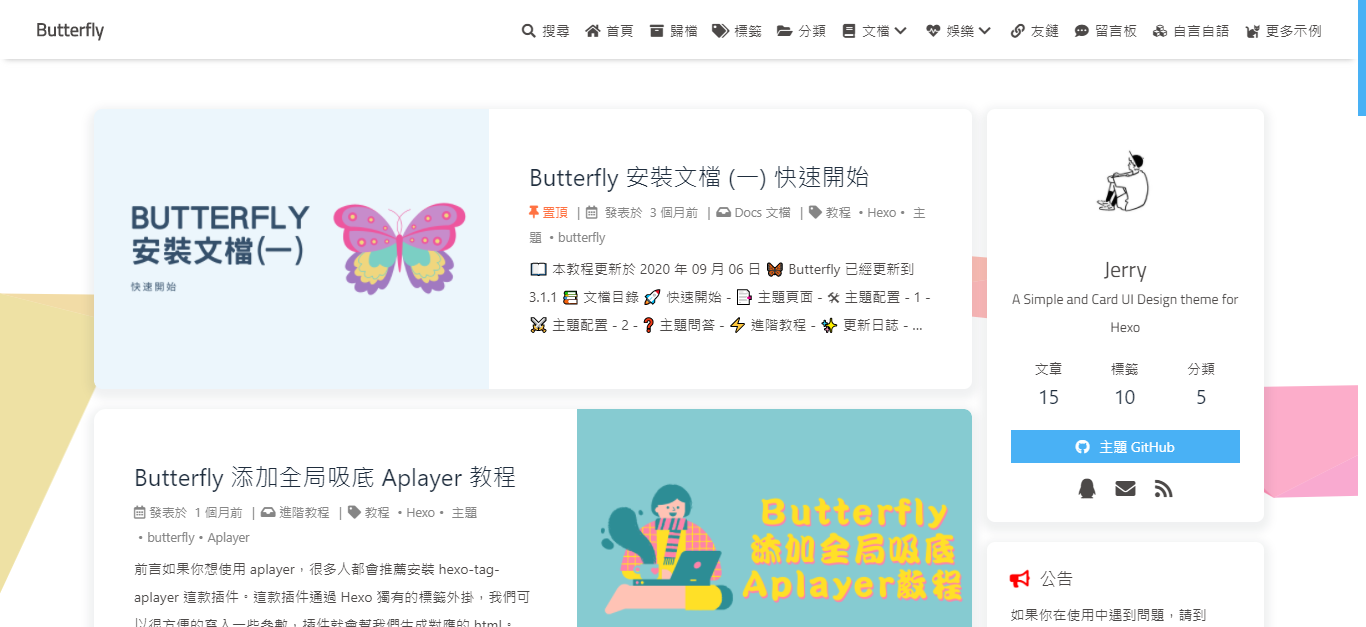
文章封面
文章的 markdown 文档上,在 Front-matter 添加 cover ,并填上要显示的图片地址。
如果不配置 cover,可以设置显示默认的 cover。
如果不想在首页显示 cover, 可以设置为 false。
文章封面的获取顺序 Front-matter 的 cover > 配置文件的 default_cover > false
cover:# 是否显示文章封面index_enable: trueaside_enable: truearchives_enable: true# 封面显示的位置# 三个值可配置 left , right , bothposition: both# 当没有设置cover时,默认的封面显示default_cover:
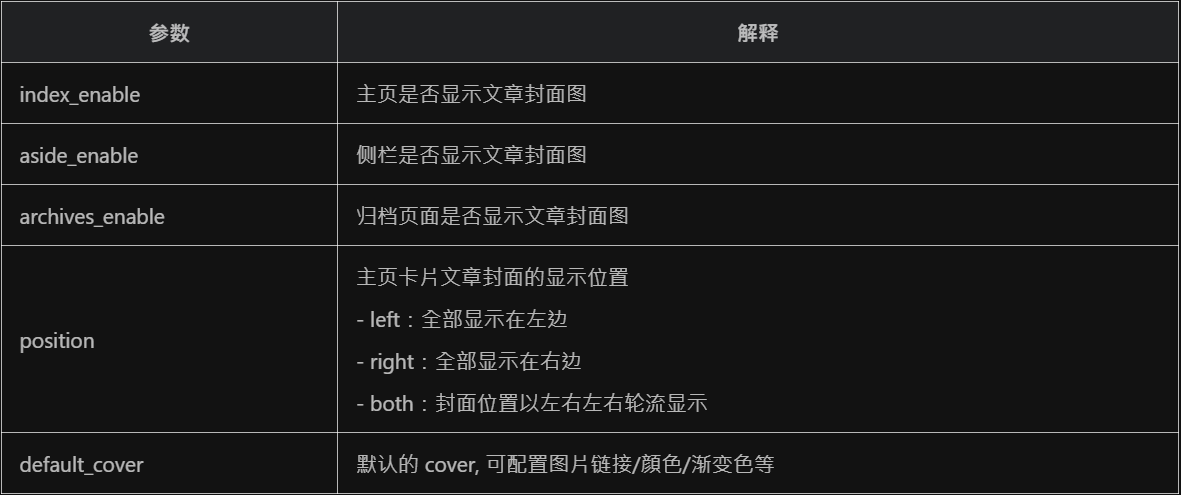
当配置多张图片时,会随机选择一张作为cover.此时写法应为
default_cover:- https://file.crazywong.com/gh/jerryc127/CDN@latest/cover/default_bg.png- https://file.crazywong.com/gh/jerryc127/CDN@latest/cover/default_bg2.png- https://file.crazywong.com/gh/jerryc127/CDN@latest/cover/default_bg3.png

left
right
both
页面 meta 显示
post_meta:page:date_type: both # created or updated or both 主页文章日期是创建日或者更新日或都显示date_format: relative # date/relative 显示日期还是相对日期categories: true # true or false 主页是否显示分类tags: true # true or false 主页是否显示标签label: true # true or false 显示描述性文字post:date_type: both # created or updated or both 文章页日期是创建日或者更新日或都显示date_format: relative # date/relative 显示日期还是相对日期categories: true # true or false 文章页是否显示分类tags: true # true or false 文章页是否显示标签label: true # true or false 显示描述性文字
主页
文章页

date_format 是 3.2.0 新增的内容,配置时间显示明确时间还是相对时间
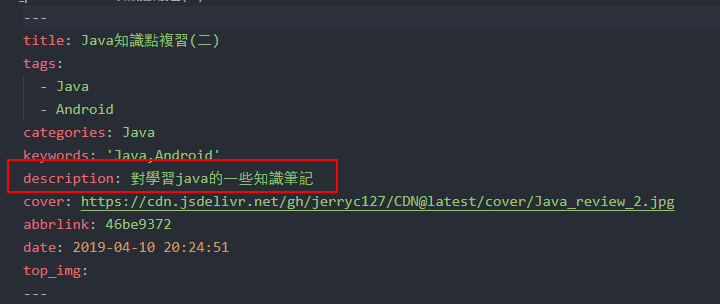
主页文章节选(自动节选和文章页description)
因为主题UI的关係,主页文章节选只支持自动节选和文章页description。
在butterfly里,有四种可供选择
- description: 只显示description
- both: 优先选择description,如果没有配置description,则显示自动节选的内容
- auto_excerpt:只显示自动节选
- false: 不显示文章内容
index_post_content:method: 3length: 500 # if you set method to 2 or 3, the length need to config
description在front-matter里添加
页面锚点
开启页面锚点后,当你在进行滚动时,页面链接会根据标题ID进行替换
(注意: 每替换一次,会留下一个历史记录。所以如果一篇文章有很多锚点的话,网页的历史记录会很多。)
# anchor
# when you scroll in post , the url will update according to header id.
anchor:button:enable: falsealways_show: falseicon: # the unicode value of Font Awesome icon, such as '\3423'auto_update: false # when you scroll in post, the URL will update according to header id.
图片描述
可开启图片Figcaption描述文字显示
优先显示图片的 title 属性,然后是 alt 属性
photofigcaption: true

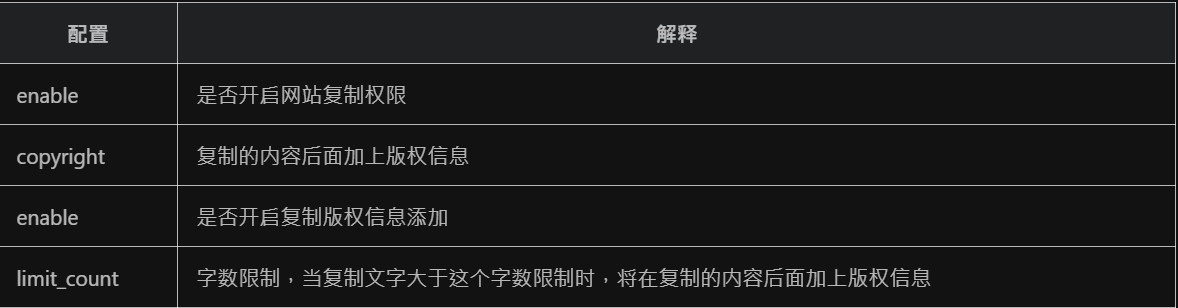
复制相关配置
可配置网站是否可以复制、复制的内容是否添加版权信息
# copy settings
# copyright: Add the copyright information after copied content (复制的内容后面加上版权信息)
copy:enable: truecopyright:enable: truelimit_count: 50
添加版权信息后
Lorem ipsum dolor sit amet, test link consectetur adipiscing elit. Strong text pellentesque ligula commodo viverra vehicula. Italic text at ullamcorper enim. Morbi a euismod nibh. Underline text non elit nisl. Deleted text tristique, sem id condimentum tempus, metus lectus venenatis mauris, sit amet semper lorem felis a eros. Fusce egestas nibh at sagittis auctor. Sed ultricies ac arcu quis molestie. Donec dapibus nunc in nibh egestas, vitae volutpat sem iaculis. Curabitur sem tellus, elementum nec quam id, fermentum laoreet mi. Ut mollis ullamcorper turpis, vitae facilisis velit ultricies sit amet. Etiam laoreet dui odio, id tempus justo tincidunt id. Phasellus scelerisque nunc sed nunc ultricies accumsan.作者: Jerry
连结: http://localhost:4000/posts/bd3c650b/#Paragraph
来源: Butterfly
着作权归作者所有。商业转载请联络作者获得授权,非商业转载请注明出处。
文章页相关配置
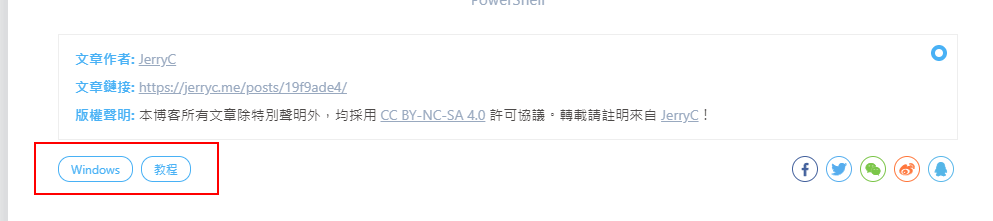
文章版权
post_copyright:enable: truedecode: falseauthor_href:license: CC BY-NC-SA 4.0license_url: https://creativecommons.org/licenses/by-nc-sa/4.0/

文章打赏
reward:enable: trueQR_code:- img: /img/wechat.jpglink:text: 微信- img: /img/alipay.jpglink:text: 支付宝
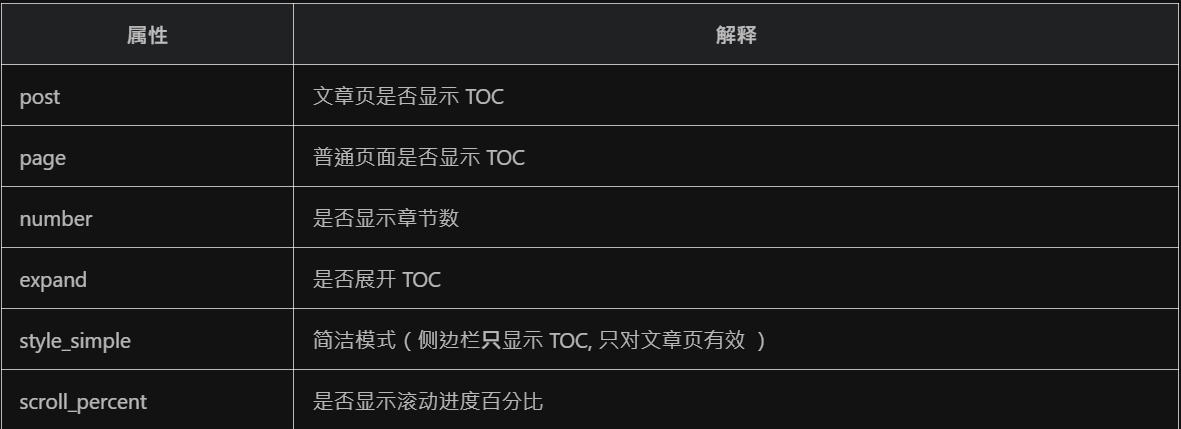
TOC
toc:post: truepage: truenumber: trueexpand: falsestyle_simple: false # for postscroll_percent: true
为特定的文章配置
在你的文章md文件的头部,加入toc_number和toc,并配置true或者false即可。
主题会优先判断文章Markdown的Front-matter是否有配置,如有,则以Front-matter的配置为准。否则,以主题配置文件中的配置为准
相关文章
当文章封面设置为 false 时,或者没有获取到封面配置,相关文章背景将会显示主题色。
related_post:enable: truelimit: 6 # 显示推荐文章数目date_type: created # or created or updated 文章日期显示创建日或者更新日
文章过期提醒
# Displays outdated notice for a post (文章过期提醒)
noticeOutdate:enable: truestyle: flat # style: simple/flatlimit_day: 365 # When will it be shownposition: top # position: top/bottommessage_prev: It has beenmessage_next: days since the last update, the content of the article may be outdated.
limit_day: 距离更新时间多少天才显示文章过期提醒
message_prev : 天数之前的文字
message_next:天数之后的文字
文章编辑按钮
# Post edit
# Easily browse and edit blog source code online.
post_edit:enable: false# url: https://github.com/user-name/repo-name/edit/branch-name/subdirectory-name/# For example: https://github.com/jerryc127/butterfly.js.org/edit/main/source/url:
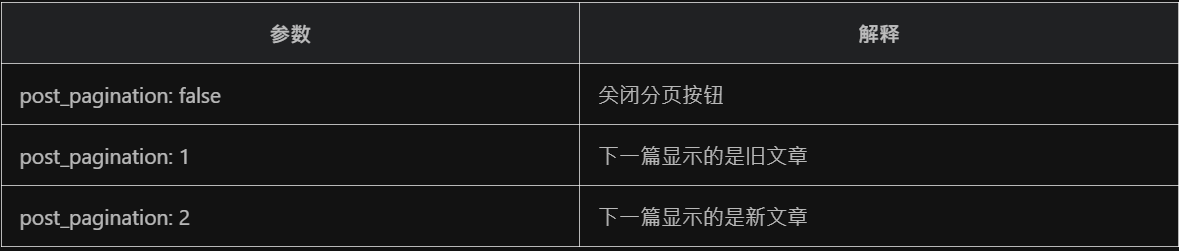
文章分页按钮
# post_pagination (分页)
# value: 1 || 2 || false
# 1: The 'next post' will link to old post
# 2: The 'next post' will link to new post
# false: disable pagination
post_pagination: false
Footer 设置
博客年份
footer:owner:enable: truesince: 2018
页脚自定义文本
custom_text: Hi, welcome to my <a href="https://butterfly.js.org/">blog</a>!
ICP
custom_text: <a href="icp链接"><img class="icp-icon" src="icp图片"><span>备案号:xxxxxx</span></a>
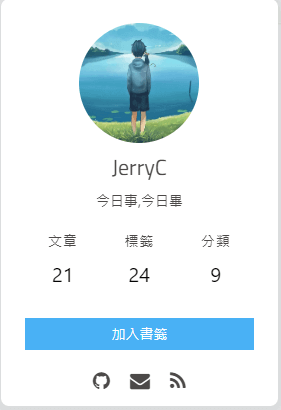
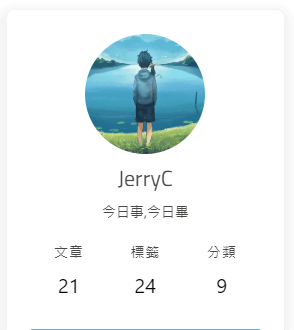
侧边栏设置 (aside)
侧边排版
aside:enable: truehide: falsebutton: truemobile: true # display on mobileposition: right # left or rightdisplay:archive: truetag: truecategory: truecard_author:enable: truedescription:button:enable: trueicon: fab fa-githubtext: Follow Melink: https://github.com/xxxxxxcard_announcement:enable: truecontent: This is my Blogcard_recent_post:enable: truelimit: 5 # if set 0 will show allsort: date # date or updatedsort_order: # Don't modify the setting unless you know how it workscard_categories:enable: truelimit: 8 # if set 0 will show allexpand: none # none/true/falsesort_order: # Don't modify the setting unless you know how it workscard_tags:enable: truelimit: 40 # if set 0 will show allcolor: falseorderby: random # Order of tags, random/name/lengthorder: 1 # Sort of order. 1, asc for ascending; -1, desc for descendingsort_order: # Don't modify the setting unless you know how it workscard_archives:enable: truetype: monthly # yearly or monthlyformat: MMMM YYYY # eg: YYYY年MM月order: -1 # Sort of order. 1, asc for ascending; -1, desc for descendinglimit: 8 # if set 0 will show allsort_order: # Don't modify the setting unless you know how it workscard_webinfo:enable: truepost_count: truelast_push_date: truesort_order: # Don't modify the setting unless you know how it works访问人数 busuanzi (UV 和 PV)
busuanzi:site_uv: truesite_pv: truepage_pv: true
如果需要修改 busuanzi 的 CDN 链接,可通过 主题配置文件 的 CDN 中的 option 进行修改
CDN:option:busuanzi: xxxxxxxxx
运行时间
runtimeshow:enable: truepublish_date: 6/7/2018 00:00:00 ##网页开通时间#格式: 月/日/年 时间#也可以写成 年/月/日 时间
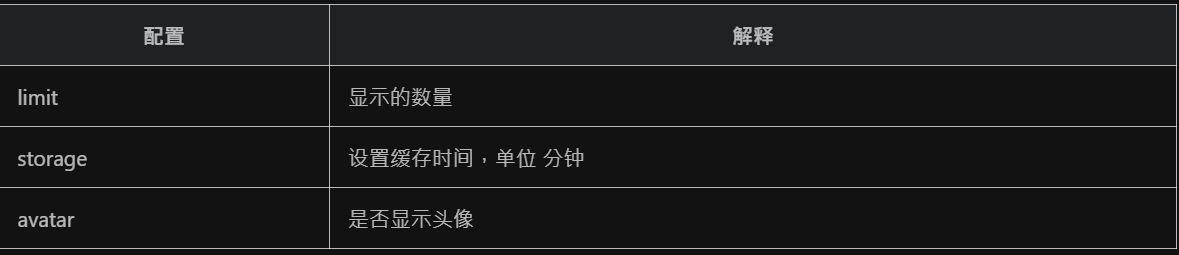
最新评论
# Aside widget - Newest Comments
newest_comments:enable: truesort_order: # Don't modify the setting unless you know how it workslimit: 6storage: 10 # unit: mins, save data to localStorageavatar: true
自定义添加栏目
https://butterfly.js.org/posts/ea33ab97/
右下角按钮 (Bottom right button)
简繁转换
translate:enable: true# 默认按钮显示文字(网站是简体,应设置为'default: 繁')default: 简#网站默认语言,1: 繁体中文, 2: 简体中文defaultEncoding: 1#延迟时间,若不在前, 要设定延迟翻译时间, 如100表示100ms,默认为0translateDelay: 0#当文字是简体时,按钮显示的文字msgToTraditionalChinese: "繁"#当文字是繁体时,按钮显示的文字msgToSimplifiedChinese: "简"
閲读模式
readmode: true
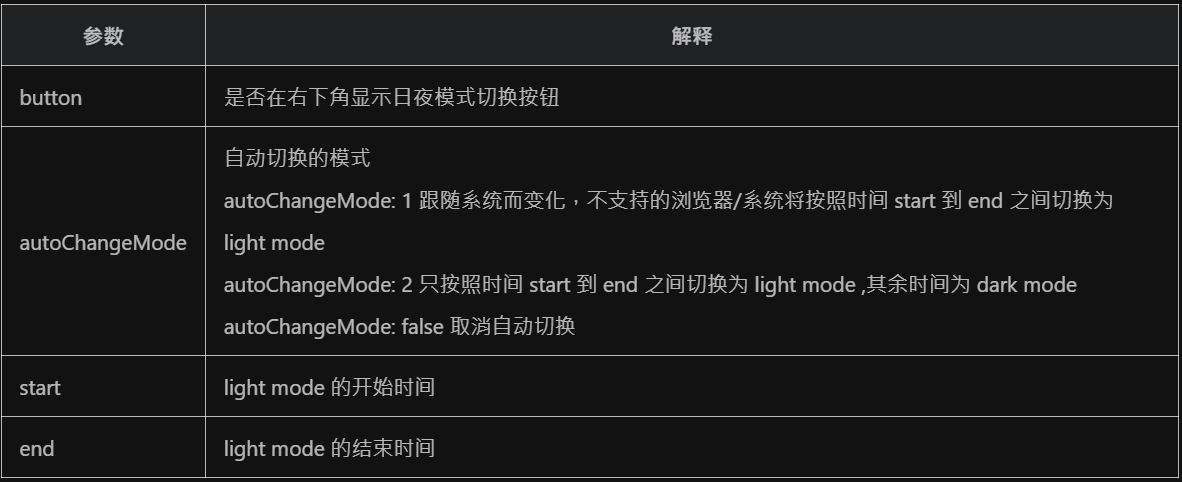
夜间模式
# dark mode
darkmode:enable: true# dark mode和 light mode切换按钮button: trueautoChangeMode: false# Set the light mode time. The value is between 0 and 24. If not set, the default value is 6 and 18start: # 8end: # 22
滚动状态百分比
# show scroll percent in scroll-to-top button
rightside_scroll_percent: true
按钮排序
# Don't modify the following settings unless you know how they work (非必要请不要修改 )
# Choose: readmode,translate,darkmode,hideAside,toc,chat,comment
# Don't repeat 不要重复
rightside_item_order:enable: falsehide: # readmode,translate,darkmode,hideAsideshow: # toc,chat,comment
标签外挂(Tag Plugins)
https://butterfly.js.org/posts/4aa8abbe/#%E6%A8%99%E7%B1%A4%E5%A4%96%E6%8E%9B%EF%BC%88Tag-Plugins%EF%BC%89
Gallery相册图库
https://butterfly.js.org/posts/4aa8abbe/#Gallery%E7%9B%B8%E5%86%8A%E5%9C%96%E5%BA%AB
原文地址:https://butterfly.js.org/
这篇关于Butterfly安装文档(三)主题配置-1的文章就介绍到这儿,希望我们推荐的文章对编程师们有所帮助!


