本文主要是介绍vscode插件快餐教程(7) - 从头开始写一个完整的lsp工程,希望对大家解决编程问题提供一定的参考价值,需要的开发者们随着小编来一起学习吧!
vscode插件快餐教程(7) - 从头开始写一个完整的lsp工程
有了一定的基础知识之后,我们就可以开始搭建一个client和server模式的lsp的插件了。
server目录
首先我们来写server端的代码。
package.json
首先我们来写package.json. 因为微软的sdk已经帮我们封装好了大部分细节,其实我们只要引用vscode-languageserver的模块就可以了:
{"name": "lsp-demo-server","description": "demo language server","version": "1.0.0","author": "Xulun","license": "MIT","engines": {"node": "*"},"repository": {"type": "git","url": "git@code.aliyun.com:lusinga/testlsp.git"},"dependencies": {"vscode-languageserver": "^4.1.3"},"scripts": {}
}
有了package.json之后,我们就可以在server目录下运行npm install命令将依赖安装进来。
安装之后会有下面的模块被引用进来:
- vscode-jsonrpc
- vscode-languageserver
- vscode-languageserver-protocol
- vscode-languageserver-types vscode-uri
tsconfig.json
因为我们是要用typescript来写server,所以我们用tsconfig.json来配置Typescript的选项:
{"compilerOptions": {"target": "es6","module": "commonjs","moduleResolution": "node","sourceMap": true,"outDir": "out","rootDir": "src","lib": ["es6"]},"include": ["src"],"exclude": ["node_modules", ".vscode-test"]
}
server.ts
下面我们开始写服务端的ts文件,首先我们要把vscode-languageserver和vscode-jsonrpc的依赖引入进来:
import {createConnection,TextDocuments,TextDocument,Diagnostic,DiagnosticSeverity,ProposedFeatures,InitializeParams,DidChangeConfigurationNotification,CompletionItem,CompletionItemKind,TextDocumentPositionParams,SymbolInformation,WorkspaceSymbolParams,WorkspaceEdit,WorkspaceFolder
} from 'vscode-languageserver';
import { HandlerResult } from 'vscode-jsonrpc';
下面,为了打印日志方便,我们使用log4js来打印日志,通过npm i log4js --save将其模块引入进来,然后对其进行初始化:
import { configure, getLogger } from "log4js";
configure({appenders: {lsp_demo: {type: "dateFile",filename: "/Users/ziyingliuziying/working/lsp_demo",pattern: "yyyy-MM-dd-hh.log",alwaysIncludePattern: true,},},categories: { default: { appenders: ["lsp_demo"], level: "debug" } }
});
const logger = getLogger("lsp_demo");
然后我们就可以调用createConnection来创建连接了:
let connection = createConnection(ProposedFeatures.all);
接着我们就可以处理一个个的事件啦,比如处理第6节介绍的初始化事件:
connection.onInitialize((params: InitializeParams) => {let capabilities = params.capabilities;return {capabilities: {completionProvider: {resolveProvider: true}}};
});
三次握手之后,我们可以在vscode上显示一条消息:
connection.onInitialized(() => {connection.window.showInformationMessage('Hello World! form server side');
});
最后,我们可以把第5节学过的代码补全的部分给加上:
connection.onCompletion((_textDocumentPosition: TextDocumentPositionParams): CompletionItem[] => {return [{label: 'TextView' + _textDocumentPosition.position.character,kind: CompletionItemKind.Text,data: 1},{label: 'Button' + _textDocumentPosition.position.line,kind: CompletionItemKind.Text,data: 2},{label: 'ListView',kind: CompletionItemKind.Text,data: 3}];}
);connection.onCompletionResolve((item: CompletionItem): CompletionItem => {if (item.data === 1) {item.detail = 'TextView';item.documentation = 'TextView documentation';} else if (item.data === 2) {item.detail = 'Button';item.documentation = 'JavaScript documentation';} else if (item.data === 3) {item.detail = 'ListView';item.documentation = 'ListView documentation';}return item;}
);
最后,我们需要让connection去监听:
documents.listen(connection);connection.listen();
client目录
服务端这就算开发就绪了,下面我们来开发客户端。
package.json
首先还是先写package.json,依赖于vscode-languageclient,不要跟服务端用的库vscode-languageserver搞混了哈。
{"name": "lspdemo-client","description": "demo language server client","author": "Xulun","license": "MIT","version": "0.0.1","publisher": "Xulun","repository": {"type": "git","url": "git@code.aliyun.com:lusinga/testlsp.git"},"engines": {"vscode": "^1.33.1"},"scripts": {"update-vscode": "vscode-install","postinstall": "vscode-install"},"dependencies": {"path": "^0.12.7","vscode-languageclient": "^4.1.4"},"devDependencies": {"vscode": "^1.1.30"}
}
tsconfig.json
反正都是ts,客户端与服务端比也没有增加啥特别的,于是照抄一份:
{"compilerOptions": {"module": "commonjs","target": "es6","outDir": "out","rootDir": "src","lib": ["es6"],"sourceMap": true},"include": ["src"],"exclude": ["node_modules", ".vscode-test"]
}
extension.ts
下面我们来写extension.ts。
其实客户端要做的事情比server还少,本质上就是启动server就好:
// Create the language client and start the client.client = new LanguageClient('DemoLanguageServer','Demo Language Server',serverOptions,clientOptions);// Start the client. This will also launch the serverclient.start();
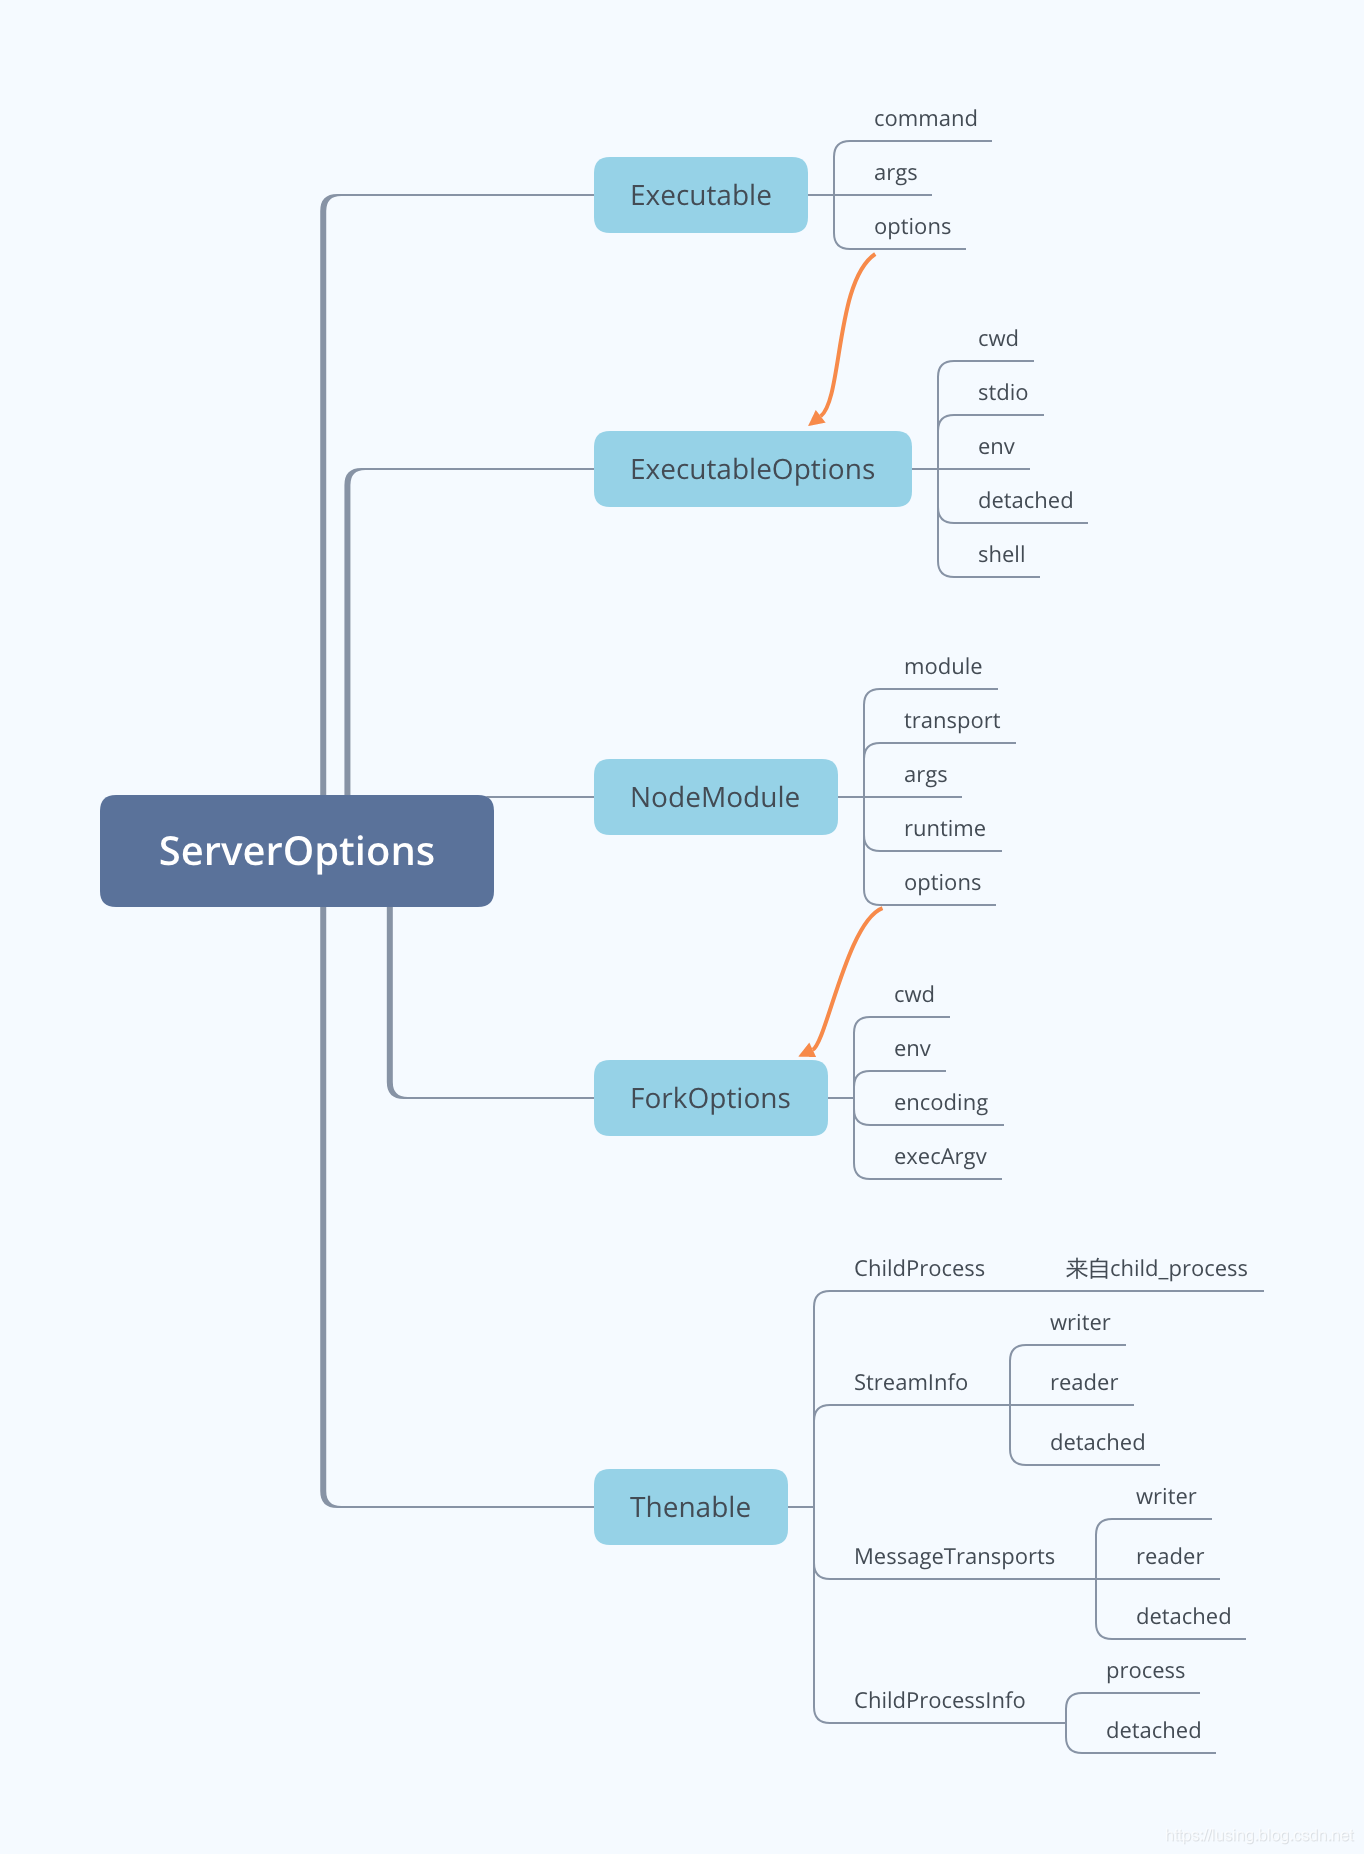
serverOptions用来配置服务端的参数,其定义为:
export type ServerOptions =
Executable |
{ run: Executable; debug: Executable; } |
{ run: NodeModule; debug: NodeModule } |
NodeModule |
(() => Thenable<ChildProcess | StreamInfo | MessageTransports | ChildProcessInfo>);
相关类型的简图如下:
下面我们来配置一下:
// 服务端配置let serverModule = context.asAbsolutePath(path.join('server', 'out', 'server.js'));let serverOptions: ServerOptions = {module: serverModule, transport: TransportKind.ipc};// 客户端配置let clientOptions: LanguageClientOptions = {// js代码触发事情documentSelector: [{ scheme: 'file', language: 'js' }],};
extension.ts的完整代码如下:
import * as path from 'path';
import { workspace, ExtensionContext } from 'vscode';import {LanguageClient,LanguageClientOptions,ServerOptions,TransportKind
} from 'vscode-languageclient';let client: LanguageClient;export function activate(context: ExtensionContext) {// 服务端配置let serverModule = context.asAbsolutePath(path.join('server', 'out', 'server.js'));let serverOptions: ServerOptions = {module: serverModule, transport: TransportKind.ipc};// 客户端配置let clientOptions: LanguageClientOptions = {// js代码触发事情documentSelector: [{ scheme: 'file', language: 'js' }],};client = new LanguageClient('DemoLanguageServer','Demo Language Server',serverOptions,clientOptions);// 启动客户端,同时启动语言服务器client.start();
}export function deactivate(): Thenable<void> | undefined {if (!client) {return undefined;}return client.stop();
}
组装运行
万事俱备,只欠包装,下面我们将上面的客户端和服务器组装一下。
插件配置 - package.json
我们关注点主要是入口函数和触发事件:
"activationEvents": ["onLanguage:javascript"],"main": "./client/out/extension",
完整的package.json如下:
{"name": "lsp_demo_server","description": "A demo language server","author": "Xulun","license": "MIT","version": "1.0.0","repository": {"type": "git","url": "git@code.aliyun.com:lusinga/testlsp.git"},"publisher": "Xulun","categories": [],"keywords": [],"engines": {"vscode": "^1.33.1"},"activationEvents": ["onLanguage:javascript"],"main": "./client/out/extension","contributes": {},"scripts": {"vscode:prepublish": "cd client && npm run update-vscode && cd .. && npm run compile","compile": "tsc -b","watch": "tsc -b -w","postinstall": "cd client && npm install && cd ../server && npm install && cd ..","test": "sh ./scripts/e2e.sh"},"devDependencies": {"@types/mocha": "^5.2.0","@types/node": "^8.0.0","tslint": "^5.11.0","typescript": "^3.1.3"}
}
装配tsconfig.json
我们还需要一个总的tsconfig.json,引用client和server两个目录:
{"compilerOptions": {"module": "commonjs","target": "es6","outDir": "out","rootDir": "src","lib": [ "es6" ],"sourceMap": true},"include": ["src"],"exclude": ["node_modules",".vscode-test"],"references": [{ "path": "./client" },{ "path": "./server" }]
}
配置vscode
上面,我们就将client, server和整合它们的代码全部写完了。
下面我们在.vscode目录中写两个配置文件,使我们可以更方便地调试和运行。
.vscode/launch.json
有了这个文件之后,我们就有了运行的配置,可以通过F5来启动。
// A launch configuration that compiles the extension and then opens it inside a new window
{"version": "0.2.0","configurations": [{"type": "extensionHost","request": "launch","name": "Launch Client","runtimeExecutable": "${execPath}","args": ["--extensionDevelopmentPath=${workspaceRoot}"],"outFiles": ["${workspaceRoot}/client/out/**/*.js"],"preLaunchTask": {"type": "npm","script": "watch"}},{"type": "node","request": "attach","name": "Attach to Server","port": 6009,"restart": true,"outFiles": ["${workspaceRoot}/server/out/**/*.js"]},],"compounds": [{"name": "Client + Server","configurations": ["Launch Client", "Attach to Server"]}]
}
.vscode/tasks.json
配置npm compile和npm watch两个脚本。
{"version": "2.0.0","tasks": [{"type": "npm","script": "compile","group": "build","presentation": {"panel": "dedicated","reveal": "never"},"problemMatcher": ["$tsc"]},{"type": "npm","script": "watch","isBackground": true,"group": {"kind": "build","isDefault": true},"presentation": {"panel": "dedicated","reveal": "never"},"problemMatcher": ["$tsc-watch"]}]
}
一切就绪之后,在插件根目录下运行下npm install。
然后在vscode中运行build命令,比如mac下是cmd-shift-b,于是就构建生成了server和client的out目录下的js和map。
现在就可以通过F5键运行啦。
本示例的源代码放在code.aliyun.com:lusinga/testlsp.git中。
这篇关于vscode插件快餐教程(7) - 从头开始写一个完整的lsp工程的文章就介绍到这儿,希望我们推荐的文章对编程师们有所帮助!


