本文主要是介绍双网关备份(bfd+VRRP+策略路由配置)企业网搭建,希望对大家解决编程问题提供一定的参考价值,需要的开发者们随着小编来一起学习吧!
设备选型
vlan规划
Ip地址规划
| 产品名字 | 产品型号 | 设备命名 | 登录密码 |
| 路由器 | Ar2220 | Dianxin | 123456 |
| 路由器 | Ar2220 | Dianxin | 123456 |
| 路由器 | Ar2220 | Liantong | 123456 |
| 路由器 | Ar2220 | R3 | 123456 |
| 交换机 | S5700 | S1 | 123456 |
| 交换机 | S5700 | S2 | 123456 |
| 交换机 | S3700 | S3 | 123456 |
| 集线器 | Hub | H1 | |
| 集线器 | Hub | H2 |
| 产品型号 | 设备命名 | 接口 | Ip地址 |
| AR2220 | Dianxin | G0/0/1 | /24 |
| AR2220 | Dianxin | G0/0/2 | 13.13.13.13/24 |
| AR2220 | Dianxin | G0/0/0 | 1.1.1.1/24 |
| AR2220 | Dianxin | G4/0/0 | /24 |
| Ar2220 | Liantong | G0/0/1 | /24 |
| Ar2220 | Liantong | G0/0/2 | 37.37.37.37/24 |
| Ar2220 | Liantong | G0/0/0 | 31.31.31.31/24 |
| Ar2220 | Liantong | G4/0/0 | /24 |
| Ar2220 | R3 | G0/0/1 | |
| Ar2220 | R3 | G0/0/0 | |
| S5700 | S1 | G0/0/1 | Vlan100 |
| S5700 | S1 | G0/0/2 | Vlan200 |
| S5700 | S1 | G0/0/3 | E-trunk 1 |
| S5700 | S1 | G0/0/4 | E-trunk 1 |
| S5700 | S2 | G0/0/1 | Vlan200 |
| S5700 | S2 | G0/0/2 | Vlan100 |
| S5700 | S2 | G0/0/3 | E-trunk 1 |
| S5700 | S2 | G0/0/4 | E-trunk 1 |
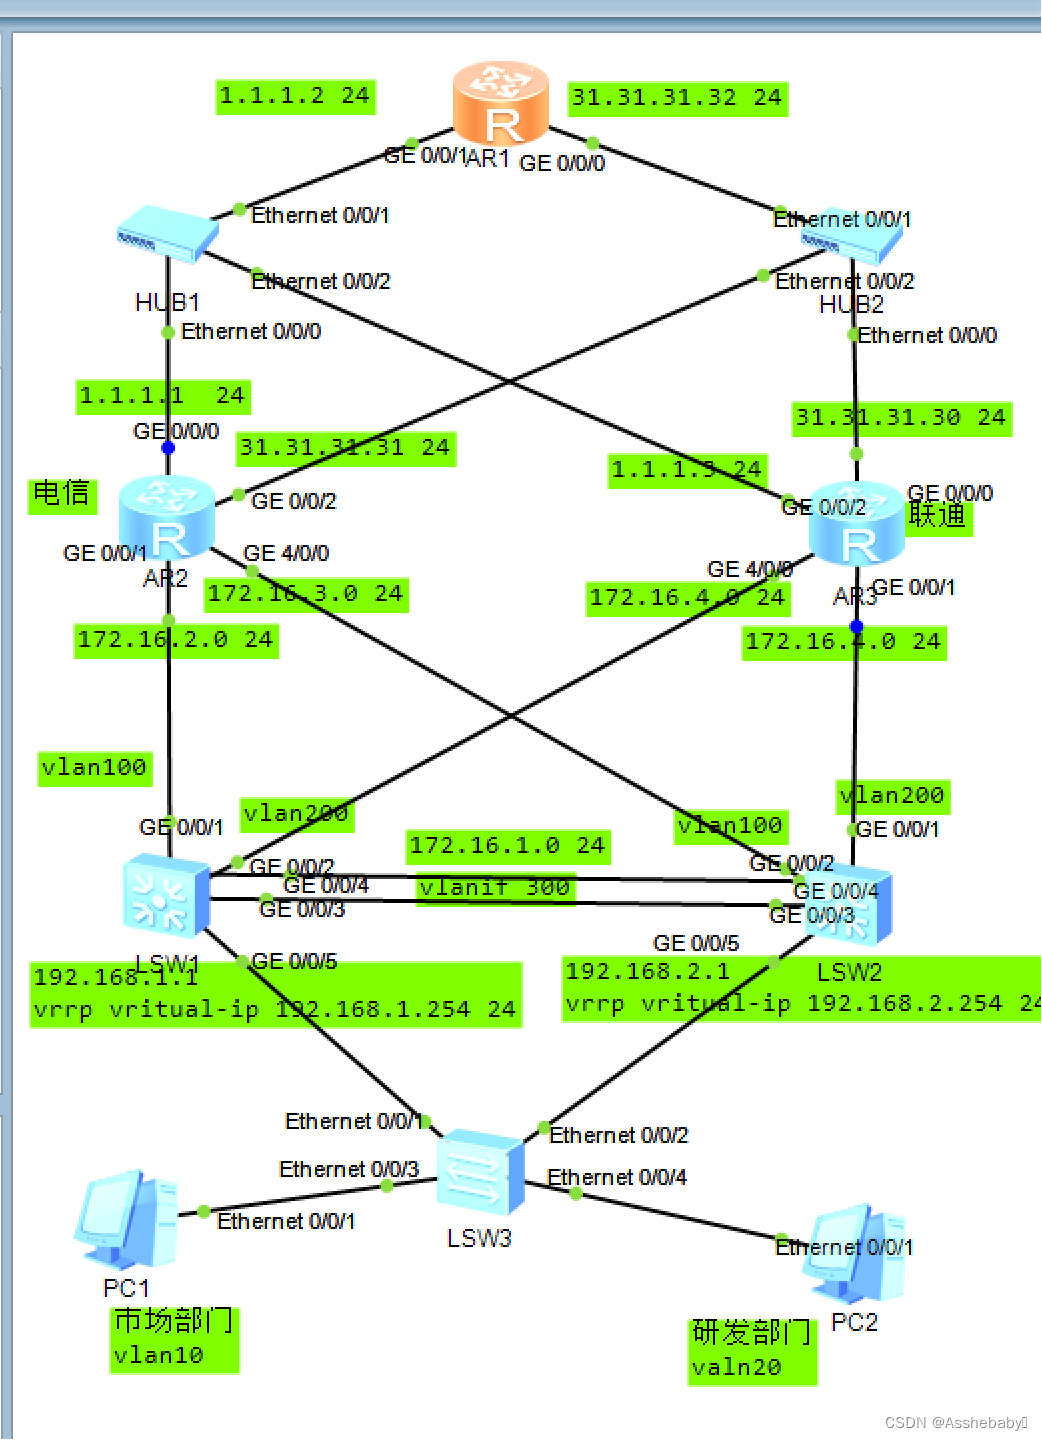
实验拓扑
基础配置
Vlan划分以及IP配置
S3
<Huawei>sy
Enter system view, return user view with Ctrl+Z.
[Huawei]sys S3
[S3] v b 10 20
[S3]int e0/0/1
[S3-Ethernet0/0/1]p l t
[S3-Ethernet0/0/1]p t a v 10 20
[S3-Ethernet0/0/1]int e0/0/2
[S3-Ethernet0/0/2]p l t
[S3-Ethernet0/0/2]p t a v 10 20
[S3-Ethernet0/0/1]int e0/0/3
[S3-Ethernet0/0/3]p l d
[S3-Ethernet0/0/3]p d v 10
[S3-Ethernet0/0/3]int e0/0/4
[S3-Ethernet0/0/4]p l a
[S3-Ethernet0/0/4]p d v 20
S1
<Huawei>sy
Enter system view, return user view with Ctrl+Z.
[Huawei]sy s1
[s1]un in en
Info: Information center is disabled.
[s1]v b 10 20 100 200 300
Info: This operation may take a few seconds. Please wait for a moment...done.
[s1]int g0/0/5
[s1-GigabitEthernet0/0/5]p l t
[s1-GigabitEthernet0/0/5]p t a v 10 20
[s1-GigabitEthernet0/0/5]q
[s1]int e 1
[s1-Eth-Trunk1]q
[s1]int g0/0/3
[s1-GigabitEthernet0/0/3]e 1
[s1-GigabitEthernet0/0/3]int g0/0/4
[s1-GigabitEthernet0/0/4]e 1
[s1]int g0/0/2
[s1-GigabitEthernet0/0/2]p l d
[s1-GigabitEthernet0/0/2]p d v 200
[s1-GigabitEthernet0/0/2]int g0/0/1
[s1-GigabitEthernet0/0/1]p l d
[s1-GigabitEthernet0/0/1]p d v 100
[s1-GigabitEthernet0/0/1]int e 1
[s1-Eth-Trunk1]p l t
[s1-Eth-Trunk1]p t p v 300
[s1-Eth-Trunk1]p t a v 300
[s1-Eth-Trunk1]p t a v 300 10 20 100 200
[s1-Eth-Trunk1]q
[s1]int v 10
[s1-Vlanif10]ip add 192.168.1.1 24
[s1-Vlanif10]q
[s1]int v 300
[s1-Vlanif300]ip add 172.16.1.1 24
[s1-Vlanif300]int v 100
[s1-Vlanif100]ip add 1.1.1.2 24
[s1-Vlanif100]int v 200
[s1-Vlanif200]ip add 3.3.3.4 24
[s1]int v 20
[s1-Vlanif20]ip add 192.168.2.2 24
S2
<Huawei>sy
Enter system view, return user view with Ctrl+Z.
[Huawei]sys s2
[s2]v b 10 20 100 300 200
[s2]un in en
Info: Information center is disabled.
[s2]int g0/0/5
[s2-GigabitEthernet0/0/5]p l t
[s2-GigabitEthernet0/0/5]p t a v 10 20
[s2-GigabitEthernet0/0/5]int e 1
[s2-Eth-Trunk1]q
[s2]int g0/0/3
[s2-GigabitEthernet0/0/3]e 1
Info: This operation may take a few seconds. Please wait for a moment...done.
[s2-GigabitEthernet0/0/3]int g0/0/4
[s2-GigabitEthernet0/0/4]e 1
Info: This operation may take a few seconds. Please wait for a moment...done.
[s2-GigabitEthernet0/0/4]int g0/0/2
[s2-GigabitEthernet0/0/2]p l a
[s2-GigabitEthernet0/0/2]p d v 100
[s2-GigabitEthernet0/0/2]int g0/0/1
[s2-GigabitEthernet0/0/1]p l a
[s2-GigabitEthernet0/0/1]p d v 200
[s2-GigabitEthernet0/0/1]int e 1
[s2-Eth-Trunk1]p l t
[s2-Eth-Trunk1]p t a v 100 200 10 20 300
[s2-Eth-Trunk1]p t p v 300
[s2-Eth-Trunk1]int v 10
[s2-Vlanif10]ip add 192.168.1.2 24
[s2-Vlanif10]int v 20
[s2-Vlanif20]ip add 192.168.2.1 24
[s2-Vlanif20]int v 300
[s2-Vlanif300]ip add 172.16.1.2 24
[s2-Vlanif300]int v 100
[s2-Vlanif100]ip add 9.9.9.10 24
[s2-Vlanif100]int v 200
[s2-Vlanif200]ip add 10.10.10.11 24
Disnxin
<Huawei>sy
Enter system view, return user view with Ctrl+Z.
[Huawei]sy dianxin
[dianxin]int g0/0/0
[dianxin-GigabitEthernet0/0/0]ip add 2.2.2.2 24
[dianxin-GigabitEthernet0/0/0]int g0/0/1
[dianxin-GigabitEthernet0/0/1]ip add 1.1.1.1 24
[dianxin-GigabitEthernet0/0/1]int g0/0/2
[dianxin-GigabitEthernet0/0/2]ip add 13.13.13.13 24
[dianxin-GigabitEthernet0/0/2]int g4/0/0
[dianxin-GigabitEthernet4/0/0]ip add 9.9.9.9 24
Liantong
<Huawei>sy
Enter system view, return user view with Ctrl+Z.
[Huawei]sy liantong
[liantong]int g0/0/0
[liantong-GigabitEthernet0/0/0]ip add 31.31.31.31 24
[liantong-GigabitEthernet0/0/0]int g0/0/2
[liantong-GigabitEthernet0/0/2]ip add 37.37.37.37 24
[liantong-GigabitEthernet0/0/2]int g4/0/0
[liantong-GigabitEthernet4/0/0]ip add 3.3.3.3 24
[liantong-GigabitEthernet4/0/0]int g0/0/1
[liantong-GigabitEthernet0/0/1]ip add 10.10.10.10 24
Ip地址池和网关配置
S2
<s2>sy
Enter system view, return user view with Ctrl+Z.
[s2]dhcp e
Info: The operation may take a few seconds. Please wait for a moment.done.
[s2]int v 10
[s2-Vlanif10]dhcp sel int
[s2-Vlanif10]dhcp server static-bind ip-address 192.168.1.253 mac-address 5489-9858-03F4
[s2-Vlanif10]int v 20
[s2-Vlanif20]dhcp sel int
S1
<s1>sy
Enter system view, return user view with Ctrl+Z.
[s1]dhcp e
Info: The operation may take a few seconds. Please wait for a moment.done.
[s1]int v 10
[s1-Vlanif10]dhcp sel int
[s1-Vlanif10]dhcp ser
[s1-Vlanif10]dhcp server s
[s1-Vlanif10]dhcp server static-bind ip
[s1-Vlanif10]dhcp server static-bind ip-address 192.168.1.253 ma
[s1-Vlanif10]dhcp server static-bind ip-address 192.168.1.253 mac-address 5489-9858-03F4
[s1-Vlanif10]int v 20
[s1-Vlanif20]dhcp sel int
Mstp配置
S1
<s1>sy
Enter system view, return user view with Ctrl+Z.
[s1]stp mode mstp
[s1]stp region-configuration
[s1-mst-region]region-name lwh
[s1-mst-region]instance 1 vlan 10
[s1-mst-region]instance 2 vlan 20
[s1-mst-region]active region-configuration
Info: This operation may take a few seconds. Please wait for a moment...done.
[s1-mst-region]q
[s1]stp instance 1 root primary
[s1]stp instance 2 root secondary
S2
<s2>sy
Enter system view, return user view with Ctrl+Z.
[s2]stp mode mstp
[s2]stp region-configuration
[s2-mst-region]region-name lwh
[s2-mst-region]instance 1 vlan 10
[s2-mst-region]instance 2 vlan 20
[s2-mst-region]active region-configuration
Info: This operation may take a few seconds. Please wait for a moment...done.
[s2-mst-region]q
[s2]stp instance 1 root secondary
[s2]stp instance 2 root primary
S3
<S3>sy
Enter system view, return user view with Ctrl+Z.
[S3]stp mode mstp
[S3]stp region-configuration
[S3-mst-region]instance 1 vlan 10
[S3-mst-region]instance 2 v 20
[S3-mst-region]region-name lwh
[S3-mst-region]active region-configuration
Info: This operation may take a few seconds. Please wait for a moment...done.
[S3-mst-region]q
效果
[S3]dis stp instance 1 b
MSTID Port Role STP State Protection
1 Ethernet0/0/1 ROOT FORWARDING NONE
1 Ethernet0/0/2 ALTE DISCARDING NONE
1 Ethernet0/0/3 DESI FORWARDING NONE
[S3]dis stp instance 2 b
MSTID Port Role STP State Protection
2 Ethernet0/0/1 ALTE DISCARDING NONE
2 Ethernet0/0/2 ROOT FORWARDING NONE
2 Ethernet0/0/4 DESI FORWARDING NONE
[S3]
Vrrp和bfd在交换机上的配置
S1
<s1>sy
Enter system view, return user view with Ctrl+Z.
[s1]int v 10
[s1-Vlanif10]vrrp vrid 1 virtual-ip 192.168.1.254
[s1-Vlanif10]vrrp vrid 1 priority 110
[s1-Vlanif10]q
[s1]int v 20
[s1-Vlanif20]vrrp vrid 2 virtual-ip 192.168.2.254
[s1-Vlanif20]vrrp vrid 2 priority 90
S2
<s2>sy
Enter system view, return user view with Ctrl+Z.
[s2]int v 10
[s2-Vlanif10]vrrp vrid 1 virtual-ip 192.168.1.254
[s2-Vlanif10]vrrp vrid 1 priority 90
[s2-Vlanif10]int v 20
[s2-Vlanif20]vrrp vrid 2 virtual-ip 192.168.2.254
[s2-Vlanif20]vrrp vrid 2 priority 110
[s2-Vlanif20]
S1
<s2>sy
Enter system view, return user view with Ctrl+Z.
[s1]bfd lwh bind peer-ip 192.168.2.1 source-ip 192.168.2.2 auto
[s1-bfd-session-lwh]discriminator local 2
[s1-bfd-session-lwh]discriminator remote 1
[s1-bfd-session-lwh]min-tx-interval 101
[s1-bfd-session-lwh]min-rx-interval 102
[s1-bfd-session-lwh]commit
[s1-bfd-session-lwh]q
[s1]bfd lsl bind peer-ip 192.168.1.2 source-ip 192.168.1.1 auto
[s1-bfd-session-lsl]discriminator local 3
[s1-bfd-session-lsl]discriminator remote 4
[s1-bfd-session-lsl]min-tx-interval 103
[s1-bfd-session-lsl]min-rx-interval 104
[s1-bfd-session-lsl]commit
S2
<s2>sy
Enter system view, return user view with Ctrl+Z.
[s2]bfd
[s2-bfd]q
[s2]bfd lwh bind peer-ip 192.168.2.2 source-ip 192.168.2.1 auto
[s2-bfd-session-lwh]discriminator local 1
[s2-bfd-session-lwh]discriminator remote 2
[s2-bfd-session-lwh]min-tx-interval 102
[s2-bfd-session-lwh]min-tx-interval 101
[s2-bfd-session-lwh]commit
[s2-bfd-session-lwh]q
[s2]bfd lsl bind peer-ip 192.168.1.1 source-ip 192.168.1.2 auto
[s2-bfd-session-lsl]discriminator local 4
[s2-bfd-session-lsl]discriminator remote 3
[s2-bfd-session-lsl]min-tx-interval 103
[s2-bfd-session-lsl]min-rx-interval 104
[s2-bfd-session-lsl]commit
[s2-bfd-session-lsl]q
效果
<s1>dis bfd session all
--------------------------------------------------------------------------------
Local Remote PeerIpAddr State Type InterfaceName
--------------------------------------------------------------------------------
8192 8192 192.168.2.1 Up S_AUTO_PEER -
3 4 192.168.1.2 Up S_IP_PEER -
--------------------------------------------------------------------------------
Total UP/DOWN Session Number : 2/0
策略路由(未做)(s2)
<s1>sy
Enter system view, return user view with Ctrl+Z.
第一步
[s1]acl 3000
[s1-acl-adv-3000]rule 5 permit ip source 192.168.1.0 0.0.0.255
[s1-acl-adv-3000]q
[s1]acl 3001
[s1-acl-adv-3001]rule 5 permit ip source 192.168.2.0 0.0.0.255
[s1-acl-adv-3001]q
第二步
[s1]traffic classifier todianxin
[s1-classifier-todianxin]if-match acl 3000
[s1-classifier-todianxin]q
[s1]traffic classifier toliantong
[s1-classifier-toliantong]if
[s1-classifier-toliantong]if-match acl 3001
[s1-classifier-toliantong]q
第三步
[s1]traffic behavior todianxin
[s1-behavior-todianxin]redirect ip-nexthop 172.16.3.1
[s1-behavior-todianxin]q
[s1]traffic behavior toliantong
[s1-behavior-toliantong]redirect ip-nexthop 172.16.5.1
[s1-behavior-toliantong]q
第四步
[s1]traffic policy 1
[s1-trafficpolicy-1]classifier todianxin behavior todianxin
[s1-trafficpolicy-1]classifier toliantong behavior toliantong
[s1-trafficpolicy-1]q
第五步
[s1]int g0/0/5
[s1-GigabitEthernet0/0/5]traffic-policy 1 inbound
<s1>sy
Enter system view, return user view with Ctrl+Z.
第一步
[s1]acl 3000
[s1-acl-adv-3000]rule 5 permit ip source 192.168.1.0 0.0.0.255
[s1-acl-adv-3000]q
[s1]acl 3001
[s1-acl-adv-3001]rule 5 permit ip source 192.168.2.0 0.0.0.255
[s1-acl-adv-3001]q
第二步
[s1]traffic classifier todianxin
[s1-classifier-todianxin]if-match acl 3000
[s1-classifier-todianxin]q
[s1]traffic classifier toliantong
[s1-classifier-toliantong]if
[s1-classifier-toliantong]if-match acl 3001
[s1-classifier-toliantong]q
第三步
[s1]traffic behavior todianxin
[s1-behavior-todianxin]redirect ip-nexthop 172.16.2.1
[s1-behavior-todianxin]q
[s1]traffic behavior toliantong
[s1-behavior-toliantong]redirect ip-nexthop 172.16.4.1
[s1-behavior-toliantong]q
第四步
[s1]traffic policy 1
[s1-trafficpolicy-1]classifier todianxin behavior todianxin
[s1-trafficpolicy-1]classifier toliantong behavior toliantong
[s1-trafficpolicy-1]q
第五步
[s1]int g0/0/5
[s1-GigabitEthernet0/0/5]traffic-policy 1 inbound
Ospf配置
S1
[s1]ospf
[s1-ospf-1]dis th
#
ospf 1
area 0.0.0.0
network 192.168.1.0 0.0.0.255
network 192.168.2.0 0.0.0.255
network 172.16.2.0 0.0.0.255
network 172.16.4.0 0.0.0.255
#
Return
S2
[s2-ospf-1]dis th
#
ospf 1
area 0.0.0.0
network 172.16.3.0 0.0.0.255
network 172.16.5.0 0.0.0.255
network 172.16.1.0 0.0.0.255
#
return
[s2-ospf-1]
R1
[dianxin]ospf
[dianxin-ospf-1]dis th
[V200R003C00]
#
ospf 1
area 0.0.0.0
network 172.16.2.0 0.0.0.255
network 172.16.3.0 0.0.0.255
#
R2
[V200R003C00]
#
ospf 1
area 0.0.0.0
network 172.16.4.0 0.0.0.255
network 172.16.5.0 0.0.0.255
#
Return
静态地址配置
S1
ip route-static 0.0.0.0 0.0.0.0 172.16.2.1
ip route-static 0.0.0.0 0.0.0.0 172.16.4.1
S2
ip route-static 0.0.0.0 0.0.0.0 172.16.5.1
ip route-static 0.0.0.0 0.0.0.0 172.16.3.1
R1
#
ip route-static 0.0.0.0 0.0.0.0 1.1.1.2
ip route-static 0.0.0.0 0.0.0.0 31.31.31.32 preference 50
#
ip route-static 0.0.0.0 0.0.0.0 31.31.31.32
ip route-static 0.0.0.0 0.0.0.0 1.1.1.2 preference 50
这篇关于双网关备份(bfd+VRRP+策略路由配置)企业网搭建的文章就介绍到这儿,希望我们推荐的文章对编程师们有所帮助!


