本文主要是介绍随手记录第十话 -- 升级SpringBoot3.0 + JDK17的踩坑记录,希望对大家解决编程问题提供一定的参考价值,需要的开发者们随着小编来一起学习吧!
随着有些jar包的升级,JDK1.8已经不是最稳定的版本了。
前段时间接触到Web3相关,jar包的编译最低要JDK13了,碰巧另一个使用Kotlin写的jar包依赖需要17了,那就直接上17吧,同时Springboot也上到3.0。
1. 框架说明
Springboot3.0 + SpringSecurity + Swagger,数据库Jpa和mybatis都可,缓存使用redis。
先看主pom.xml依赖
<parent><groupId>org.springframework.boot</groupId><artifactId>spring-boot-starter-parent</artifactId><version>3.0.0</version><relativePath/>
</parent>
依赖项
<!--Spring boot 安全框架--><dependency><groupId>org.springframework.boot</groupId><artifactId>spring-boot-starter-security</artifactId></dependency>
<!-- Swagger UI 相关 2.0.4版本存在问题 --><dependency><groupId>org.springdoc</groupId><artifactId>springdoc-openapi-starter-webmvc-ui</artifactId><version>2.2.0</version></dependency><dependency><groupId>org.springframework.boot</groupId><artifactId>spring-boot-starter-validation</artifactId></dependency>
服务之间调用采用openfeign,<openfeign.version>12.2</openfeign.version>
<!--Spring boot openfeign-->
<dependency><groupId>io.github.openfeign</groupId><artifactId>feign-core</artifactId><version>${openfeign.version}</version>
</dependency>
<dependency><groupId>io.github.openfeign</groupId><artifactId>feign-okhttp</artifactId><version>${openfeign.version}</version>
</dependency>
<dependency><groupId>io.github.openfeign</groupId><artifactId>feign-jackson</artifactId><version>${openfeign.version}</version>
</dependency>
<!--spring契约-->
<dependency><groupId>io.github.openfeign</groupId><artifactId>feign-spring4</artifactId><version>${openfeign.version}</version>
</dependency>
至于其他的依赖JWT,Redis,Jpa,Mybatis就不贴了
2. SpringSecurity配置
和2.x版本的变化的还是挺大的,3.0采用的是是流式写法。
2.1 验证规则
public class SpringSecurityConf {@AutowiredApplicationContext applicationContext;@Beanpublic PasswordEncoder passwordEncoder() {// 密码加密方式return new BCryptPasswordEncoder();}@Beanpublic AuthenticationManager authenticationManager(AuthenticationConfiguration config) throws Exception {return config.getAuthenticationManager();}@Beanpublic JwtTokenOncePerRequestFilter authenticationJwtTokenFilter() {return new JwtTokenOncePerRequestFilter();}@Beanpublic SecurityFilterChain securityFilterChain(HttpSecurity http) throws Exception {// 获取匿名标记Map<String, Set<String>> anonymousUrls = this.getAnonymousUrl();http//禁言basic明文.httpBasic().disable()//前后端分离不用卡跨域.csrf().disable()//禁用默认登录页.formLogin().disable()//授权异常.exceptionHandling(exceptions -> {//403处理类 无法访问  401处理类 身份信息验证错误exceptions.authenticationEntryPoint(getAuthenticationEntryPoint()).accessDeniedHandler(getAccessDeniedHandler());})//http请求.authorizeHttpRequests(registry -> {registry.requestMatchers(HttpMethod.GET, anonymousUrls.get(RequestMethodEnum.GET.getType()).toArray(new String[0])).permitAll().requestMatchers(HttpMethod.POST, anonymousUrls.get(RequestMethodEnum.POST.getType()).toArray(new String[0])).permitAll().requestMatchers(HttpMethod.DELETE, anonymousUrls.get(RequestMethodEnum.DELETE.getType()).toArray(new String[0])).permitAll().requestMatchers(HttpMethod.PUT, anonymousUrls.get(RequestMethodEnum.PUT.getType()).toArray(new String[0])).permitAll().requestMatchers(HttpMethod.OPTIONS, "/**").permitAll();//添加白名单的this.addWhiteListAuthorize(registry);//添加自定义的this.addCustomAuthorize(registry);//默认全部放行
//                    registry.requestMatchers("/**").permitAll();// 所有请求都需要认证registry.anyRequest().authenticated();})//验证service类
//                .authenticationProvider().addFilterBefore(this.getDefaultFilter(), UsernamePasswordAuthenticationFilter.class);return http.build();}//可重写该public void addWhiteListAuthorize(AuthorizeHttpRequestsConfigurer<HttpSecurity>.AuthorizationManagerRequestMatcherRegistry registry) {String[] PASS_PATH_GROUP = new String[]{"/*.html","/webSocket/**","/swagger-ui/*","/*/api-docs/*","/*/api-docs*","/actuator/*","/error",};for (String str : PASS_PATH_GROUP) {registry.requestMatchers(str).permitAll();}}//例如system有不同的处理 可重写该方法public void addCustomAuthorize(AuthorizeHttpRequestsConfigurer<HttpSecurity>.AuthorizationManagerRequestMatcherRegistry registry) {//hasRole 需要在权限面前加上ROLE_ hasAuthority/则不需要registry.requestMatchers("/api/**").hasAuthority(SecurityConstant.AUTH_USER).requestMatchers("/admin/**").hasAuthority(SecurityConstant.AUTH_MANAGER);}public AccessDeniedHandler getAccessDeniedHandler() {return (request, response, e) -> {log.error("403 Forbidden,URI:{}", request.getRequestURI());//当用户在没有授权的情况下访问受保护的REST资源时,将调用此方法发送403 Forbidden响应response.sendError(HttpServletResponse.SC_FORBIDDEN, e.getMessage());};}public AuthenticationEntryPoint getAuthenticationEntryPoint() {return (request, response, e) -> {log.error("401 无凭据,{},URI:{}", request.getMethod(), request.getRequestURI());// 当用户尝试访问安全的REST资源而不提供任何凭据时,将调用此方法发送401 响应response.sendError(HttpServletResponse.SC_UNAUTHORIZED, e == null ? "Unauthorized" : e.getMessage());};}//默认的jwt校验器public JwtTokenOncePerRequestFilter getDefaultFilter() throws Exception {return new JwtTokenOncePerRequestFilter();}//自定义授权开放的注解 例如AnonymousGetMapping 注解了的方法放开权限public Map<String, Set<String>> getAnonymousUrl() {// 搜寻匿名标记 url: @AnonymousAccessRequestMappingHandlerMapping requestMappingHandlerMapping =(RequestMappingHandlerMapping) applicationContext.getBean("requestMappingHandlerMapping");Map<RequestMappingInfo, HandlerMethod> handlerMethodMap = requestMappingHandlerMapping.getHandlerMethods();// 获取匿名标记Map<String, Set<String>> anonymousUrls = new HashMap<>(6);Set<String> get = new HashSet<>();Set<String> post = new HashSet<>();Set<String> put = new HashSet<>();Set<String> patch = new HashSet<>();Set<String> delete = new HashSet<>();Set<String> all = new HashSet<>();for (Map.Entry<RequestMappingInfo, HandlerMethod> infoEntry : handlerMethodMap.entrySet()) {HandlerMethod handlerMethod = infoEntry.getValue();AnonymousAccess anonymousAccess = handlerMethod.getMethodAnnotation(AnonymousAccess.class);if (null != anonymousAccess) {List<RequestMethod> requestMethods = new ArrayList<>(infoEntry.getKey().getMethodsCondition().getMethods());RequestMethodEnum request = RequestMethodEnum.find(requestMethods.size() == 0 ? RequestMethodEnum.ALL.getType() : requestMethods.get(0).name());Set<PathPattern> pathPatterns = infoEntry.getKey().getPathPatternsCondition().getPatterns();for (PathPattern pattern : pathPatterns) {switch (Objects.requireNonNull(request)) {case GET:get.add(pattern.getPatternString());break;case POST:post.add(pattern.getPatternString());break;case PUT:put.add(pattern.getPatternString());break;case PATCH:patch.add(pattern.getPatternString());break;case DELETE:delete.add(pattern.getPatternString());break;default:all.add(pattern.getPatternString());break;}}}}anonymousUrls.put(RequestMethodEnum.GET.getType(), get);anonymousUrls.put(RequestMethodEnum.POST.getType(), post);anonymousUrls.put(RequestMethodEnum.PUT.getType(), put);anonymousUrls.put(RequestMethodEnum.PATCH.getType(), patch);anonymousUrls.put(RequestMethodEnum.DELETE.getType(), delete);anonymousUrls.put(RequestMethodEnum.ALL.getType(), all);return anonymousUrls;}
}
2.2 拦截器
每个请求在满足权限之后都会走的入口类
public class JwtTokenOncePerRequestFilter extends OncePerRequestFilter {RedisConf redisConf;public JwtTokenOncePerRequestFilter() {}//如果有自定义拦截请求处理 //则重写验证规则中的getDefaultFilter方法 传入自定义拦截器public JwtTokenOncePerRequestFilter(RedisConf redisConf) {this.redisConf = redisConf;}@Overrideprotected void doFilterInternal(HttpServletRequest req, HttpServletResponse res,FilterChain chain) throws ServletException, IOException {String token = JwtUtils.getToken(req);if (token == null) {//可能会存在前端session缓存问题SecurityContextHolder.getContext().setAuthentication(null);chain.doFilter(req, res);return;}try {//验证token 并取出对应信息Authentication authentication = JwtUtils.getAuthentication(token);SecurityContextHolder.getContext().setAuthentication(authentication);//子类自定义操作 例如 存储,redis过期/续期this.handler(token, authentication);chain.doFilter(req, res);} catch (Exception e) {GlobalExceptionEnum ex = GlobalExceptionEnum.TOKEN_IS_ERROR;logger.error(e.getMessage());res.setContentType("application/json; charset=utf-8");res.setStatus(HttpStatus.UNAUTHORIZED.value());res.getWriter().write("{\"code\": " + HttpStatus.UNAUTHORIZED.value() + ", \"message\": \"" + ex.getText() + "\"}");res.getWriter().close();}}public void handler(String token, Authentication authentication) {if (redisConf != null && JwtUtils.containsRole(SecurityConstant.AUTH_USER)) {//仅针对用户服务做拦截 减少redis访问 对于 Token 为空的不需要去查Redisif (StringUtils.isNotEmptyObj(token)) {Long uid = JwtUtils.getLoginUid();String oldToken = redisConf.get(String.format(RedisKey.MEMBER_UID_TOKEN, uid));if (oldToken != null && !token.equals(oldToken)) {logger.error("token不一致:token:" + token + ",oldToken:" + oldToken);throw new BadRequestException(GlobalExceptionEnum.TOKEN_IS_ERROR.getText());}}}}
}
2.3 验证器
从验证规则来看,上面的验证器我是注释掉了的,因为登录注册是由自己实现,不是走的SpringSecurity的密码验证。这里也贴一下代码
//用账户密码登录的 会传入的明文密码 根据验证规则里面设置的加密算法进行加密
UsernamePasswordAuthenticationToken authenticationToken =new UsernamePasswordAuthenticationToken(authUser.getUsername(), password);
经过框架内部加密密码后,会回调到UserDetailsService#loadUserByUsername方法,该方法需要自己实现
@Service("userDetailsService")
public class UserDetailsServiceImpl implements UserDetailsService {private final UserService userService;private final RoleService roleService;private final DataService dataService;private final LoginProperties loginProperties;@Overridepublic JwtUserDto loadUserByUsername(String username) {boolean searchDb = true;JwtUserDto jwtUserDto = null;if (searchDb) {UserDto user;try {user = userService.findByName(username);} catch (EntityNotFoundException e) {// SpringSecurity会自动转换UsernameNotFoundException为BadCredentialsExceptionthrow new UsernameNotFoundException("", e);}if (user == null) {throw new UsernameNotFoundException("");} else {if (!user.getEnabled()) {throw new BadRequestException("账号未激活!");}jwtUserDto = new JwtUserDto(user,dataService.getDeptIds(user),roleService.mapToGrantedAuthorities(user));userDtoCache.put(username, jwtUserDto);}}return jwtUserDto;}
}
在这里面验证状态等,同时补齐权限,然后返回对应的dto,框架会根据dto里面的password来校验密码是否正确。
3. Swagger变化
在Springboot3中,原来的swagger-ui包已经不支持了,需要更改为springdoc
3.1 依赖
在最开始使用的2.0.4版本中,会出现@RequestParam(required = false)在swagger界面中不生效的问题。
<!-- Swagger UI 相关 2.0.4版本存在问题 -->
<dependency><groupId>org.springdoc</groupId><artifactId>springdoc-openapi-starter-webmvc-ui</artifactId><version>2.2.0</version>
</dependency>
<dependency><groupId>org.springframework.boot</groupId><artifactId>spring-boot-starter-validation</artifactId>
</dependency>
3.2 配置
和2版本相比,如果想添加Authorization,需要在类上添加如下注解
@Configuration
@SecurityScheme(name = "Authorization", type = SecuritySchemeType.HTTP, scheme = "bearer", in = SecuritySchemeIn.HEADER)
public abstract class SwaggerConf {@Beanpublic OpenAPI createOpenApi() {return new OpenAPI().info(apiInfo())//设置授权信息.security(List.of(new SecurityRequirement().addList("Authorization")))//引入其他文档
//                .externalDocs(new ExternalDocumentation().description("百度一下")
//                        .url("http://www.baido.com"));}public Info apiInfo() {return new Info().title("一款 web3.0 业务接口文档").description("web3业务处理").version("1.0");}//分组@Beanpublic GroupedOpenApi publicApi() {return GroupedOpenApi.builder().group("api").pathsToMatch("/api/**").build();}@Beanpublic GroupedOpenApi adminApi() {return GroupedOpenApi.builder().group("admin").pathsToMatch("/admin/**").build();}
}
其他的配置大同小异。
3.3 注解的使用
原来的版本的注解我就不贴了,先看类上和方式上的注解
@Tag(name = "APP:FTMO数据相关接口")
@RestController
@RequestMapping("/api/app")
public class CmsController {//get参数的注解自行查询@Operation(summary = "test测试", description = "test接口说明")@AnonymousGetMapping("/test")public UserInfo test(@RequestBody UserInfoVO vo) {}
}
在实体类上的注解
@Schema(title = "用户数据VO")
@Data
public class UserInfoVO extends UserInfo {@Schema(title = "页码查询")Integer page;@Schema(title = "条数")Integer pageSize;
}
需要注意的是在同一规范返回的实体类上不用注解
@NoArgsConstructor
@Data
//加了这个注解回导致无法显示泛型的实体类
//@Schema(name = "ApiResult", description = "REST接口标准返回值 View Model")
public class ApiResultVO<T> implements Serializable {/*** 返回码*/@Schema(title ="REST接口返回码")private Integer code;/*** 返回描述*/@Schema(title ="REST接口返回消息")private String message;/*** 返回数据*///这个DataVO类上不影响private DataVO<T, Object> content;
}
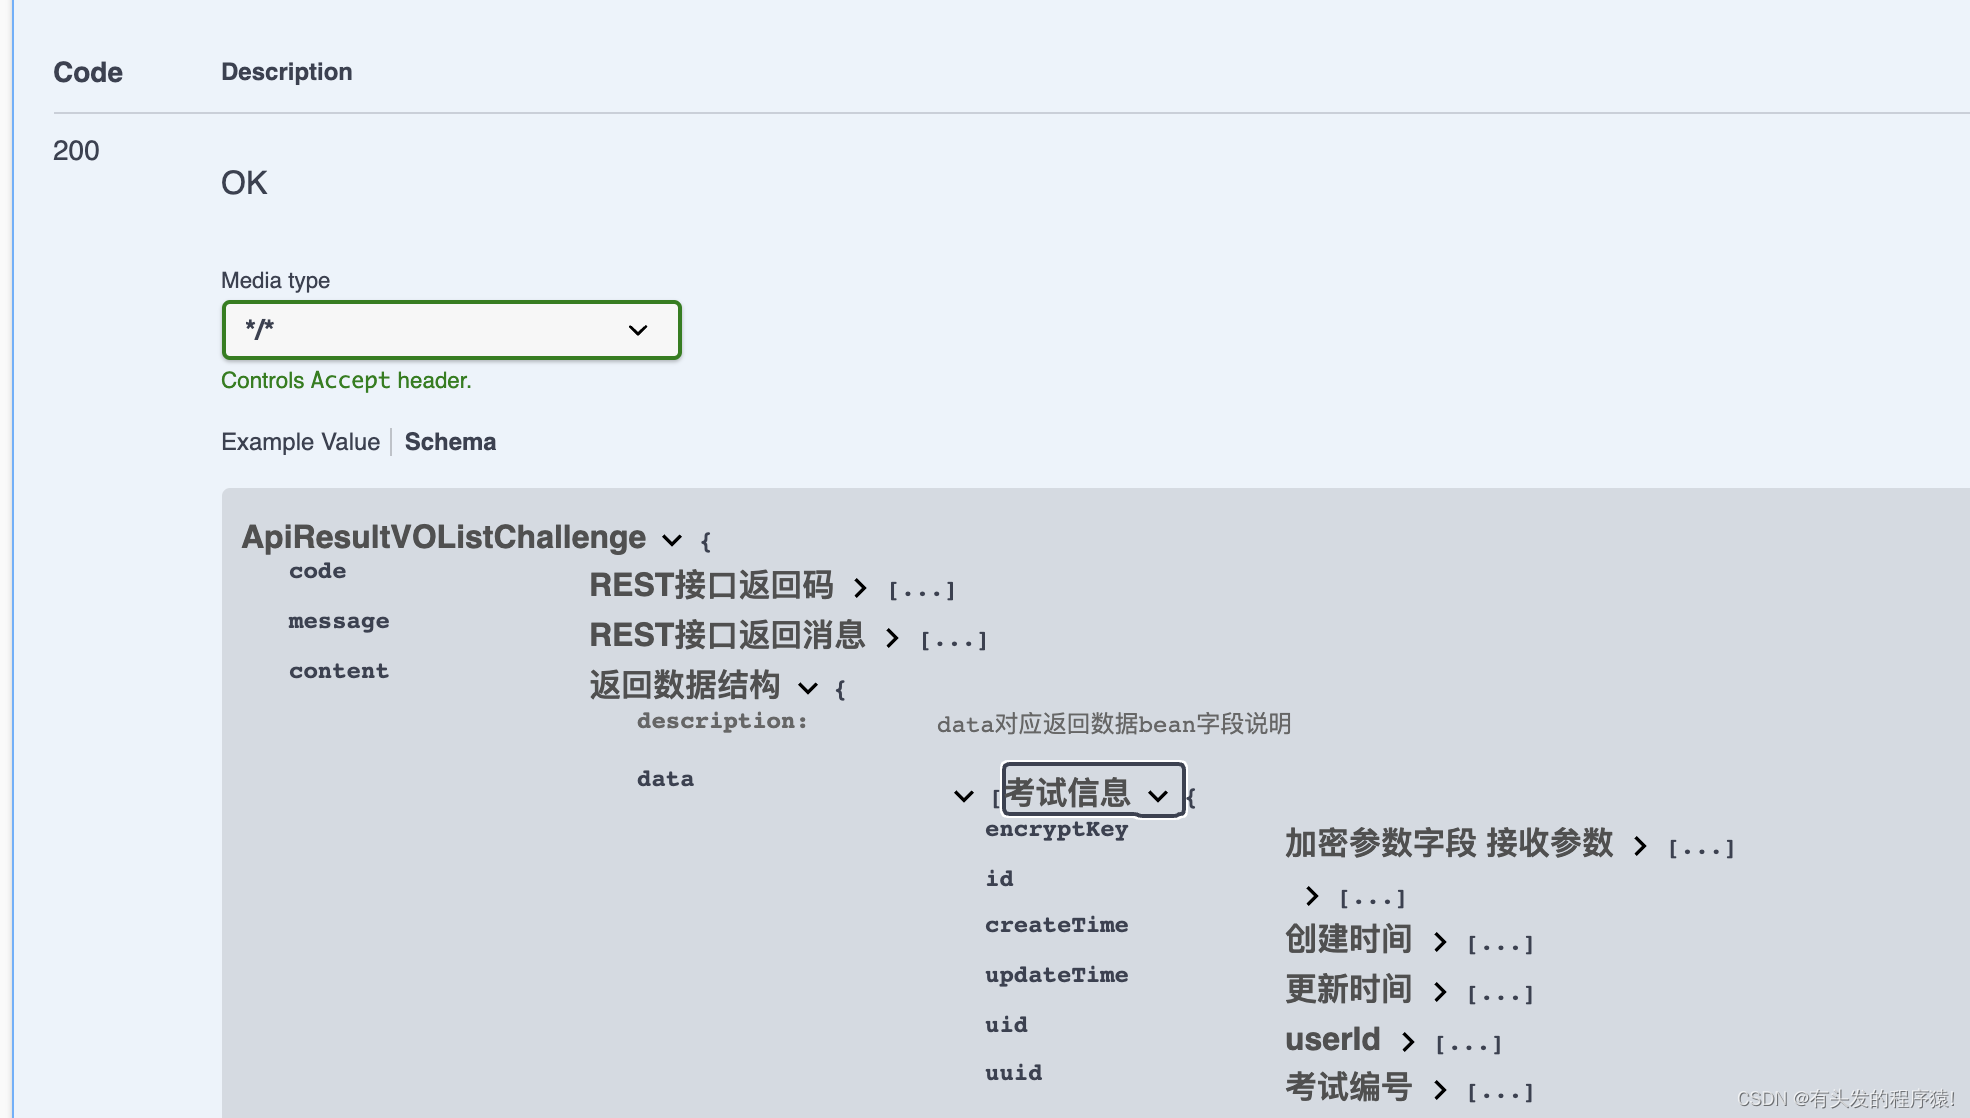
3.4 效果图
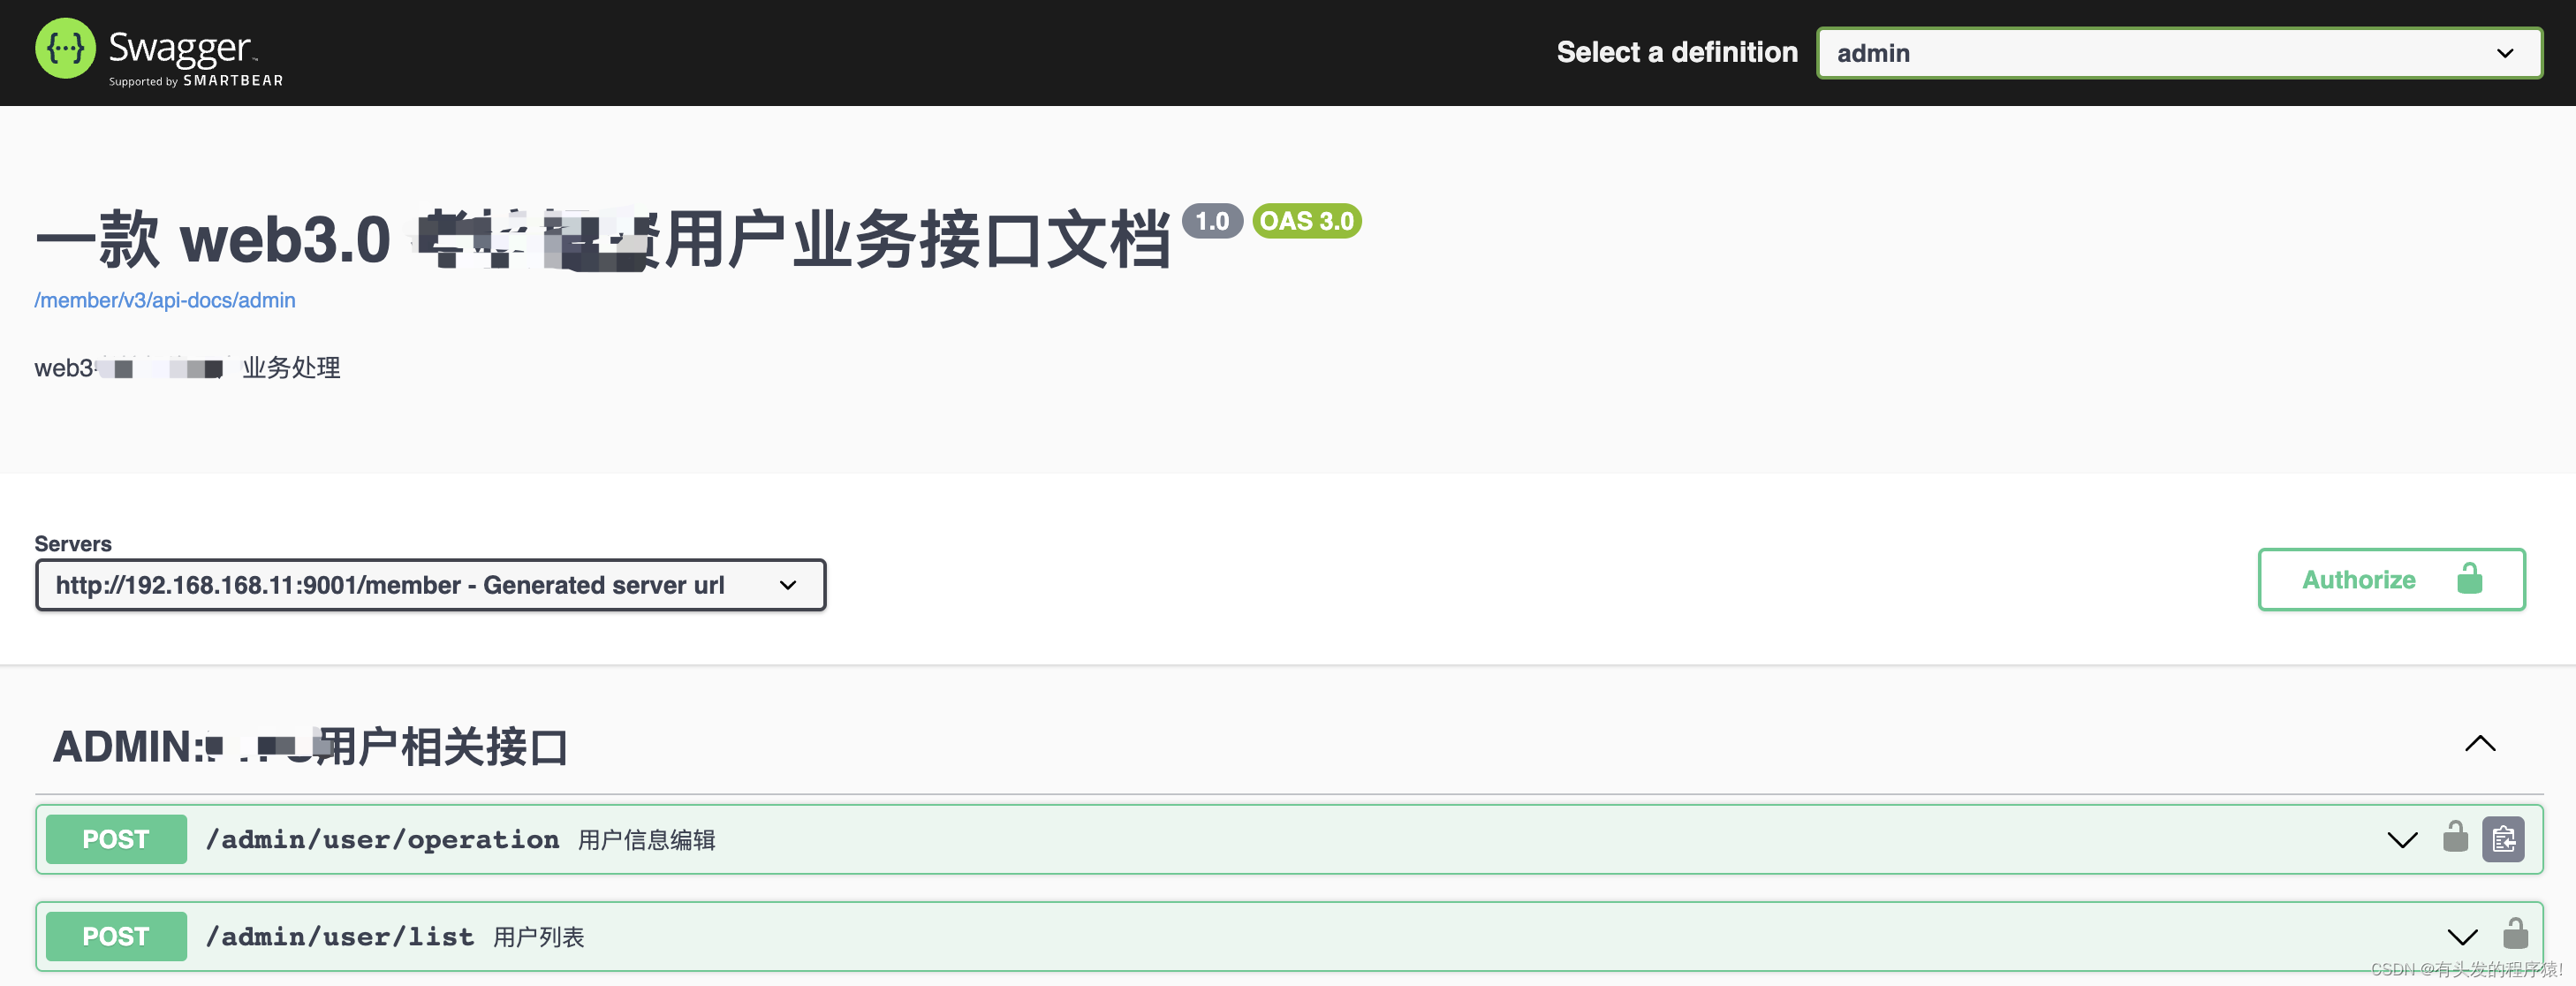
传入参数说明

返回参数实体类说明
4.其他
配置文件redis,移动多了一层data目录
data:redis:database: 0#数据库索引host: 192.168.0.100port: 6379password:#连接超时时间timeout: 5000
过去有一段时间了,今天才抽时间记录一下,还有其他问题会继续更新。
以上就是本文的全部内容了!
上一篇:随手记录第九话 – Java框架整合篇
下一篇:随手记录第十一话 – xxx
非学无以广才,非志无以成学。
这篇关于随手记录第十话 -- 升级SpringBoot3.0 + JDK17的踩坑记录的文章就介绍到这儿,希望我们推荐的文章对编程师们有所帮助!


