本文主要是介绍C#简单晶圆wafermapping显示示范demo,希望对大家解决编程问题提供一定的参考价值,需要的开发者们随着小编来一起学习吧!
点击,双击可改变颜色
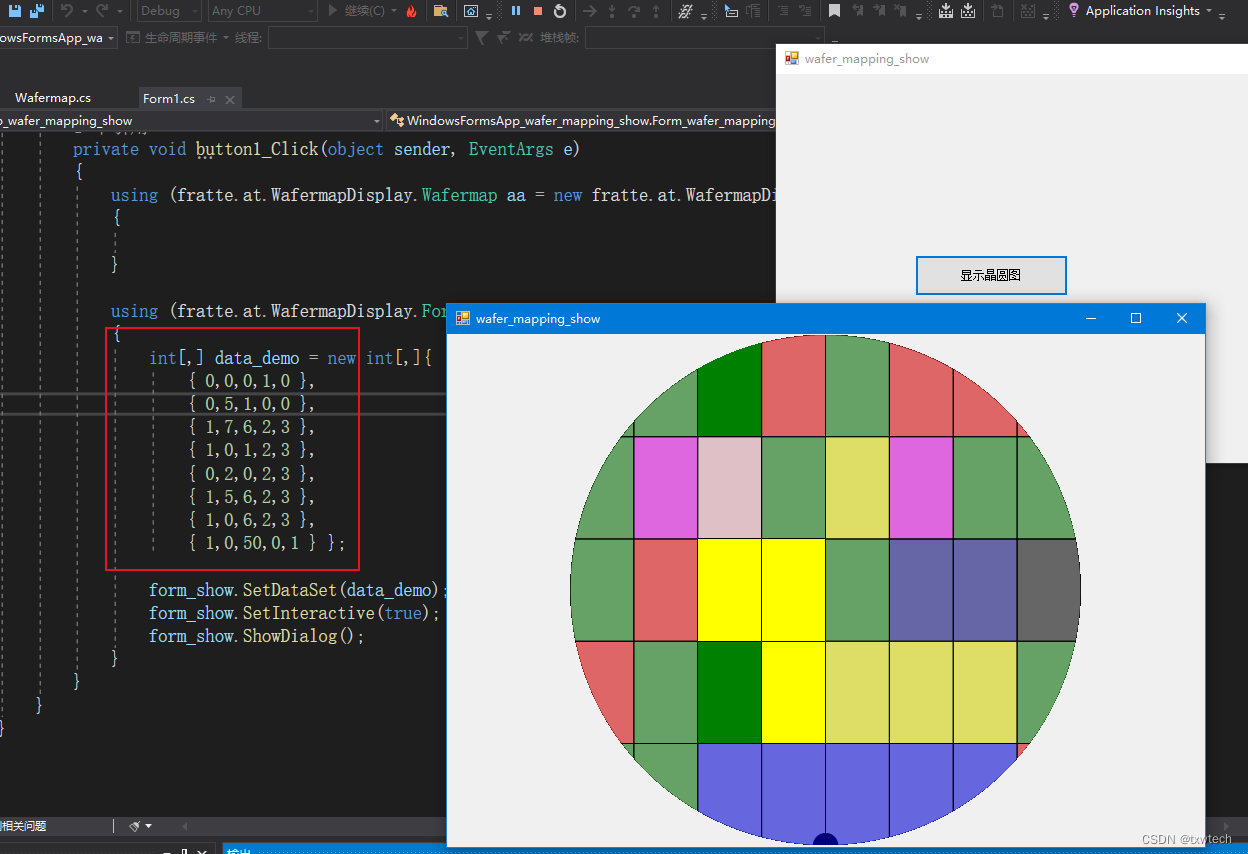
预设5行8列数据:
using (fratte.at.WafermapDisplay.Form1 form_show = new fratte.at.WafermapDisplay.Form1()){int[,] data_demo = new int[,]{{ 0,0,0,1,0 },{ 0,5,1,0,0 },{ 1,7,6,2,3 },{ 1,0,1,2,3 },{ 0,2,0,2,3 }, { 1,5,6,2,3 },{ 1,0,6,2,3 }, { 1,0,50,0,1 } };form_show.SetDataSet(data_demo);form_show.SetInteractive(true);form_show.ShowDialog();}预设颜色对应表:
private void setupDefaultColors(){// Just some sample colors to get startedcolors = new Color[255];colors[0] = Color.Green;colors[1] = Color.Red;colors[2] = Color.Yellow;colors[3] = Color.Blue;colors[4] = Color.Orange;colors[5] = Color.Magenta;colors[6] = Color.DarkBlue;colors[7] = Color.Pink;colors[50] = Color.Black;}Wafermap.cs动态库
using System;
using System.Collections.Generic;
using System.ComponentModel;
using System.Drawing;
using System.Data;
using System.Linq;
using System.Text;
using System.Threading.Tasks;
using System.Windows.Forms;
using System.Drawing.Drawing2D;namespace fratte.at.WafermapDisplay
{public partial class Wafermap : UserControl{private String tooSmallString = "TOO SMALL";public String TooSmallString{get { return tooSmallString; }set { tooSmallString = value; }}private String noDataString = "NO DATA";public String NoDataString{get { return noDataString; }set { noDataString = value; }}private int translation_x=0;public int TranslationX{get { return translation_x; }set { translation_x = value; }}private int translation_y=0;public int TranslationY{get { return translation_y; }set { translation_y = value; }}private int rotation;public int Rotation{get { return rotation; }set { if (value % 90 == 0 && value >= 0 && value < 360)rotation = value;elsethrow new ArgumentException("Rotation has to be 0, 90, 180 or 270 degrees (Is "+value+")");}}private float zoom;public float Zoom{get { return zoom; }set { zoom = value; }}private int notchLocation = 0;public int Notchlocation{get { return notchLocation; }set {if (value % 90 == 0 && value >= 0 && value <= 270)notchLocation = value;elsethrow new ArgumentException("NotchLocation has to be 0, 90, 180 or 270 degrees (Is "+value+")");}}private int[,] dataset;public int[,] Dataset{get { return dataset; }set { dataset = value; }}private Color[] colors;public Color[] Colors{get { return colors; }set { colors = value; }}public Wafermap(){zoom=1f;InitializeComponent();SetStyle(ControlStyles.ResizeRedraw, true);DoubleBuffered = true;setupDefaultColors();registerEvents();}private void setupDefaultColors(){// Just some sample colors to get startedcolors = new Color[255];colors[0] = Color.Green;colors[1] = Color.Red;colors[2] = Color.Yellow;colors[3] = Color.Blue;colors[4] = Color.Orange;colors[5] = Color.Magenta;colors[6] = Color.DarkBlue;colors[7] = Color.Pink;colors[50] = Color.Black;}private void Wafermap_Load(object sender, EventArgs e){this.Dock = DockStyle.Fill;}private bool isScaled;public bool IsScaled{get { return isScaled; }}private int scaleFactor;public int ScaleFactor{get { return scaleFactor; }}// We need some globals to be available for calculationsRectangleF boundingBox_;SizeF dieSize_;protected override void OnPaint(PaintEventArgs e){// set rotatione.Graphics.RotateTransform((float)rotation);if(rotation!=0){// When we rotate, we also have to translateswitch (rotation){case 90:e.Graphics.TranslateTransform(0, -boundingBox_.Width);break;case 180:e.Graphics.TranslateTransform(-boundingBox_.Width,-boundingBox_.Height);break;case 270:e.Graphics.TranslateTransform(-boundingBox_.Height, 0);break;}}// set additional translatione.Graphics.TranslateTransform(translation_x, translation_y); // Use antialiase.Graphics.SmoothingMode = SmoothingMode.AntiAlias;// Here comes everything that has to be calculated on each resize/redraw// Just do this calculations once// Let's find the best Size for the outlinefloat w = this.Width*zoom;float h = this.Height*zoom;float size = w < h ? w : h;// Wafersize is size-2 because we're not drawing the first and the last pixelsSizeF wafersize = new SizeF(size - 2, size - 2);PointF starting = new PointF((w - size) / 2f, (h - size) / 2f);RectangleF boundingBox = new RectangleF(starting, wafersize);boundingBox_ = boundingBox;// Create graphics path.GraphicsPath clipPath = new GraphicsPath();clipPath.AddEllipse(boundingBox);// Set clipping region to path.e.Graphics.SetClip(clipPath, CombineMode.Replace);drawCircle(e.Graphics,boundingBox);drawNotch(e.Graphics, boundingBox, notchLocation);// Let's calculate everything needed for drawing the diesif (dataset != null && dataset.Length > 0){int maxX = dataset.GetLength(0);int maxY = dataset.GetLength(1);float sizeX = boundingBox.Width / (float)maxX;float sizeY = boundingBox.Height / (float)maxY;int every = 1;// If dieSizeX or dieSizeY is less then 2 pixels// take only every nth diewhile (sizeX <= 2 || sizeY <= 2){every = every * 2;sizeX = boundingBox.Width / (float)(maxX/every);sizeY = boundingBox.Height / (float)(maxY/every);}SizeF dieSize = new SizeF(sizeX, sizeY);dieSize_ = dieSize;// If every != 1 we recalculate the input data// Otherwise we pass the original dataset// Caveat: We must not overwrite the original dataset ;)if (every > 1){// Create a new dataset// Get the highest bin code in x/y to x/y + every as result for x/y// First set the propertyisScaled = true;scaleFactor = every;drawDies(e.Graphics, boundingBox, fratte.at.WafermapDisplay.WafermapTools.scaleArray(dataset,every), dieSize);// Print "Too small" messageFontFamily myFontFamily = new FontFamily("Arial");Font myFont = new Font(myFontFamily,10,FontStyle.Bold,GraphicsUnit.Pixel);e.Graphics.DrawString(tooSmallString, myFont, new SolidBrush(Color.Red), boundingBox.Location);}else{// PropertiesisScaled = false;scaleFactor = 1;// Simply draw the diedrawDies(e.Graphics, boundingBox, dataset, dieSize);}}else{// Display "No Data" messageFontFamily myFontFamily = new FontFamily("Arial");Font myFont = new Font(myFontFamily,10,FontStyle.Bold,GraphicsUnit.Pixel);e.Graphics.DrawString(noDataString, myFont,new SolidBrush( Color.Red), boundingBox.Location);}}// Try to reuse - only instantiated onceSolidBrush waferFillbrush = new SolidBrush(Color.Silver);Pen blackPen = new Pen(Color.Black);SolidBrush notchFillBrush = new SolidBrush(Color.Black);private void drawCircle(Graphics g, RectangleF boundingBox){ g.FillEllipse(waferFillbrush, boundingBox);g.DrawEllipse(blackPen, boundingBox);}private void drawNotch(Graphics g, RectangleF boundingBox, int location){// Draw the notch (Phyical property on the wafer for alignment. Can be at 0, 90, 180, 270 degrees// starting from 0° at the bottom CCW)// The Shape is  fixed to a cut circlefloat size=boundingBox.Width<boundingBox.Height?boundingBox.Width:boundingBox.Height;size = size * 0.05f;// Calculate the location of the notch// 180°float x=boundingBox.X+(boundingBox.Width/2f)-(size/2f);float y=boundingBox.Y-(size/2f);int start = 0;int end = 180;switch (location){case 0:y = boundingBox.Y +boundingBox.Height-(size / 2f);end = -180;break;case 90:x = boundingBox.X - (size / 2f);y = boundingBox.Y +(boundingBox.Height/2f)- (size / 2f);start = 90;end = -180;break;case 270:x = boundingBox.X +boundingBox.Width- (size / 2f);y = boundingBox.Y + (boundingBox.Height / 2f) - (size / 2f);start = 90;end = 180;break;}g.FillPie(notchFillBrush, x, y, size, size,start,end);}Pen dieOutlinePen = new Pen(Color.Black);private void drawDies(Graphics g, RectangleF boundingBox, int[,] data, SizeF dieSize){for (int x = 0; x < data.GetLength(0); x++){for (int y = 0; y < data.GetLength(1); y++){Color fill = Color.FromArgb(120,colors[data[x, y]]);PointF position = new PointF(boundingBox.X+(float)x * dieSize.Width,boundingBox.Y+(float)y*dieSize.Height);RectangleF die = new RectangleF(position, dieSize);g.FillRectangle(new SolidBrush(fill), die);g.DrawRectangle(dieOutlinePen, die.X,die.Y,die.Width,die.Height);}}}private bool interactive=false;public bool Interactive{get { return interactive; }set { interactive = value;registerEvents();}}private void registerEvents(){// Event to be registeredif (interactive){this.MouseClick += Wafermap_MouseClick;this.MouseMove += Wafermap_MouseMove;this.MouseDoubleClick += Wafermap_MouseDbClick;}}void Wafermap_MouseMove(object sender, MouseEventArgs e){// This one is going to be tricky// We need to calculate the die coordinates from screen coordinates// We have global vars boundingBox_ and dieSize_float x_coord=((float)e.X - boundingBox_.X) / dieSize_.Width;float y_coord = ((float)e.Y - boundingBox_.Y) / dieSize_.Height;int x = (int)Math.Floor(x_coord);int y = (int)Math.Floor(y_coord);try{dieEntered(x, y, dataset[x, y]);}catch (Exception){System.Diagnostics.Debug.WriteLine(DateTime.Now.ToString()+ ":确认在wafer区域移动..");}}public void Wafermap_MouseClick(object sender, MouseEventArgs e){// Basically the same as MouseMove, just a few other infos passedfloat x_coord = ((float)e.X - boundingBox_.X) / dieSize_.Width;float y_coord = ((float)e.Y - boundingBox_.Y) / dieSize_.Height;int x = (int)Math.Floor(x_coord);int y = (int)Math.Floor(y_coord);try{//dieClicked(x, y, dataset[x, y], e.Button);dieClicked(x, y, 0, e.Button);}catch (Exception ex){System.Diagnostics.Debug.WriteLine(DateTime.Now.ToString() + ":确认单击区域..");throw ex;}}public void Wafermap_MouseDbClick(object sender, MouseEventArgs e){// Basically the same as MouseMove, just a few other infos passedfloat x_coord = ((float)e.X - boundingBox_.X) / dieSize_.Width;float y_coord = ((float)e.Y - boundingBox_.Y) / dieSize_.Height;int x = (int)Math.Floor(x_coord);int y = (int)Math.Floor(y_coord);try{dieClicked(x, y, 2, e.Button);}catch (Exception ex){System.Diagnostics.Debug.WriteLine(DateTime.Now.ToString() + ":确认双击区域.");throw ex;}}// This method will get called if the mousepointer enters a diepublic virtual void dieEntered(int x, int y, int bincode){// updateDie(x, y, bincode);}// This method should get overridden if you want to reakt on clicks on a diepublic virtual void dieClicked(int x, int y, int bincode,MouseButtons btn){updateDie(x,y, bincode);}// This method should be used to change die coloring of a bin directly// This is needed to avoid redraws when not neccessary// The updated bins are filled with higher alpha to highlight thempublic void updateDie(int x, int y, int bincode){//  Color fill = Color.FromArgb(255, colors[bincode]);Color fill = colors[bincode];PointF position = new PointF(boundingBox_.X + (float)x * dieSize_.Width, boundingBox_.Y + (float)y * dieSize_.Height);RectangleF die = new RectangleF(position, dieSize_);Graphics g = this.CreateGraphics();// update clipping// Create graphics path.GraphicsPath clipPath = new GraphicsPath();clipPath.AddEllipse(boundingBox_);// Set clipping region to path.g.SetClip(clipPath, CombineMode.Replace);// Drawg.FillRectangle(new SolidBrush(fill), die);g.DrawRectangle(dieOutlinePen, die.X, die.Y, die.Width, die.Height);}}
}
构造函数注册点击事件:
public Wafermap(){zoom=1f;InitializeComponent();SetStyle(ControlStyles.ResizeRedraw, true);DoubleBuffered = true;setupDefaultColors();registerEvents();}点击双击事件绑定:
private void registerEvents(){// Event to be registeredif (interactive){this.MouseClick += Wafermap_MouseClick;this.MouseMove += Wafermap_MouseMove;this.MouseDoubleClick += Wafermap_MouseDbClick;}}SetInteractive(true);
激活事件注册功能
功能代码源码:
待更新。。。
这篇关于C#简单晶圆wafermapping显示示范demo的文章就介绍到这儿,希望我们推荐的文章对编程师们有所帮助!


