本文主要是介绍最简单的 UE 4 C++ 教程 —— 给 Actor 添加径向推力【十八】,希望对大家解决编程问题提供一定的参考价值,需要的开发者们随着小编来一起学习吧!
原教程是基于 UE 4.18,我是基于 UE 4.25】
英文原地址
接上一节教程,本教程非常有趣,我们将通过在设定范围内的所有物体上添加径向推力来模拟爆炸。
创建一个名为 AddRadialForce 的新角色。我们不需要对头文件做任何操作。下面是由虚幻生成的默认头文件。
AddRadialForce.h
#pragma once#include "CoreMinimal.h"
#include "GameFramework/Actor.h"
#include "AddRadialForce.generated.h"UCLASS()
class UNREALCPP_API AAddRadialForce : public AActor
{GENERATED_BODY()public:	// Sets default values for this actor's propertiesAAddRadialForce();protected:// Called when the game starts or when spawnedvirtual void BeginPlay() override;public:	// Called every framevirtual void Tick(float DeltaTime) override;};
为了在调试过程中提供帮助,让我们将 DrawDebugHelpers 头文件添加到代码中。
#include "AddRadialForce.h"
// add debug helpfers
#include "DrawDebugHelpers.h"
在这个例子中,我们将在 BeginPlay() 函数中执行所有的逻辑。我们想要收集我们范围内的所有命中结果,并从范围的扫描中获得结果。为此,我们将使用 TArray 跟踪重叠的 actor。
void AAddRadialForce::BeginPlay()
{Super::BeginPlay();// create tarray for hit resultsTArray<FHitResult> OutHits;// crate tarray for sweep actorsTArray<AActor*> SweepActors;}
接下来我们要声明 TArray 数组 OutHits 。我们希望扫描范围从 actor 的位置开始同时也从该位置结束,并让 CollisionShape 是一个 500 单位的球体。您可以使用 GetActorLocation() 来获取 actor 的位置,它返回一个向量。我们使用 FCollisionShape:: makephere (500.0f) 来创建一个CollisionShape。
// Called when the game starts or when spawned
void AAddRadialForce::BeginPlay()
{Super::BeginPlay();// create tarray for hit resultsTArray<FHitResult> OutHits;// get actor locationsFVector MyLocation = GetActorLocation();// start and end locations. The sphere will create the radial sweep.FVector Start = MyLocation;FVector End = MyLocation;// create a collision sphereFCollisionShape MyColSphere = FCollisionShape::MakeSphere(500.0f);}
为了可视化扫描的球体,我们将绘制一个调试球体。
// Called when the game starts or when spawned
void AAddRadialForce::BeginPlay()
{Super::BeginPlay();// create tarray for hit resultsTArray<FHitResult> OutHits;// get actor locationsFVector MyLocation = GetActorLocation();// start and end locations. The sphere will create the radial sweep.FVector Start = MyLocation;FVector End = MyLocation;// create a collision sphereFCollisionShape MyColSphere = FCollisionShape::MakeSphere(500.0f);// draw collision sphereDrawDebugSphere(GetWorld(), GetActorLocation(), MyColSphere.GetSphereRadius(), 50, FColor::Cyan, true);
}
接下来我们要检查我们的 actor 在我们 BeginPlay() 时是否击中了任何东西。每个 actor 都有GetWorld 功能。从 ,我们将使用从 GetWorld() 函数得到的 SweepMultiByChannel() 函数并对其设置上面刚创建的变量作为参数。这将返回一个 bool,指示是否有其他 actor 在该 actor 的范围内。
void AAddRadialForce::BeginPlay()
{Super::BeginPlay();// create tarray for hit resultsTArray<FHitResult> OutHits;// get actor locationsFVector MyLocation = GetActorLocation();// start and end locations. The sphere will create the radial sweep.FVector Start = MyLocation;FVector End = MyLocation;// create a collision sphereFCollisionShape MyColSphere = FCollisionShape::MakeSphere(500.0f);// draw collision sphereDrawDebugSphere(GetWorld(), GetActorLocation(), MyColSphere.GetSphereRadius(), 50, FColor::Cyan, true);// check if something got hit in the sweepbool isHit = GetWorld()->SweepMultiByChannel(OutHits, Start, End, FQuat::Identity, ECC_WorldStatic, MyColSphere);}
如果 isHit 为真,我们将通过遍历数组 OutHits ,并向每个成功 cast 的 actor 的根组件添加径向推力。
if (isHit){// loop through TArrayfor (auto& Hit : OutHits){UStaticMeshComponent* MeshComp = Cast<UStaticMeshComponent>((Hit.GetActor())->GetRootComponent());if (MeshComp){// alternivly you can use ERadialImpulseFalloff::RIF_Linear for the impulse to get linearly weaker as it gets further from origin.// set the float radius to 500 and the float strength to 2000.MeshComp->AddRadialImpulse(GetActorLocation(), 500.f, 2000.f, ERadialImpulseFalloff::RIF_Constant, true);}}}最终完整 cpp 代码如下
#include "AddRadialForce.h"
// add debug helpfers
#include "DrawDebugHelpers.h"// Sets default values
AAddRadialForce::AAddRadialForce()
{// Set this actor to call Tick() every frame.  You can turn this off to improve performance if you don't need it.PrimaryActorTick.bCanEverTick = true;}// Called when the game starts or when spawned
void AAddRadialForce::BeginPlay()
{Super::BeginPlay();// create tarray for hit resultsTArray<FHitResult> OutHits;// get actor locationsFVector MyLocation = GetActorLocation();// start and end locations. The sphere will create the radial sweep.FVector Start = MyLocation;FVector End = MyLocation;// create a collision sphereFCollisionShape MyColSphere = FCollisionShape::MakeSphere(500.0f);// draw collision sphereDrawDebugSphere(GetWorld(), GetActorLocation(), MyColSphere.GetSphereRadius(), 50, FColor::Cyan, true);// check if something got hit in the sweepbool isHit = GetWorld()->SweepMultiByChannel(OutHits, Start, End, FQuat::Identity, ECC_WorldStatic, MyColSphere);if (isHit){// loop through TArrayfor (auto& Hit : OutHits){UStaticMeshComponent* MeshComp = Cast<UStaticMeshComponent>((Hit.GetActor())->GetRootComponent());if (MeshComp){// alternivly you can use  ERadialImpulseFalloff::RIF_Linear for the impulse to get linearly weaker as it gets further from origin.// set the float radius to 500 and the float strength to 2000.MeshComp->AddRadialImpulse(GetActorLocation(), 500.f, 2000.f, ERadialImpulseFalloff::RIF_Constant, true);}}}}// Called every frame
void AAddRadialForce::Tick(float DeltaTime)
{Super::Tick(DeltaTime);}
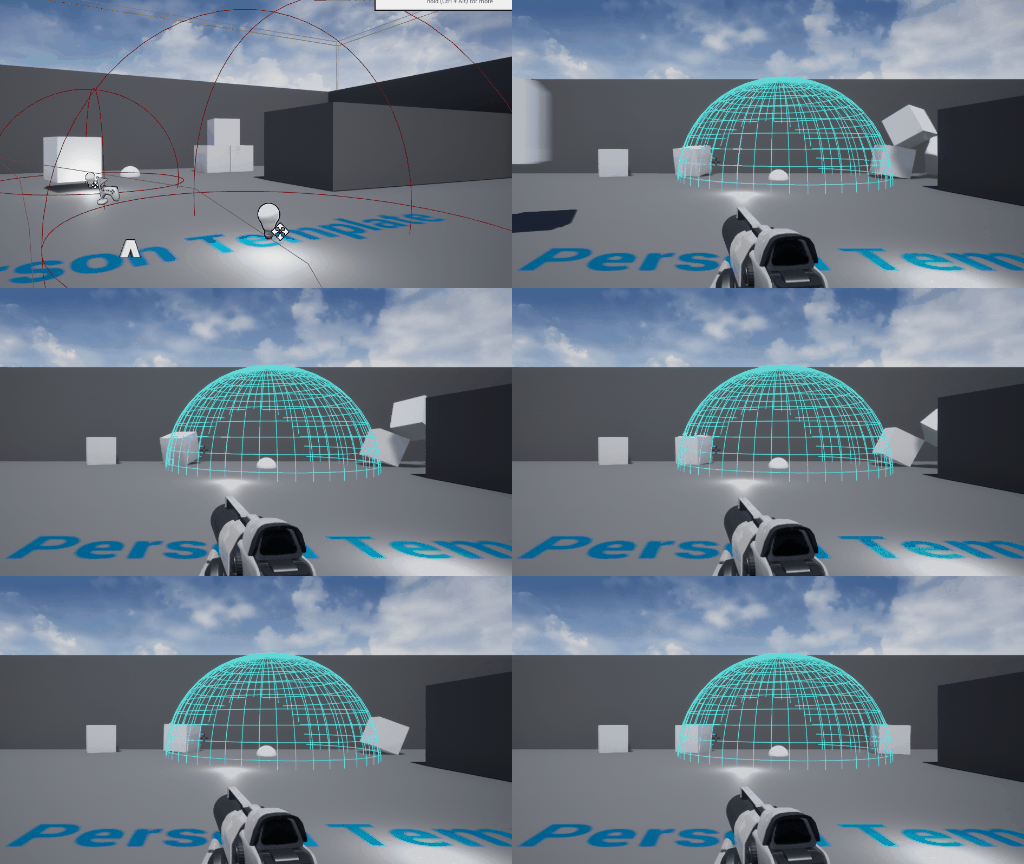
实际运行起来的效果图如下

这篇关于最简单的 UE 4 C++ 教程 —— 给 Actor 添加径向推力【十八】的文章就介绍到这儿,希望我们推荐的文章对编程师们有所帮助!


