本文主要是介绍FastDeploy在Windows平台上使用C++开发介绍,希望对大家解决编程问题提供一定的参考价值,需要的开发者们随着小编来一起学习吧!
1 FastDeploy库环境准备
1.1 预编译库安装
FastDeploy提供各平台预编译库,供开发者直接下载安装使用。当然FastDeploy编译也非常容易,开发者也可根据自身需求编译FastDeploy。
本文分为两部分:
- 1.GPU部署环境
- 2.CPU部署环境
1.1.1 GPU部署环境
环境要求
- CUDA >= 11.2
- cuDNN >= 8.0
- python >= 3.6
- OS: Linux(x64)/Windows 10(x64)
支持CPU和Nvidia GPU的部署,默认集成Paddle Inference、ONNX Runtime、OpenVINO以及TensorRT推理后端,Vision视觉模型模块,Text文本NLP模型模块
版本信息:
Paddle Inference:2.4-dev5
ONNXRuntime:1.12.0
OpenVINO:2022.2.0.dev20220829
TensorRT:8.5.2.2
C++ SDK安装
Release版本
| 平台 | 文件 | 说明 |
|---|---|---|
| Linux x64 | fastdeploy-linux-x64-gpu-1.0.7.tgz | g++ 8.2, CUDA 11.2, cuDNN 8.2编译产出 |
| Windows x64 | fastdeploy-win-x64-gpu-1.0.7.zip | Visual Studio 16 2019, CUDA 11.2, cuDNN 8.2编译产出 |
Develop版本(Nightly build)
| 平台 | 文件 | 说明 |
|---|---|---|
| Linux x64 | fastdeploy-linux-x64-gpu-0.0.0.tgz | g++ 8.2, CUDA 11.2, cuDNN 8.2编译产出 |
| Windows x64 | fastdeploy-win-x64-gpu-0.0.0.zip | Visual Studio 16 2019, CUDA 11.2, cuDNN 8.2编译产出 |
需要注意的是,使用的FastDeploy脚本的版本要与下载的版本一致,如果是SDK是Release建议FastDeploy库也选用Release。
1.1.2 CPU部署环境
1.2 自行编译C++ SDK
详见链接:打开学习
建议使用编译好的库,效率较高,少花时间。
以win10下编译简单讲解一下
Windows编译需要满足条件
- Windows 10/11 x64
- Visual Studio 2019
- cuda >= 11.2
- cudnn >= 8.2
注意:安装CUDA时需要勾选Visual Studio Integration, 或者手动将C:\Program Files\NVIDIA GPU Computing Toolkit\CUDA\v11.2\extras\visual_studio_integration\MSBuildExtensions\文件夹下的4个文件复制到C:\Program Files (x86)\Microsoft Visual Studio\2019\Community\MSBuild\Microsoft\VC\v160\BuildCustomizations\文件夹。否则执行cmake命令时可能会遇到No CUDA toolset found报错。
在Windows菜单中,找到x64 Native Tools Command Prompt for VS 2019打开,执行如下命令
git clone https://github.com/PaddlePaddle/FastDeploy.git
cd FastDeploy
mkdir build && cd build
cmake .. -G "Visual Studio 16 2019" -A x64 ^-DENABLE_ORT_BACKEND=ON ^-DENABLE_PADDLE_BACKEND=ON ^-DENABLE_OPENVINO_BACKEND=ON ^-DENABLE_TRT_BACKEND=OFF ^-DENABLE_VISION=ON ^-DENABLE_TEXT=OFF ^-DWITH_GPU=OFF ^-DTRT_DIRECTORY=D:\Paddle\TensorRT-8.4.1.5 ^-DCUDA_DIRECTORY=C:\Program Files\NVIDIA GPU Computing Toolkit\CUDA\v11.6 ^-DCMAKE_INSTALL_PREFIX=D:\Paddle\compiled_fastdeploy
% nuget restore  (please execute it when WITH_CSHARPAPI=ON to prepare dependencies in C#)
msbuild fastdeploy.sln /m /p:Configuration=Release /p:Platform=x64
msbuild INSTALL.vcxproj /m /p:Configuration=Release /p:Platform=x64
git clone https://github.com/PaddlePaddle/FastDeploy.git
cd FastDeploy
mkdir build && cd build
cmake .. -G "Visual Studio 16 2019" -A x64 ^-DENABLE_ORT_BACKEND=OFF ^-DENABLE_PADDLE_BACKEND=OFF ^-DENABLE_OPENVINO_BACKEND=ON ^-DENABLE_TRT_BACKEND=OFF ^-DENABLE_VISION=ON ^-DENABLE_TEXT=OFF ^-DWITH_GPU=OFF ^-DOPENCV_DIRECTORY=D:\bushu\opencv\build ^-DCMAKE_INSTALL_PREFIX=D:\fastdeploy_cpumsbuild fastdeploy.sln /m /p:Configuration=Release /p:Platform=x64
msbuild INSTALL.vcxproj /m /p:Configuration=Release /p:Platform=x64
编译完成后,即在CMAKE_INSTALL_PREFIX指定的目录下生成C++推理库
如您使用CMake GUI可参考文档Windows使用CMakeGUI + Visual Studio 2019 IDE编译
2 下载FastDeploy代码
FastDeploy库里面包含了许多代码示例,还有文档的讲解,强烈建议您下载。
git clone https://github.com/PaddlePaddle/FastDeploy
# 如果上面网站速度比较慢,也可以使用国内的Gitee下载
git clone https://gitee.com/paddlepaddle/FastDeploy
本示例中使用的是分割代码,C++代码的目录如下:
FastDeploy/ examples / vision / segmentation / paddleseg / semantic_segmentation / cpu-gpu /
这段代码一会需要拷贝到visual studio编译器中,提前准备好。
3 深度学习模型
您可以自己训练深度学习模型,这里使用预训练好的模型,模型下载地址为:
https://bj.bcebos.com/paddlehub/fastdeploy/PP_LiteSeg_B_STDC2_cityscapes_without_argmax_infer.tgz
测试图片下载地址为:
https://paddleseg.bj.bcebos.com/dygraph/demo/cityscapes_demo.png
创建Visual studio工程
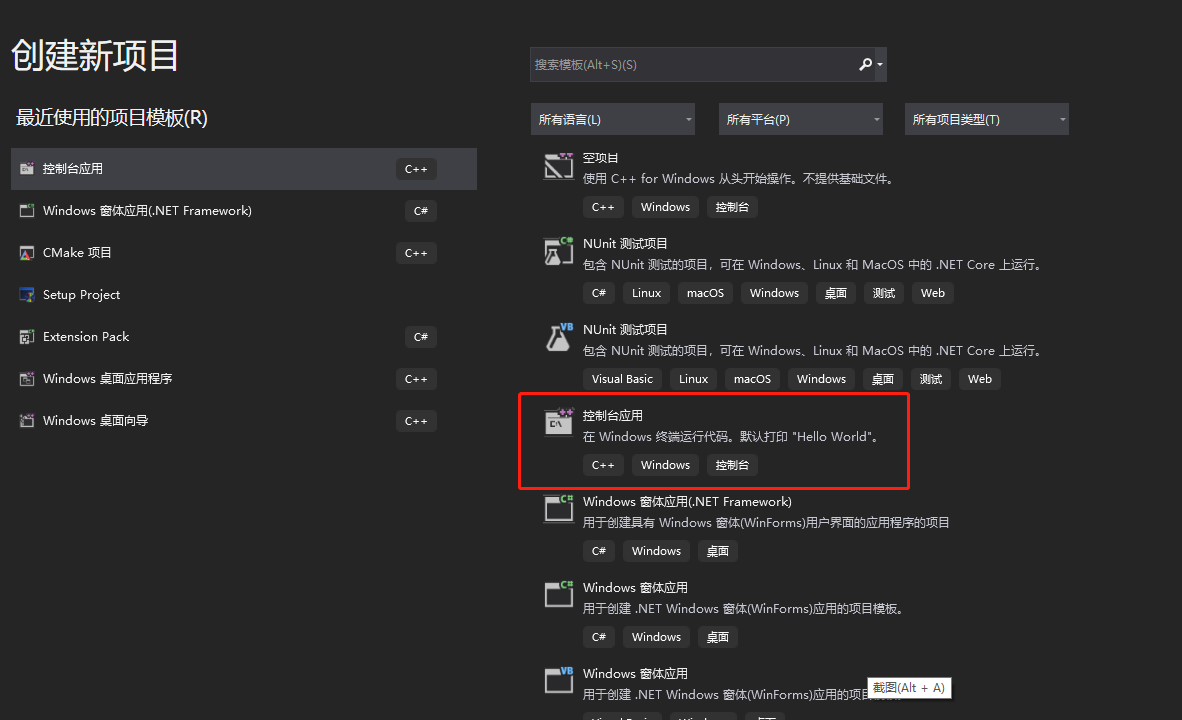
下载并安装Visual Studio 2019,点击新建,选择C++控制台应用,点击下一步。
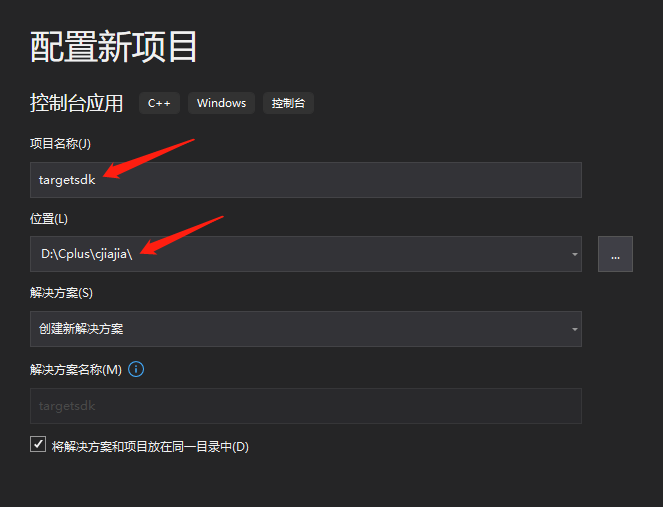
填入项目名称,选择项目的位置,点击创建。
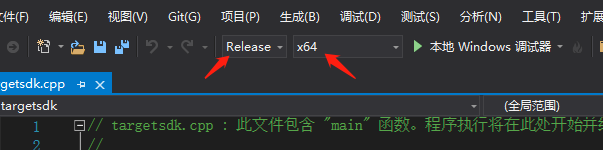
在上面状态栏将项目设置为Release,选择x64平台。
删除代码,将FastDeploy/ examples / vision / segmentation / paddleseg / semantic_segmentation / cpu-gpu /infer.cc中的代码拷贝到编辑器中,代码如下:
// Copyright (c) 2022 PaddlePaddle Authors. All Rights Reserved.
//
// Licensed under the Apache License, Version 2.0 (the "License");
// you may not use this file except in compliance with the License.
// You may obtain a copy of the License at
//
//     http://www.apache.org/licenses/LICENSE-2.0
//
// Unless required by applicable law or agreed to in writing, software
// distributed under the License is distributed on an "AS IS" BASIS,
// WITHOUT WARRANTIES OR CONDITIONS OF ANY KIND, either express or implied.
// See the License for the specific language governing permissions and
// limitations under the License.#include "fastdeploy/vision.h"#ifdef WIN32
const char sep = '\\';
#else
const char sep = '/';
#endifvoid CpuInfer(const std::string& model_dir, const std::string& image_file) {auto model_file = model_dir + sep + "model.pdmodel";auto params_file = model_dir + sep + "model.pdiparams";auto config_file = model_dir + sep + "deploy.yaml";auto option = fastdeploy::RuntimeOption();option.UseCpu();auto model = fastdeploy::vision::segmentation::PaddleSegModel(model_file, params_file, config_file, option);if (!model.Initialized()) {std::cerr << "Failed to initialize." << std::endl;return;}auto im = cv::imread(image_file);fastdeploy::vision::SegmentationResult res;if (!model.Predict(im, &res)) {std::cerr << "Failed to predict." << std::endl;return;}std::cout << res.Str() << std::endl;auto vis_im = fastdeploy::vision::VisSegmentation(im, res, 0.5);cv::imwrite("vis_result.jpg", vis_im);std::cout << "Visualized result saved in ./vis_result.jpg" << std::endl;
}void GpuInfer(const std::string& model_dir, const std::string& image_file) {auto model_file = model_dir + sep + "model.pdmodel";auto params_file = model_dir + sep + "model.pdiparams";auto config_file = model_dir + sep + "deploy.yaml";auto option = fastdeploy::RuntimeOption();option.UseGpu();auto model = fastdeploy::vision::segmentation::PaddleSegModel(model_file, params_file, config_file, option);if (!model.Initialized()) {std::cerr << "Failed to initialize." << std::endl;return;}auto im = cv::imread(image_file);fastdeploy::vision::SegmentationResult res;if (!model.Predict(im, &res)) {std::cerr << "Failed to predict." << std::endl;return;}std::cout << res.Str() << std::endl;auto vis_im = fastdeploy::vision::VisSegmentation(im, res, 0.5);cv::imwrite("vis_result.jpg", vis_im);std::cout << "Visualized result saved in ./vis_result.jpg" << std::endl;
}void TrtInfer(const std::string& model_dir, const std::string& image_file) {auto model_file = model_dir + sep + "model.pdmodel";auto params_file = model_dir + sep + "model.pdiparams";auto config_file = model_dir + sep + "deploy.yaml";auto option = fastdeploy::RuntimeOption();option.UseGpu();option.UseTrtBackend();// If use original Tensorrt, not Paddle-TensorRT,// comment the following two linesoption.EnablePaddleToTrt();option.EnablePaddleTrtCollectShape();option.SetTrtInputShape("x", {1, 3, 256, 256}, {1, 3, 1024, 1024},{1, 3, 2048, 2048});auto model = fastdeploy::vision::segmentation::PaddleSegModel(model_file, params_file, config_file, option);if (!model.Initialized()) {std::cerr << "Failed to initialize." << std::endl;return;}auto im = cv::imread(image_file);fastdeploy::vision::SegmentationResult res;if (!model.Predict(im, &res)) {std::cerr << "Failed to predict." << std::endl;return;}std::cout << res.Str() << std::endl;auto vis_im = fastdeploy::vision::VisSegmentation(im, res, 0.5);cv::imwrite("vis_result.jpg", vis_im);std::cout << "Visualized result saved in ./vis_result.jpg" << std::endl;
}int main(int argc, char* argv[]) {if (argc < 4) {std::cout<< "Usage: infer_demo path/to/model_dir path/to/image run_option, ""e.g ./infer_model ./ppseg_model_dir ./test.jpeg 0"<< std::endl;std::cout << "The data type of run_option is int, 0: run with cpu; 1: run ""with gpu; 2: run with gpu and use tensorrt backend; 3: run ""with kunlunxin."<< std::endl;return -1;}if (std::atoi(argv[3]) == 0) {CpuInfer(argv[1], argv[2]);} else if (std::atoi(argv[3]) == 1) {GpuInfer(argv[1], argv[2]);} else if (std::atoi(argv[3]) == 2) {TrtInfer(argv[1], argv[2]);}return 0;
}
设置
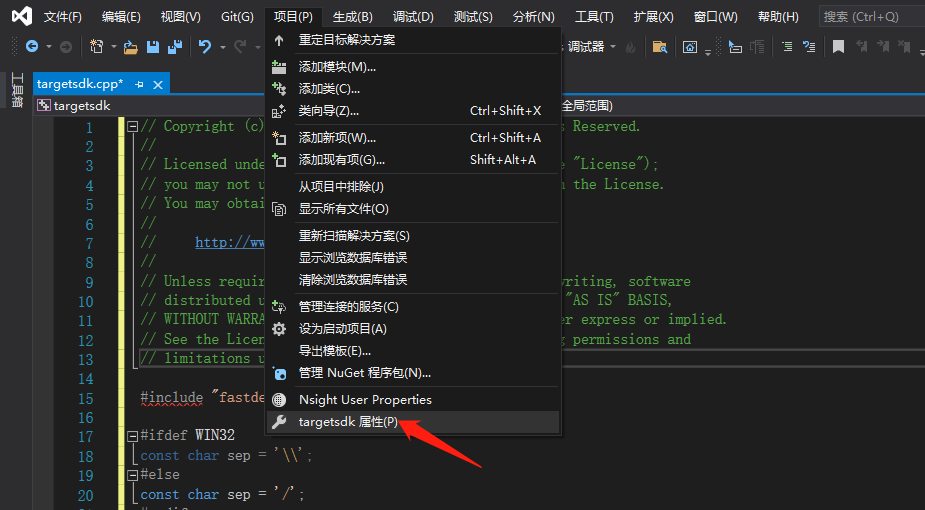
- 附件包含目录
在弹出来的属性页中选择:C/C++ —> 常规 —> 附加包含目录,然后在添加 fastdeploy 、 opencv 以及cuda的头文件路径。如:
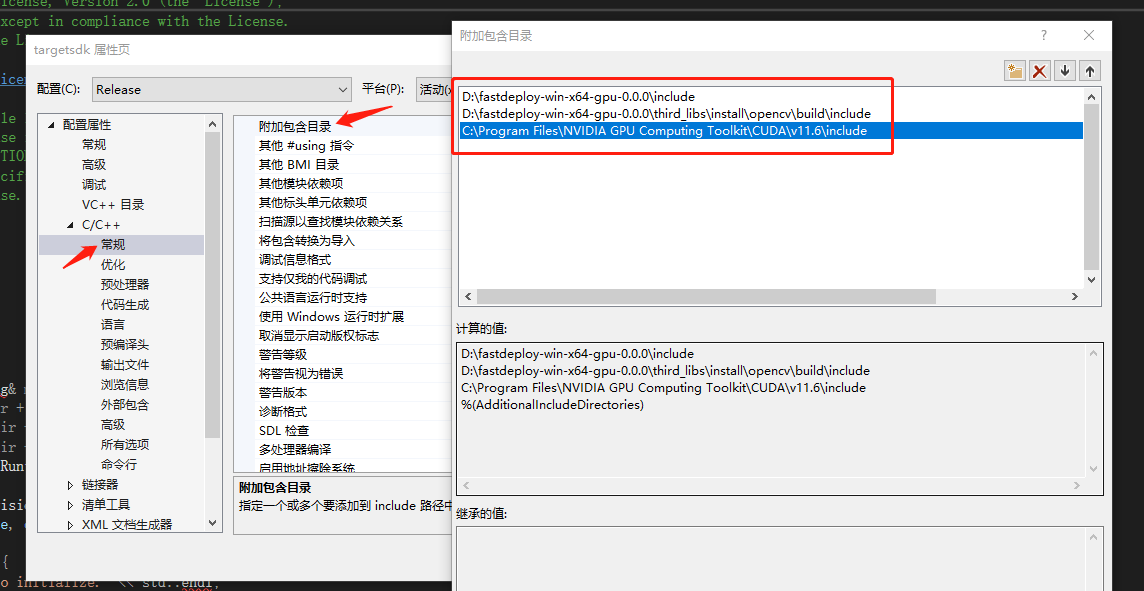
根据您存放的路径进行适当更改:
D:\fastdeploy-win-x64-gpu-0.0.0\include
D:\fastdeploy-win-x64-gpu-0.0.0\third_libs\install\opencv\build\include
C:\Program Files\NVIDIA GPU Computing Toolkit\CUDA\v11.6\include
- 配置lib路径
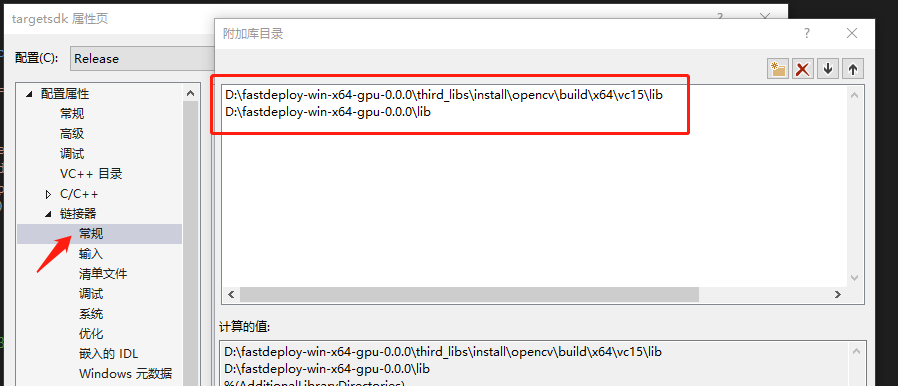
添加附加库目录如下:
D:\fastdeploy-win-x64-gpu-0.0.0\third_libs\install\opencv\build\x64\vc15\lib
D:\fastdeploy-win-x64-gpu-0.0.0\lib
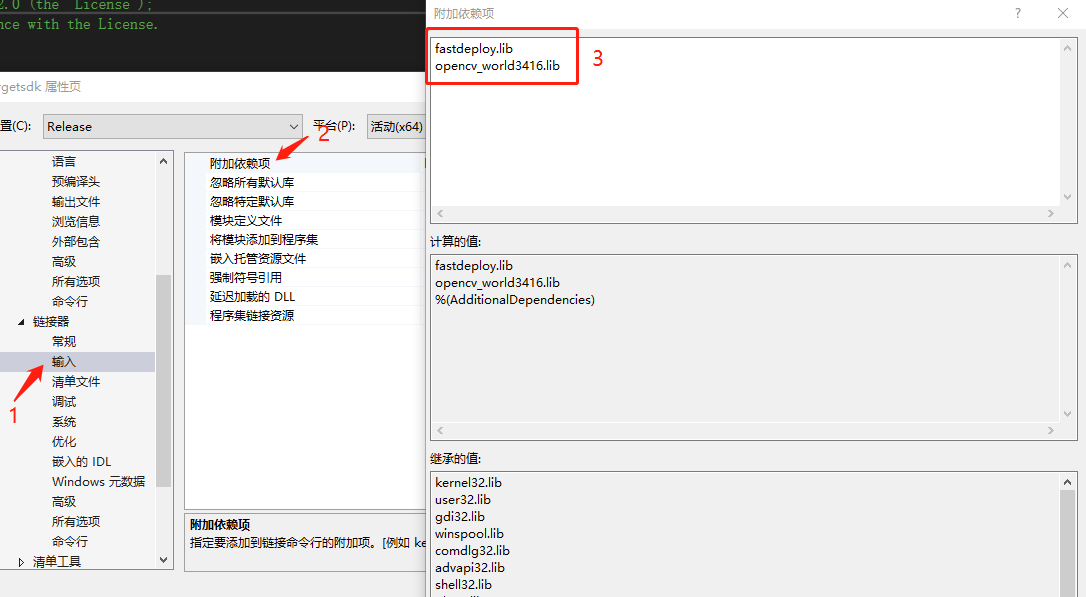
- 添加库文件
分别将
fastdeploy.lib
opencv_world3416.lib
添加到库文件中。
-
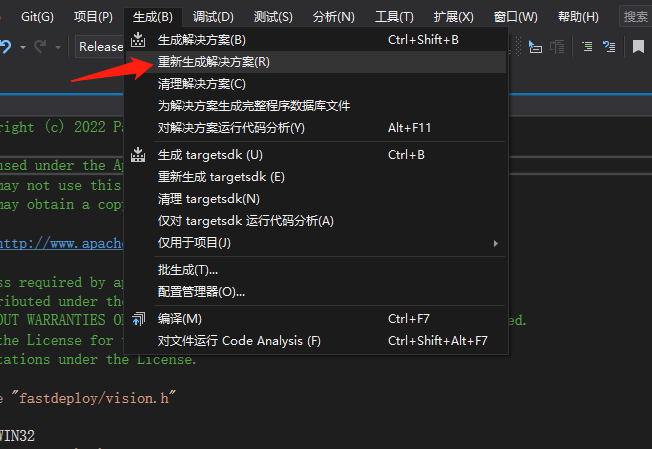
生成解决方案
可执行文件生成目录为:工程目录\x64\Release -
拷贝依赖的dll
对于版本高于0.2.1的SDK,提供了 fastdeploy_init.bat 工具来管理FastDeploy中所有的依赖库。可以通过该脚本工具查看(show)、拷贝(install) 和 设置(init and setup) SDK中所有的dll,方便用户快速完成运行时环境配置。
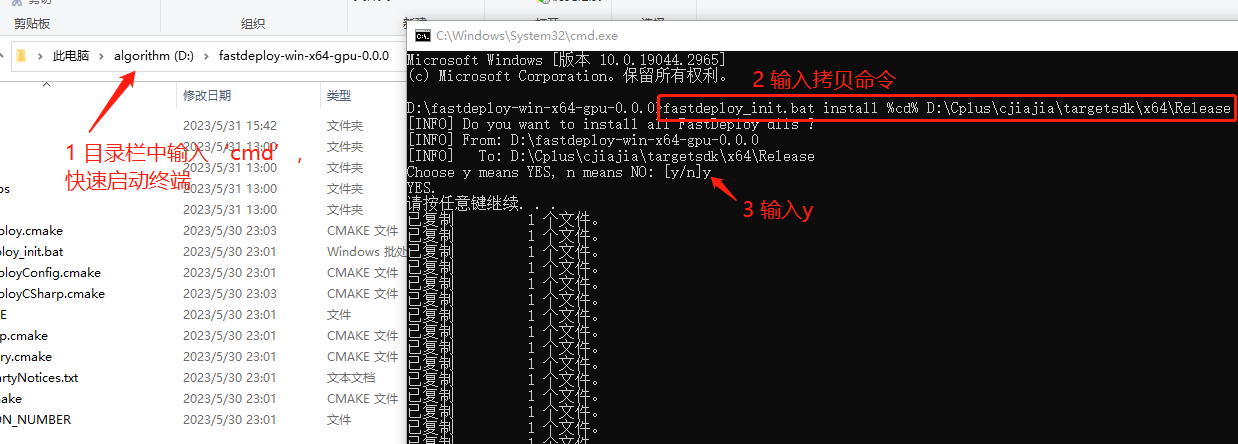
进入SDK的根目录,运行install命令,可以将SDK 中所有的 dll 安装到指定的目录(如exe所在的目录)。我们推荐这种方式来配置exe运行所需要的依赖库。比如,可以在SDK根目录下创建一个临时的bin目录备份所有的dll文件。以下命令中 %cd% 表示当前目录(SDK的根目录)。
# `install`为拷贝安装dll,`%cd%`表示当前目录,即SDK目录,`.\dir_to_copy`为拷贝的目录
D:\path-to-fastdeploy-sdk-dir>fastdeploy_init.bat install %cd% .\dir_to_copy
运行命令:
生成的项目地址为D:\Cplus\cjiajia\targetsdk\x64\Release
执行如下命令拷贝dll
fastdeploy_init.bat install %cd% D:\Cplus\cjiajia\targetsdk\x64\Release
6. 拷贝模型和测试图片
将下载好的模型和测试图片拷贝到生成的可执行文件目录。
需要注意的是,模型文件的子目录即为模型,如果直接下载可能还多了一层目录。
- 运行测试代码
# 运行部署示例
# CPU推理
./infer_demo PP_LiteSeg_B_STDC2_cityscapes_without_argmax_infer cityscapes_demo.png 0
# GPU推理
./infer_demo PP_LiteSeg_B_STDC2_cityscapes_without_argmax_infer cityscapes_demo.png 1
# GPU上Paddle-TensorRT推理
./infer_demo PP_LiteSeg_B_STDC2_cityscapes_without_argmax_infer cityscapes_demo.png 2
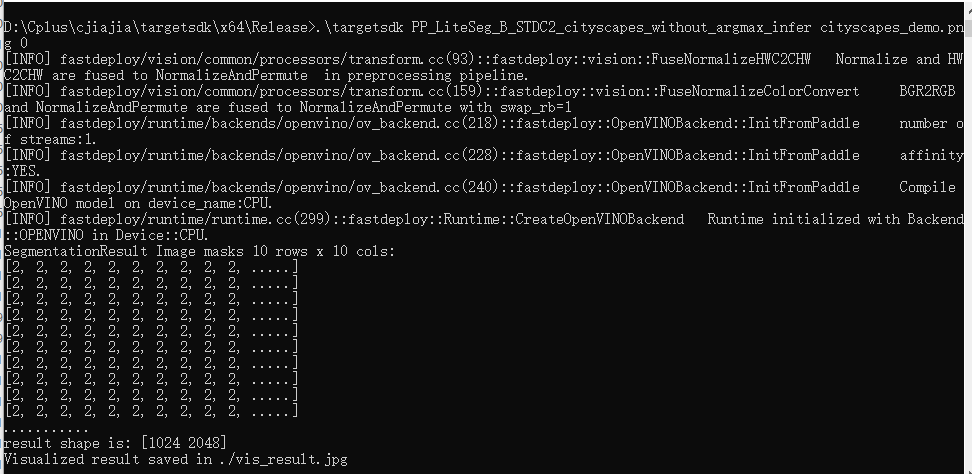
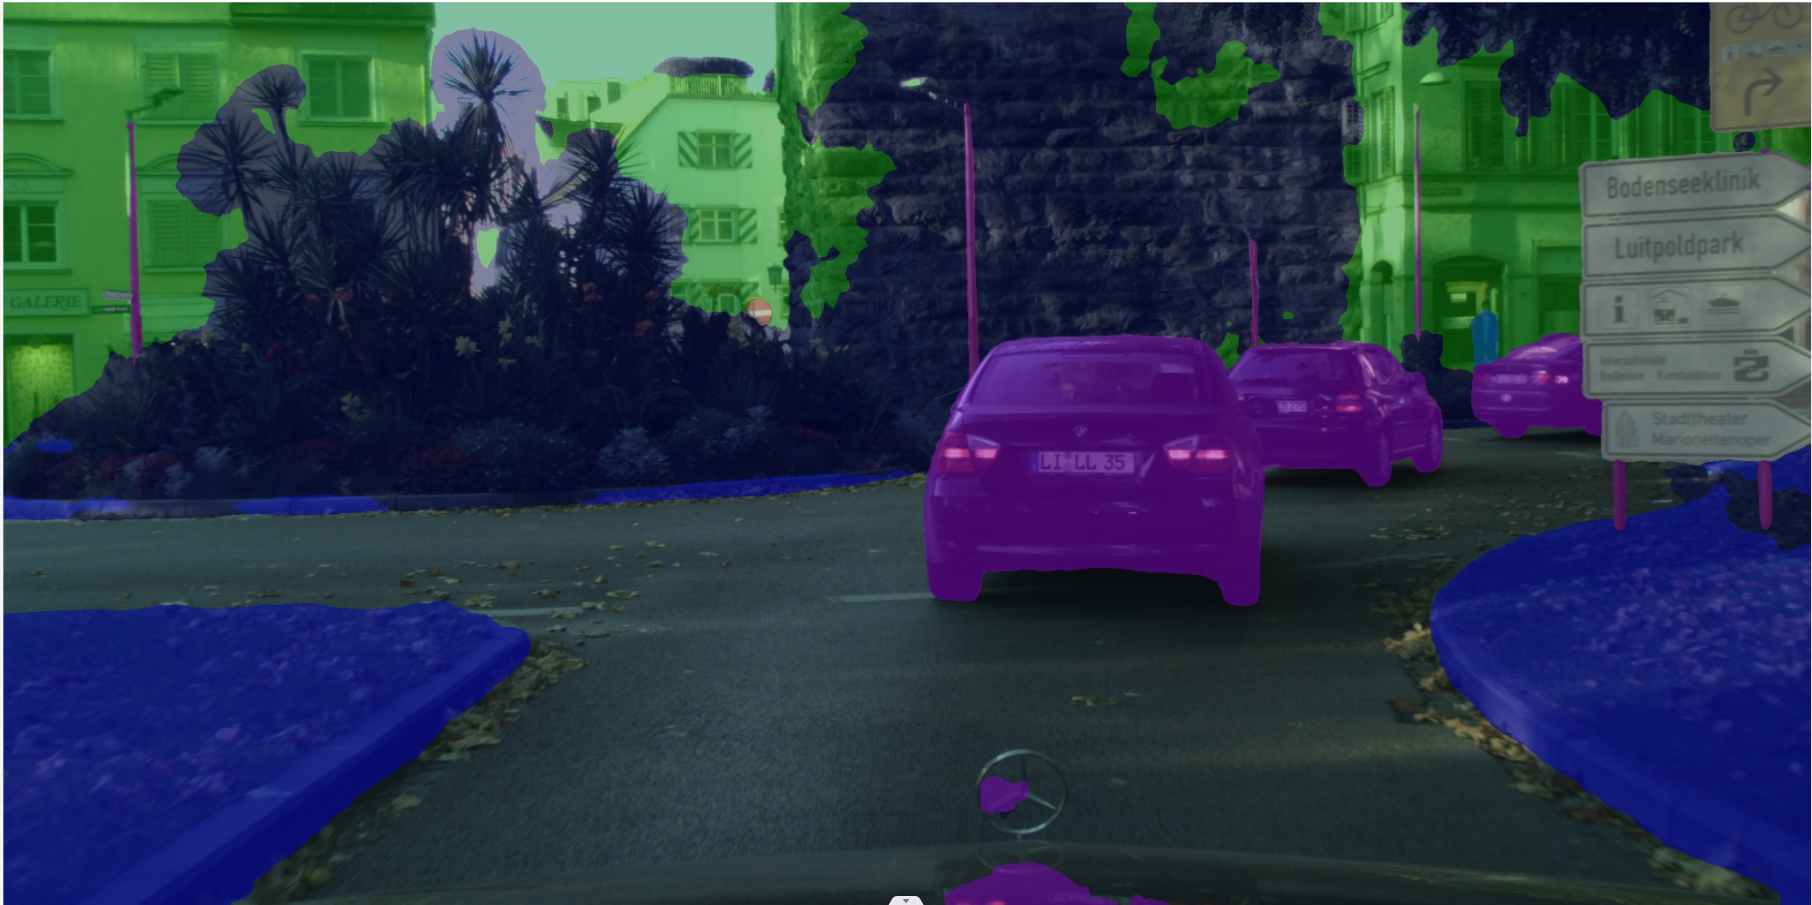
结果如vis_result.jpg所示。
8. 自定义代码
官方示例代码过于繁琐,可以使用如下自定义代码:
#include "fastdeploy/vision.h"#ifdef WIN32
const char sep = '\\';
#else
const char sep = '/';
#endifint infer(const std::string& model_dir, const std::string& image_file)
{
std::cout << "============开始测试==============" << std::endl;//模型初始化
auto model_file = model_dir + sep + "model.pdmodel";
auto params_file = model_dir + sep + "model.pdiparams";
auto config_file = model_dir + sep + "deploy.yaml";
auto option = fastdeploy::RuntimeOption();//设置后端
option.UseOpenVINOBackend();
option.SetCpuThreadNum(12);
//option.EnablePinnedMemory();
//option.SetOpenVINOShapeInfo({ {"x",{1,3,800,800}} });// 初始化模型
auto model = fastdeploy::vision::segmentation::PaddleSegModel(model_file, params_file, config_file, option);if (!model.Initialized()) {std::cerr << "初始化失败." << std::endl;return 0;
}
else {std::cout << "初始化成功" << std::endl;
}fastdeploy::vision::SegmentationResult res;
//读取样例图片进行预热
auto im = cv::imread("./5.jpg");
for (int count = 1; count <= 20; count++)
{model.Predict(im, &res);
}//计时
auto start = std::chrono::system_clock::now();
//读取测试图片
im = cv::imread(image_file);// 预测
if (!model.Predict(im, &res)) {std::cerr << "Failed to predict." << std::endl;return 0;
}std::cout << res.Str() << std::endl;
auto vis_im = fastdeploy::vision::VisSegmentation(im, res, 0.5);
cv::imwrite("vis_result.jpg", vis_im);
std::cout << "结果保存在 ./vis_result.jpg" << std::endl;//计时
auto end = std::chrono::system_clock::now();
auto duration = std::chrono::duration_cast<std::chrono::microseconds>(end - start);
double costTime = double(duration.count()) * std::chrono::microseconds::period::num / std::chrono::microseconds::period::den;printf("[%s][%d] 模型推理成功,耗费时间为: %lf s \n", __func__, __LINE__, costTime);
std::cout << "=============== 算法完成 ===============" << std::endl;}int main() {std::string model_dir = "./inference_model";  // 模型路径std::string image_file = "./5.jpg";  // 测速图片路径infer(model_dir, image_file);}
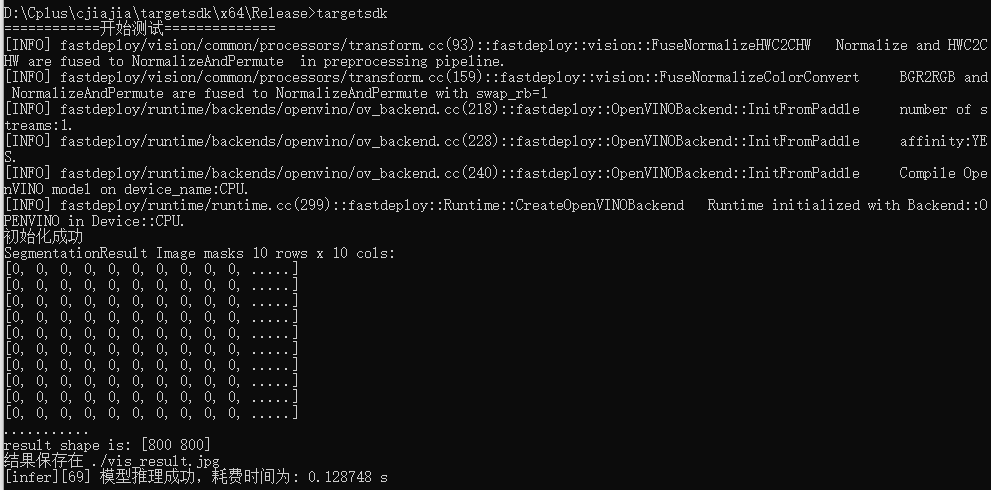
生成项目工程,需要注意的是,如果您选择重新生成解决方案,需要重新执行步骤5. 拷贝依赖的dll,因为每次重新生成工程后,plugins.xml都会被自动删除。
在终端中输入targetsdk运行代码
这篇关于FastDeploy在Windows平台上使用C++开发介绍的文章就介绍到这儿,希望我们推荐的文章对编程师们有所帮助!


