本文主要是介绍04_学习springdoc与oauth结合_简述,希望对大家解决编程问题提供一定的参考价值,需要的开发者们随着小编来一起学习吧!
文章目录
- 1 前言
- 2 基本结构
- 3 需要做的配置 简述
- 4 需要做的配置 详述
- 4.1 backend-api-gateway 的配置
- 4.1.1 application.yml
- 4.2 backend-film 的配置
- 4.2.1 pom.xml 引入依赖
- 4.2.2 application.yml 的配置
- 4.2.3 Spring Security 资源服务器的配置类 MyResourceServerConfig
- 4.2.4 Springdoc 配置类 MySpringdocConfig
- 4.3 backend-cinema 的配置
- 4.3.1 Feign JWT 中继的拦截器
- 4.4 auth-gateway 的配置
- 4.4.1 application.yml
- 4.5 auth-server 的配置
- 4.5.1 向数据库表 oauth2_registered_client 添加 client 信息
- 5 最后差点忘了😂 API 接口的 swagger 注解也需要修改
- 6 结语
1 前言
在上一篇文章 《03_学习springdoc与微服务结合_简述》 的基础上,我们可以更进一步,把 认证授权中心 Spring Authorization Server 也拽进来,让事情变得更复杂一些。😂也许事情总是会从简单到复杂。
本文的代码,是基于 Spring Boot 3.1.3、Spring Cloud 2022.0.4、Java 17 构建的。
2 基本结构
基本的组成部分 图示:

springdoc swagger ui 使用 oauth 认证和授权的流程,时序图:

3 需要做的配置 简述
如下图,一共有 5 块儿地方(红字所示),需要做配置:

简单说明一下,因为上一篇文章《03_学习springdoc与微服务结合_简述》已经对上图左侧 电影APP后台系统,做了 springdoc 与各个服务的整合,所以现在只剩下它们与 oauth2 的整合,以及 JWT 在 feign 的中继。
上图右侧的认证授权中心,是基于 spring-boot-starter-oauth2-authorization-server 写的,至于它如何配置,可以参考 Spring 官网 https://spring.io/projects/spring-authorization-server ,这里不再赘述。配置好之后,我们就只需要向数据库表添加 client 信息了。
注意,127.0.0.1 和 192.168.0.111 其实都是我本机 localhost,但是因为 eureka-server 和 spring authorization server 的缘故(🤣我也不知道具体什么原因),如果都用 127.0.0.1 ,则 spring authorization server 的反应会不正常。
4 需要做的配置 详述
有了上面的简述,接下来我们按照图片,把需要做的配置,一个个详细地说明。
4.1 backend-api-gateway 的配置
4.1.1 application.yml
springdoc:swagger-ui:urls:- name: backend-cinemaurl: /cateye/backend-cinema/v3/api-docs- name: backend-filmurl: /cateye/backend-film/v3/api-docs# 重点是下面这一句# 指定 swagger oauth2 授权码流程的 redirectUrl , 默认是 /swagger-ui/oauth2-redirect.html# 这里选择了 backend-film 服务的 swagger redirectUrl# 其实选择 backend-cinema 的也可以. 随便指定一个能访问的就行oauth2-redirect-url: http://127.0.0.1:8080/cateye/backend-film/swagger-ui/oauth2-redirect.htmlcache:disabled: true
4.2 backend-film 的配置
4.2.1 pom.xml 引入依赖
<!-- oauth 资源服务 -->
<dependency><groupId>org.springframework.boot</groupId><artifactId>spring-boot-starter-oauth2-resource-server</artifactId>
</dependency>
4.2.2 application.yml 的配置
spring:application:name: backend-filmsecurity:oauth2:# 授权服务器的 URLresourceserver:jwt:# 这个是 auth-gateway. 在 auth-server 里面,我设置的 issuer-uri 也是直接访问网关issuer-uri: http://192.168.0.111:9090# springdoc 的配置
springdoc:swagger-ui:oauth:# oauth 客户端的 clientId 和 clientSecretclientId: cat-eye-background-backend-film-swaggerclientSecret: passwordcache:disabled: true# 授权码流程的2个urloAuthFlow:authorizationUrl: ${spring.security.oauth2.resourceserver.jwt.issuer-uri}/oauth2/authorizetokenUrl: ${spring.security.oauth2.resourceserver.jwt.issuer-uri}/oauth2/token
4.2.3 Spring Security 资源服务器的配置类 MyResourceServerConfig
import org.springframework.context.annotation.Bean;
import org.springframework.context.annotation.Configuration;
import org.springframework.security.config.Customizer;
import org.springframework.security.config.annotation.web.builders.HttpSecurity;
import org.springframework.security.config.annotation.web.configuration.EnableWebSecurity;
import org.springframework.security.web.SecurityFilterChain;@EnableWebSecurity
@Configuration
public class MyResourceServerConfig {/*** 资源服务器的 spring security 过滤器链*/@Beanpublic SecurityFilterChain filterChain(HttpSecurity http) throws Exception {http.authorizeHttpRequests(authorize -> authorize// 放行 swagger 相关的页面.requestMatchers("/v3/api-docs/**", "/swagger-ui/**", "/swagger-ui.html").permitAll()// 演员相关的权限控制.requestMatchers("/actor/search-by-id/**","/actor/search-page").hasAuthority("SCOPE_actor.read").requestMatchers("/actor/**").hasAuthority("SCOPE_actor.write")// 影片相关的权限控制.requestMatchers("/film/search-by-id/**","/film/search-page","/film/search-batch").hasAuthority("SCOPE_film.read").requestMatchers("/film/**").hasAuthority("SCOPE_film.write")// 剩余的都至少需要认证.anyRequest().authenticated()).oauth2ResourceServer((oauth2) -> oauth2.jwt(Customizer.withDefaults()));return http.build();}
}
4.2.4 Springdoc 配置类 MySpringdocConfig
😂因为要配置的挺多,我们就使用注解形式的配置吧,写起来简洁明了一些。下面配置的是 OAuth2 的授权码流程。
import io.swagger.v3.oas.annotations.OpenAPIDefinition;
import io.swagger.v3.oas.annotations.enums.SecuritySchemeType;
import io.swagger.v3.oas.annotations.info.Info;
import io.swagger.v3.oas.annotations.info.License;
import io.swagger.v3.oas.annotations.security.*;
import io.swagger.v3.oas.models.Components;
import io.swagger.v3.oas.models.OpenAPI;
import io.swagger.v3.oas.models.security.Scopes;
import org.springframework.beans.factory.annotation.Value;
import org.springframework.context.annotation.Bean;
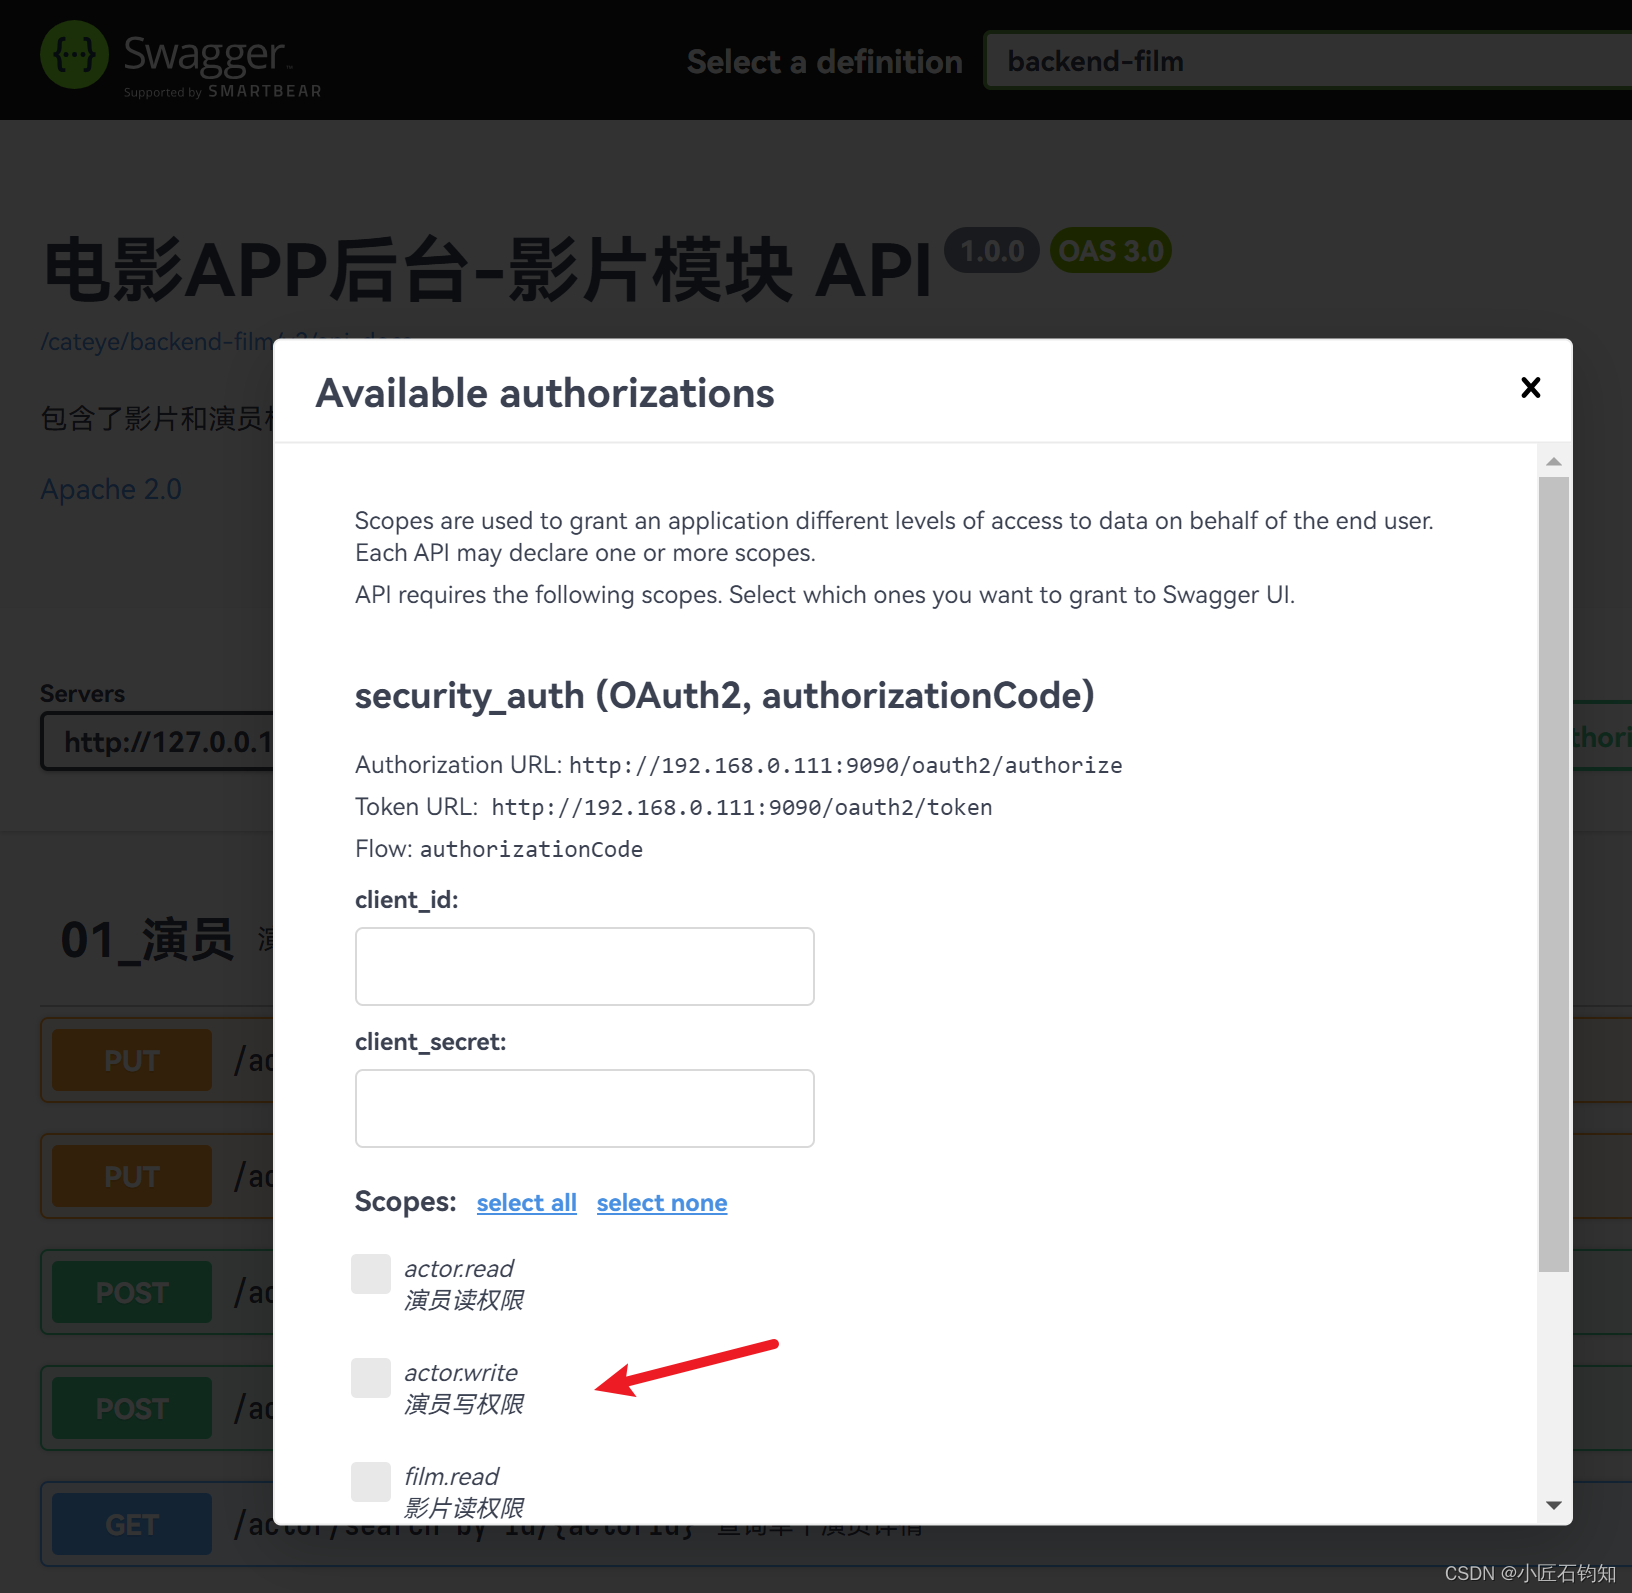
import org.springframework.context.annotation.Configuration;@OpenAPIDefinition(info = @Info(title = "电影APP后台-影片模块 API", version = "1.0.0", description = "包含了影片和演员相关的 API",license = @License(name = "Apache 2.0", url = "https://www.apache.org/licenses/LICENSE-2.0")))
@SecurityScheme(name = "security_auth", type = SecuritySchemeType.OAUTH2,flows = @OAuthFlows(authorizationCode = @OAuthFlow(authorizationUrl = "${springdoc.oAuthFlow.authorizationUrl}",tokenUrl = "${springdoc.oAuthFlow.tokenUrl}",scopes = {@OAuthScope(name = "actor.read", description = "演员读权限"),@OAuthScope(name = "actor.write", description = "演员写权限"),@OAuthScope(name = "film.read", description = "影片读权限"),@OAuthScope(name = "film.write", description = "影片写权限")})))
@Configuration
public class MySpringdocConfig {
}
效果如下图:
4.3 backend-cinema 的配置
4.3.1 Feign JWT 中继的拦截器
本文参考自 《JWT如何在OpenFeign调用中进行令牌中继》https://juejin.cn/post/7023246872147918885 ,把用到的代码拷贝如下:
import feign.RequestInterceptor;
import feign.RequestTemplate;
import org.springframework.http.HttpHeaders;
import org.springframework.stereotype.Component;
import org.springframework.web.context.request.RequestContextHolder;
import org.springframework.web.context.request.ServletRequestAttributes;import java.util.Objects;
import java.util.regex.Matcher;
import java.util.regex.Pattern;@Component
public class FeignBearerTokenRequestInterceptor implements RequestInterceptor {private static final Pattern BEARER_TOKEN_HEADER_PATTERN = Pattern.compile("^Bearer (?<token>[a-zA-Z0-9-._~+/]+=*)$",Pattern.CASE_INSENSITIVE);@Overridepublic void apply(RequestTemplate template) {final String authorization = HttpHeaders.AUTHORIZATION;ServletRequestAttributes requestAttributes = (ServletRequestAttributes) RequestContextHolder.getRequestAttributes();if (Objects.nonNull(requestAttributes)) {String authorizationHeader = requestAttributes.getRequest().getHeader(HttpHeaders.AUTHORIZATION);Matcher matcher = BEARER_TOKEN_HEADER_PATTERN.matcher(authorizationHeader);if (matcher.matches()) {// 清除token头 避免传染template.header(authorization);template.header(authorization, authorizationHeader);}}}
}
4.4 auth-gateway 的配置
4.4.1 application.yml
spring:application:name: auth-gatewaycloud:gateway:# CORS配置globalcors:cors-configurations:'[/**]':allowedOrigins: "*"allowedMethods:- GET- HEAD- POST- PUT- DELETE- TRACE- OPTIONS- PATCHallowedHeaders: "*"
4.5 auth-server 的配置
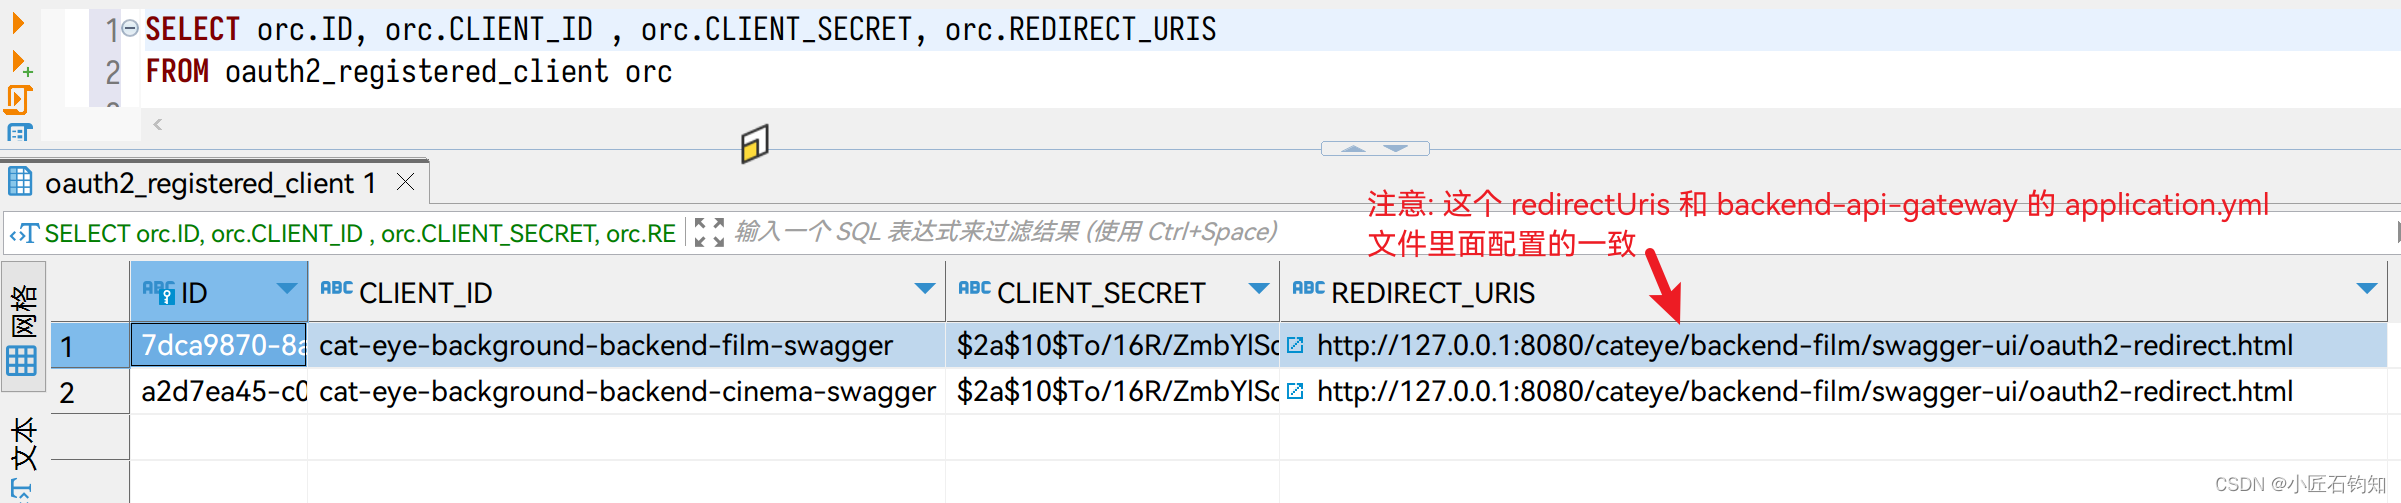
4.5.1 向数据库表 oauth2_registered_client 添加 client 信息
如下图:
可以在 auth-server 的 test 类里面,通过代码 insert 一行 client 信息,如下:
import org.junit.jupiter.api.Assertions;
import org.junit.jupiter.api.Test;
import org.mariadb.jdbc.MariaDbDataSource;
import org.springframework.jdbc.core.JdbcTemplate;
import org.springframework.security.oauth2.core.AuthorizationGrantType;
import org.springframework.security.oauth2.core.ClientAuthenticationMethod;
import org.springframework.security.oauth2.core.oidc.OidcScopes;
import org.springframework.security.oauth2.server.authorization.client.JdbcRegisteredClientRepository;
import org.springframework.security.oauth2.server.authorization.client.RegisteredClient;import java.sql.SQLException;
import java.util.UUID;public class SecurityTest {@Testpublic void addRegisteredClient() throws SQLException {MariaDbDataSource dataSource = new MariaDbDataSource();dataSource.setUrl("jdbc:mariadb://192.168.56.1:3306/cateye?autoReconnect=true&allowMultiQueries=true");dataSource.setUser("sjzadmin");dataSource.setPassword("P_sjz123");JdbcTemplate jdbcTemplate = new JdbcTemplate(dataSource);JdbcRegisteredClientRepository repository = new JdbcRegisteredClientRepository(jdbcTemplate);RegisteredClient client = RegisteredClient.withId(UUID.randomUUID().toString()).clientId("cat-eye-background-backend-cinema-swagger")// 注意 密码不能重复, 所以可以稍稍修改下密码, 然后再直接 SQL 改回来.clientSecret("1$2a$10$To/16R/ZmbYlSqvpb9G2OOwZPrGO7VC52WLQUPtVMciymzujN/s4i")// 注意 swagger 的 client_id client_secret 是通过 POST 请求的请求体过来的// 而不是在 HTTP Basic 里面, 所以下面要用 CLIENT_SECRET_POST.clientAuthenticationMethod(ClientAuthenticationMethod.CLIENT_SECRET_POST).authorizationGrantType(AuthorizationGrantType.AUTHORIZATION_CODE).authorizationGrantType(AuthorizationGrantType.REFRESH_TOKEN).authorizationGrantType(AuthorizationGrantType.CLIENT_CREDENTIALS).redirectUri("http://127.0.0.1:8080/cateye/backend-film/swagger-ui/oauth2-redirect.html").scope(OidcScopes.OPENID).scope(OidcScopes.PROFILE).scope("movie.hall.read").scope("movie.hall.write").scope("film.read").build();repository.save(client);RegisteredClient dbClient = repository.findByClientId("cat-eye-background-backend-cinema-swagger");Assertions.assertNotNull(dbClient);}
}
5 最后差点忘了😂 API 接口的 swagger 注解也需要修改
@Tag(name = "02_影片", description = "影片 API")
@ApiResponses(@ApiResponse(responseCode = "200", description = "接口请求成功"))
public interface FilmApi {// 注意,接口的 Operation 注解里面要加 security 属性// 其 name 就是 4.2.4 小节 MySpringdocConfig 类里面定义的// @SecurityScheme(name = "security_auth")@Operation(summary = "分页查询影片", security = @SecurityRequirement(name = "security_auth"))@RequestMapping(value = "/film/search-page", method = RequestMethod.POST, produces = MediaType.APPLICATION_JSON_VALUE)JsonResult<PageInfo<FilmBriefResp>> searchPage(@Valid @RequestBody PageReq<FilmSearchPageReq> pageReq);
}
6 结语
因本文涉及的代码是学习用的小项目中的代码,而生产环境可能更加复杂吧,所以本文仅供参考😁
感谢阅读~
这篇关于04_学习springdoc与oauth结合_简述的文章就介绍到这儿,希望我们推荐的文章对编程师们有所帮助!


