本文主要是介绍logicFlow 流程图编辑工具使用及开源地址,希望对大家解决编程问题提供一定的参考价值,需要的开发者们随着小编来一起学习吧!
一、工具介绍
LogicFlow 是一款流程图编辑框架,提供了一系列流程图交互、编辑所必需的功能和灵活的节点自定义、插件等拓展机制。LogicFlow 支持前端研发自定义开发各种逻辑编排场景,如流程图、ER 图、BPMN 流程等。在工作审批配置、机器人逻辑编排、无代码平台流程配置都有较好的应用。
更多资料请查看LogicFlow 系列文章
二、vue3 + vite + tsx 基本使用
1、插件引入
npm install @logicflow/core
npm install @logicflow/extension
2、页面使用
import LogicFlow from "@logicflow/core";
import "@logicflow/core/dist/style/index.css";const lf = new LogicFlow({container: document.querySelector("#app"),grid: true,
});lf.render({nodes: [{id: "1",type: "rect",x: 100,y: 100,text: "节点1",},{id: "2",type: "circle",x: 300,y: 200,text: "节点2",},],edges: [{sourceNodeId: "1",targetNodeId: "2",type: "polyline",text: "连线",},],
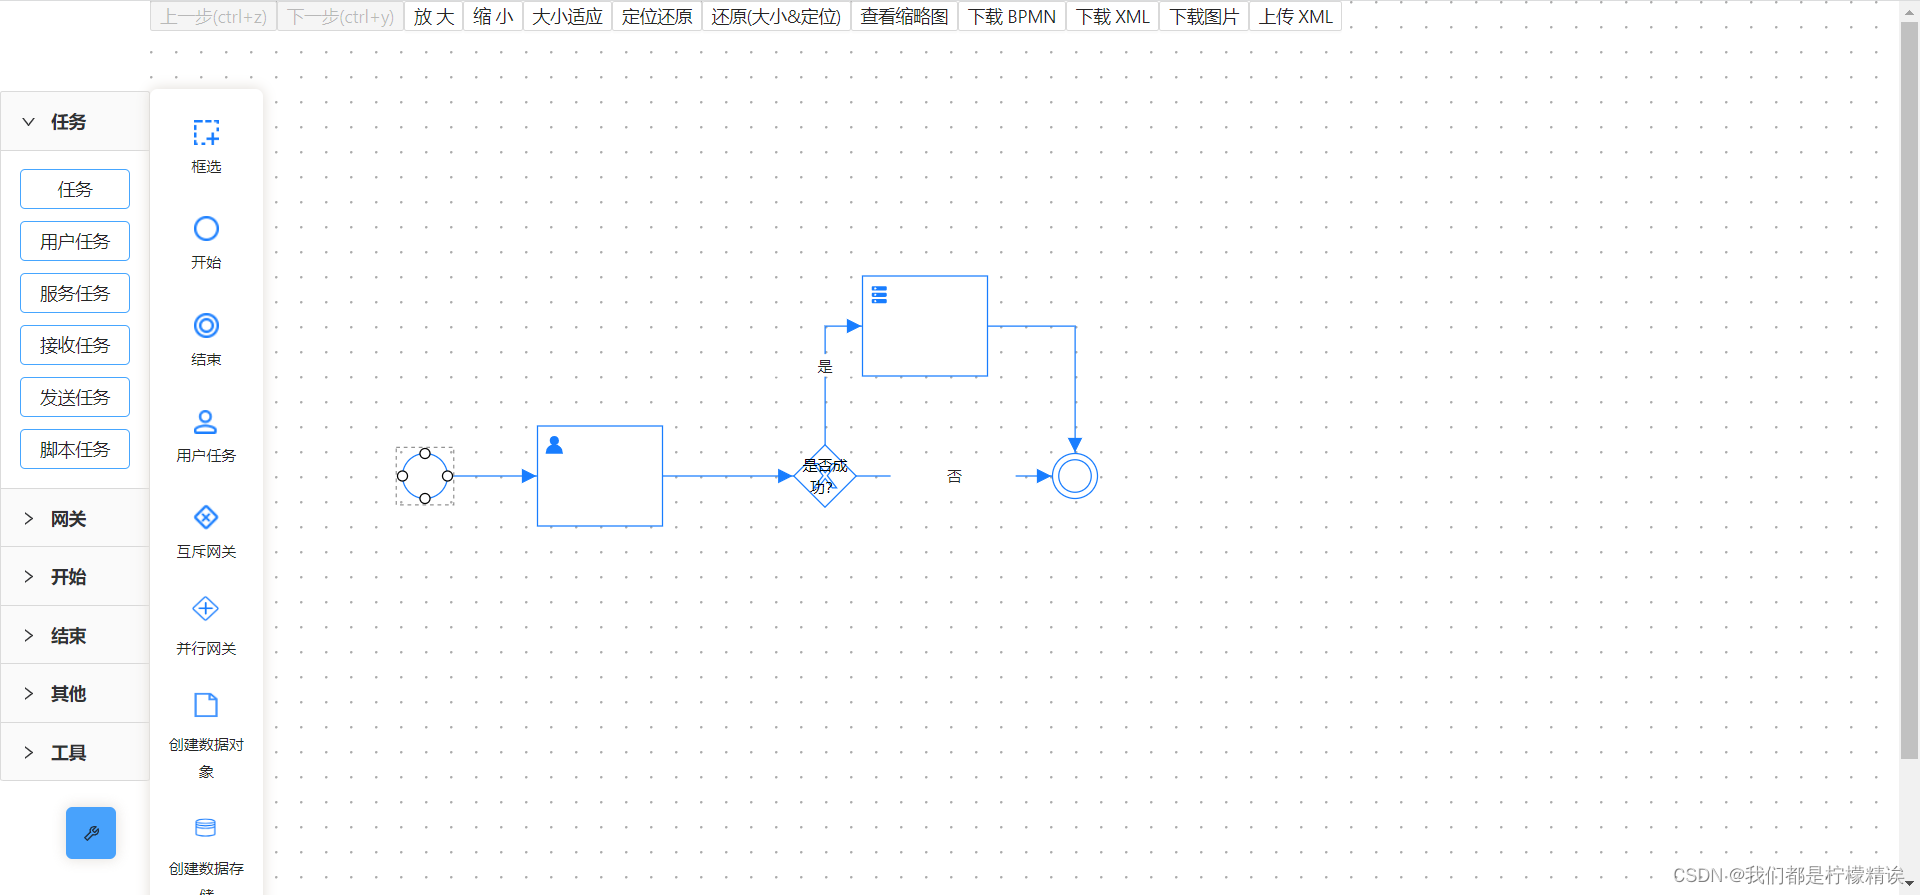
});三、使用 bpmn 元素
1、
2、
四、自定义节点
1、基于基本节点的重新自定义
如下图,如果需要重新开发任务节点、或者新增一个并行网关,就需要去重新定义新节点
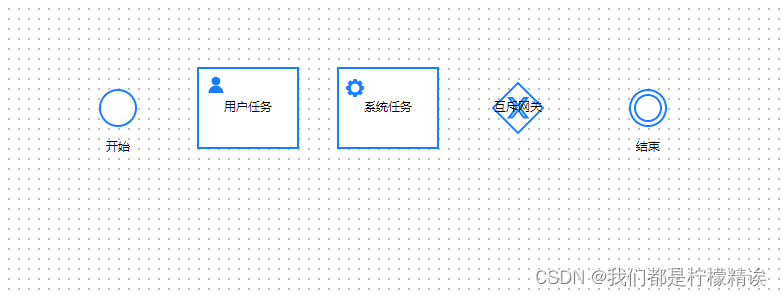
(1)自定义用户任务(rect)
// eslint-disable-next-line max-classes-per-file
import Ids from 'ids'
// eslint-disable-next-line max-classes-per-file
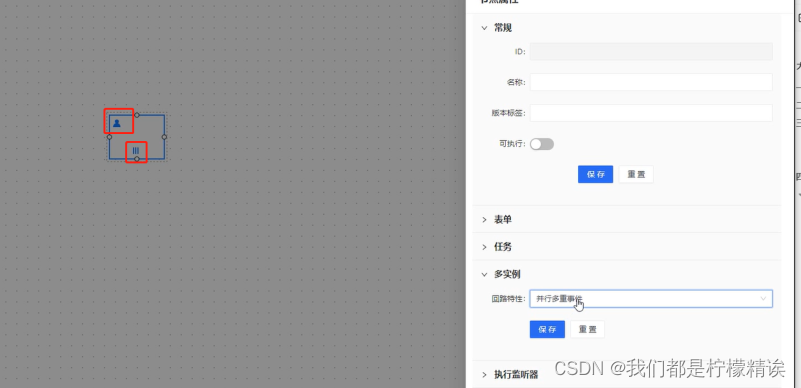
export default function registerUserTask(lf: any) {const NODE_COLOR = '#187dff'// 多实例展示const matterOptions = {// 循环事件circleMatter:'M512.272 139.637V0L326.09 186.182l186.182 186.181V232.728c153.6 0 279.272 125.673 279.272 279.272 0 46.545-13.963 93.09-32.582 130.328l69.818 69.817c32.582-60.508 55.854-125.673 55.854-200.145 0.001-204.8-167.562-372.363-372.362-372.363z m0 651.635c-153.6 0-279.273-125.673-279.273-279.272 0-46.546 13.964-93.09 32.583-130.328l-69.818-69.817C163.182 372.363 139.91 437.528 139.91 512c0 204.8 167.563 372.363 372.363 372.363V1024l186.182-186.182-186.182-186.181v139.635z',// 并行多重事件parallelMatter:'M256 174.08v614.4h102.4v-614.4H256z m204.8 0v614.4h102.4v-614.4H460.8z m204.8 0v614.4h102.4v-614.4H665.6z',// 时序多重事件timingMatter:'M204.8 225.28v102.4h614.4v-102.4H204.8z m0 204.8v102.4h614.4v-102.4H204.8z m0 204.8v102.4h614.4v-102.4H204.8z',}const ids = new Ids([32, 32, 1])lf.register('bpmn:userTask', ({ RectNode, RectNodeModel, h }) => {class View extends RectNode {getIconShape() {const { model } = this.propsconst { x, y, width, height } = modelconst { instanceType } = model.getProperties()const type = matterOptions[instanceType]return [// 左上角svg图标h('svg',{x: x - width / 2 + 5,y: y - height / 2 + 5,width: 20,height: 20,viewBox: '0 0 1222 1024',},h('path', {fill: NODE_COLOR,d: 'M892.8 737.122c-20.8-49.2-50.6-93.4-88.5-131.3-37.9-37.9-82.1-67.7-131.3-88.5-11-4.7-22.2-8.8-33.5-12.5 63.3-40.6 105.2-111.6 105.2-192.3 0-126.1-102.2-228.3-228.3-228.3s-228.5 102.1-228.5 228.2c0 79.6 40.7 149.6 102.4 190.5-13.3 4.1-26.4 8.9-39.3 14.3-49.2 20.8-93.4 50.6-131.3 88.5-37.9 37.9-67.7 82.1-88.5 131.3-21.6 51-32.5 105.1-32.5 160.9v48H925.3v-48c0-55.7-11-109.8-32.5-160.8z',})),// 底部中间svg图标h('svg',{x: x - width / 2 + 38,y: y + height / 2 - 27,width: 25,height: 25,viewBox: '0 0 1274 1024',},h('path', {fill: NODE_COLOR,d: type,})),]}getShape() {const { model } = this.propsconst { x, y, width, height, radius } = modelconst style = model.getNodeStyle()return h('g', {}, [h('rect', {...style,x: x - width / 2,y: y - height / 2,rx: radius,ry: radius,width,height,}),...this.getIconShape(),])}}class Model extends RectNodeModel {constructor(data, graphModel) {// 修改自定义节点idif (!data.id) data.id = `UserTask_${ids.next()}`data.text = {value: (data.text && data.text.value) || '',x: data.x,y: data.y + 50,}super(data, graphModel)}initNodeData(data) {super.initNodeData(data)const length = 80this.points = [[0, 0],[length + 20, 0],[length + 20, length],[0, length],]}// 自定义锚点样式getAnchorStyle() {const style = super.getAnchorStyle()style.hover.r = 8style.hover.fill = 'rgb(24, 125, 255)'style.hover.stroke = 'rgb(24, 125, 255)'return style}getNodeStyle() {const style = super.getNodeStyle()style.stroke = NODE_COLORreturn style}}return {view: View,model: Model,}})
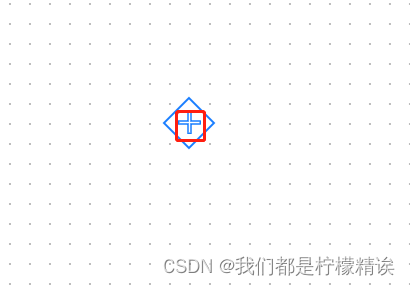
}(2)自定义并行网关(polygon)
// eslint-disable-next-line max-classes-per-file
import Ids from 'ids'// eslint-disable-next-line max-classes-per-file
const NODE_COLOR: string = '#187dff'
export default function registerParallelGateway(lf: any) {const ids = new Ids([32, 32, 1])lf.register('bpmn:parallelGateway',({PolygonNode,PolygonNodeModel,h,}: {PolygonNode: anyPolygonNodeModel: anyh: any}) => {// 继承 logicFLow的多边形节点class Node extends PolygonNode {// eslint-disable-next-line class-methods-use-thisgetIconShape() {// h方法是 LogicFlow 对外暴露的渲染函数return h('svg',{x: 14,y: 13,width: 23,height: 23,viewBox: '0 0 1024 1024',},h('path', {fill: NODE_COLOR,d: 'M1024 592V432c0-8.8-7.2-16-16-16H624c-8.8 0-16-7.2-16-16V16c0-8.8-7.2-16-16-16H432c-8.8 0-16 7.2-16 16v384c0 8.8-7.2 16-16 16H16c-8.8 0-16 7.2-16 16v160c0 8.8 7.2 16 16 16h384c8.8 0 16 7.2 16 16v384c0 8.8 7.2 16 16 16h160c8.8 0 16-7.2 16-16V624c0-8.8 7.2-16 16-16h384c8.8 0 16-7.2 16-16zM536 960h-48c-4.4 0-8-3.6-8-8V560c0-8.8-7.2-16-16-16H72c-4.4 0-8-3.6-8-8v-48c0-4.4 3.6-8 8-8h392c8.8 0 16-7.2 16-16V72c0-4.4 3.6-8 8-8h48c4.4 0 8 3.6 8 8v392c0 8.8 7.2 16 16 16h392c4.4 0 8 3.6 8 8v48c0 4.4-3.6 8-8 8H560c-8.8 0-16 7.2-16 16v392c0 4.4-3.6 8-8 8z',}))}getShape() {const { model } = this.propsconst { width, height, x, y, points } = modelconst { fill, fillOpacity, strokeWidth, stroke, strokeOpacity } =model.getNodeStyle()const transform = `matrix(1 0 0 1 ${x - width / 2} ${y - height / 2})`const pointsPath = points.map((point: any[]) => point.join(',')).join(' ')return h('g', { transform }, [h('polygon', {points: pointsPath,fill,stroke,strokeWidth,strokeOpacity,fillOpacity,}),this.getIconShape(),])}}class Model extends PolygonNodeModel {constructor(data: any, graphModel: any) {// 重写自定义节点 id 的生成规则if (!data.id) {data.id = `Gateway_${ids.next()}`}data.text = {value: (data.text && data.text.value) || '',x: data.x,y: data.y + 50,}super(data, graphModel)const length = 25this.points = [[length, 0],[length * 2, length],[length, length * 2],[0, length],]}getNodeStyle() {const style = super.getNodeStyle()style.stroke = NODE_COLORreturn style}}return {view: Node,model: Model,}})
}
2、基于图标的自定义的节点
(1)SVG

// eslint-disable-next-line max-classes-per-file
import Ids from 'ids'
// eslint-disable-next-line max-classes-per-file
export default function registerDataSave(lf: any) {const NODE_COLOR = '#187dff'const ids = new Ids([32, 32, 1])lf.register('bpmn:dataSave', ({ RectNode, RectNodeModel, h }) => {class View extends RectNode {getIconShape() {const { model } = this.propsconst { x, y, width, height } = modelreturn [h('svg',{x: x - width / 2,y: y - height / 2,width: 70,height: 74,viewBox: '200 0 1000 1200', // 走向 左↑ 右↓,上内边距,缩小,上内边距↑},h('path', {fill: NODE_COLOR,d: "M512 142.336c-80.896 0-161.792 7.168-224.256 20.48-31.744 7.168-59.392 16.384-80.896 27.648-20.48 10.24-36.864 24.576-41.984 44.032 0 1.024-1.024 3.072-1.024 4.096v486.4c5.12 21.504 22.528 35.84 43.008 47.104 21.504 11.264 49.152 20.48 80.896 26.624 62.464 14.336 143.36 20.48 224.256 20.48s161.792-6.144 224.256-20.48c31.744-6.144 59.392-15.36 80.896-26.624s37.888-25.6 43.008-47.104v-2.048-481.28-3.072c0-1.024 0-3.072-1.024-4.096-5.12-19.456-21.504-33.792-41.984-44.032-21.504-11.264-49.152-20.48-80.896-27.648-62.464-13.312-143.36-20.48-224.256-20.48z m0 35.84c78.848 0 157.696 7.168 217.088 20.48 29.696 6.144 54.272 14.336 70.656 22.528 13.312 7.168 20.48 14.336 23.552 19.456-3.072 5.12-10.24 12.288-23.552 19.456-16.384 9.216-40.96 17.408-70.656 23.552-59.392 12.288-138.24 19.456-217.088 19.456s-157.696-7.168-217.088-19.456c-29.696-6.144-54.272-14.336-70.656-23.552-13.312-7.168-20.48-14.336-23.552-19.456 3.072-5.12 10.24-12.288 23.552-19.456 16.384-8.192 40.96-16.384 70.656-22.528 59.392-13.312 138.24-20.48 217.088-20.48zM199.68 287.744c2.048 1.024 5.12 3.072 7.168 4.096 21.504 11.264 49.152 19.456 80.896 26.624 62.464 13.312 143.36 20.48 224.256 20.48s161.792-7.168 224.256-20.48c31.744-7.168 59.392-15.36 80.896-26.624 2.048-1.024 5.12-3.072 7.168-4.096v41.984c-2.048 5.12-8.192 13.312-24.576 21.504-16.384 9.216-40.96 17.408-70.656 23.552-59.392 12.288-138.24 19.456-217.088 19.456s-157.696-7.168-217.088-19.456c-29.696-6.144-54.272-14.336-70.656-23.552-15.36-8.192-22.528-16.384-24.576-21.504z m0 91.136c2.048 1.024 5.12 3.072 7.168 4.096 21.504 11.264 49.152 19.456 80.896 26.624 62.464 13.312 143.36 20.48 224.256 20.48s161.792-7.168 224.256-20.48c31.744-7.168 59.392-15.36 80.896-26.624 2.048-1.024 5.12-3.072 7.168-4.096v41.984c-2.048 5.12-8.192 13.312-24.576 21.504-16.384 9.216-40.96 17.408-70.656 23.552-59.392 12.288-138.24 19.456-217.088 19.456s-157.696-7.168-217.088-19.456c-29.696-6.144-54.272-14.336-70.656-23.552-15.36-8.192-22.528-16.384-24.576-21.504z m0 91.136c2.048 1.024 5.12 3.072 7.168 4.096 21.504 11.264 49.152 19.456 80.896 26.624 62.464 14.336 143.36 20.48 224.256 20.48s161.792-6.144 224.256-20.48c31.744-7.168 59.392-15.36 80.896-26.624 2.048-1.024 5.12-3.072 7.168-4.096v248.832c-2.048 5.12-8.192 13.312-24.576 21.504-16.384 9.216-40.96 17.408-70.656 23.552-59.392 13.312-138.24 19.456-217.088 19.456s-157.696-6.144-217.088-19.456c-29.696-6.144-54.272-14.336-70.656-23.552-15.36-8.192-22.528-16.384-24.576-21.504z",})),]}getShape() {const { model } = this.propsconst { x, y, width, height, radius } = modelconst style = model.getNodeStyle()return h('g', {}, [h('rect', {...style,x: x - width / 2,y: y - height / 2,strokeWidth: 0,rx: radius,ry: radius,width,height,}),...this.getIconShape(),])}}class Model extends RectNodeModel {constructor(data, graphModel) {if (!data.id) data.id = `DataObject_${ids.next()}`data.text = {value: (data.text && data.text.value) || '',x: data.x,y: data.y + 50,}super(data, graphModel)}initNodeData(data) {super.initNodeData(data)this.width = 44this.height = 58}// 自定义锚点样式getAnchorStyle() {const style = super.getAnchorStyle()style.hover.r = 8style.hover.fill = 'rgb(24, 125, 255)'style.hover.stroke = 'rgb(24, 125, 255)'return style}getNodeStyle() {const style = super.getNodeStyle()style.stroke = NODE_COLORreturn style}}return {view: View,model: Model,}})
}
github项目开源地址:传送🚪

这篇关于logicFlow 流程图编辑工具使用及开源地址的文章就介绍到这儿,希望我们推荐的文章对编程师们有所帮助!


