本文主要是介绍使用sequelize和postgresql设置Express api,希望对大家解决编程问题提供一定的参考价值,需要的开发者们随着小编来一起学习吧!
In this tutorial I will be explaining how to set up a node-express API using sequelize and postgres. The API will have a many to many relationships which will be as follows:
在本教程中,我将解释如何使用sequelize和postgres设置node-express API。 该API将具有许多关系,如下所示:
An artist has many songs and many genres through songs
一位艺术家有很多歌曲和很多流派
A genre has many songs and many artists through songs
一个流派有很多歌曲,很多歌手通过歌曲
A song belongs to an artist and a genre
一首歌属于艺术家和流派
Let us begin by creating our directory
让我们从创建目录开始
mkdir node-express-apiand then
接着
npm init -ynpm install sequelize nodemon express body-parser cors && npm install --save-dev sequelize-cliSequelize is a promise based ORM for Postgres, MySQL, MariaDB, SQLite, and Microsoft SQL server.
Sequelize是针对Postgres,MySQL,MariaDB,SQLite和Microsoft SQL Server的基于承诺的ORM。
Sequelize-cli allows us to use the command line to access various commands that will be used throughout this tutorial. (It functions similarly to the cli commands that are included in Ruby on Rails)
Sequelize-cli允许我们使用命令行来访问将在本教程中使用的各种命令。 (它的功能类似于Ruby on Rails中包含的cli命令)
Nodemon will monitor node for any changes being made and automatically restart the server if there are changes.
Nodemon将监视节点是否进行了任何更改,并在发生更改时自动重新启动服务器。
Body-parser is body parsing middleware for node.js. It parses incoming request bodies before your handlers.
Body-parser是用于node.js的主体解析中间件。 它在处理程序之前解析传入的请求主体。
Cors can be read more about here: https://developer.mozilla.org/en-US/docs/Web/HTTP/CORS as it is beyond the scope of this blog.
可以在以下位置进一步了解Cors: https : //developer.mozilla.org/zh-CN/docs/Web/HTTP/CORS,因为它不在本博客的讨论范围之内。
Next, enter this into your terminal.
接下来,将其输入您的终端。
sequelize init
// if this and the below sequelize commands do not work properly, try typing sequelize-cli instead
This will create a number of folders into which we will be adding the files needed for the creation of the API.
这将创建许多文件夹,我们将在其中添加创建API所需的文件。
At this point we will modify the config.json file to look like this:
此时,我们将修改config.json文件,如下所示:
The “dialect” corresponds to the database you want to use for the API. I have chosen to use PostgreSQL. You will notice that in addition to removing parts of the config.json file, I have also added “dialectOptions” along with “ssl” and “rejectUnauthorized”. Check https://nodejs.org/api/tls.html if you want to learn more about ssl.
“方言”对应于您要用于API的数据库。 我选择使用PostgreSQL。 您会注意到,除了删除config.json文件的一部分外,我还添加了“ dialectOptions”以及“ ssl”和“ rejectUnauthorized”。 如果要了解有关ssl的更多信息,请检查https://nodejs.org/api/tls.html 。
Next, run these commands to create a song, genre, and artist using sequelize-cli
接下来,运行以下命令以使用sequelize-cli创建歌曲,体裁和艺术家
sequelize model:generate --name Genre --attributes name:stringsequelize model:generate --name Artist --attributes name:string,bio:stringsequelize model:generate --name Song --attributes title:string,lyrics:stringin order to automatically create their corresponding model and migration files with the attributes listed above.
为了使用上述属性自动创建其相应的模型和迁移文件。
As I am demonstrating how to create a node-express API featuring a many to many relationship, you will now need to open the song migration file and add the following code.
当我演示如何创建具有多对多关系的node-express API时,您现在需要打开歌曲迁移文件并添加以下代码。
// migrations/create-songartistId: { type: Sequelize.INTEGER, onDelete: ‘CASCADE’, references: { model: ‘Artists’, key: ‘id’, as: ‘artistId’, }},genreId: { type: Sequelize.INTEGER, onDelete: ‘CASCADE’, references: { model: ‘Genres’, key: ‘id’, as: ‘genreId’,}such that it looks like this inside your create-song migration file.
这样在您的创建歌曲迁移文件中看起来像这样。
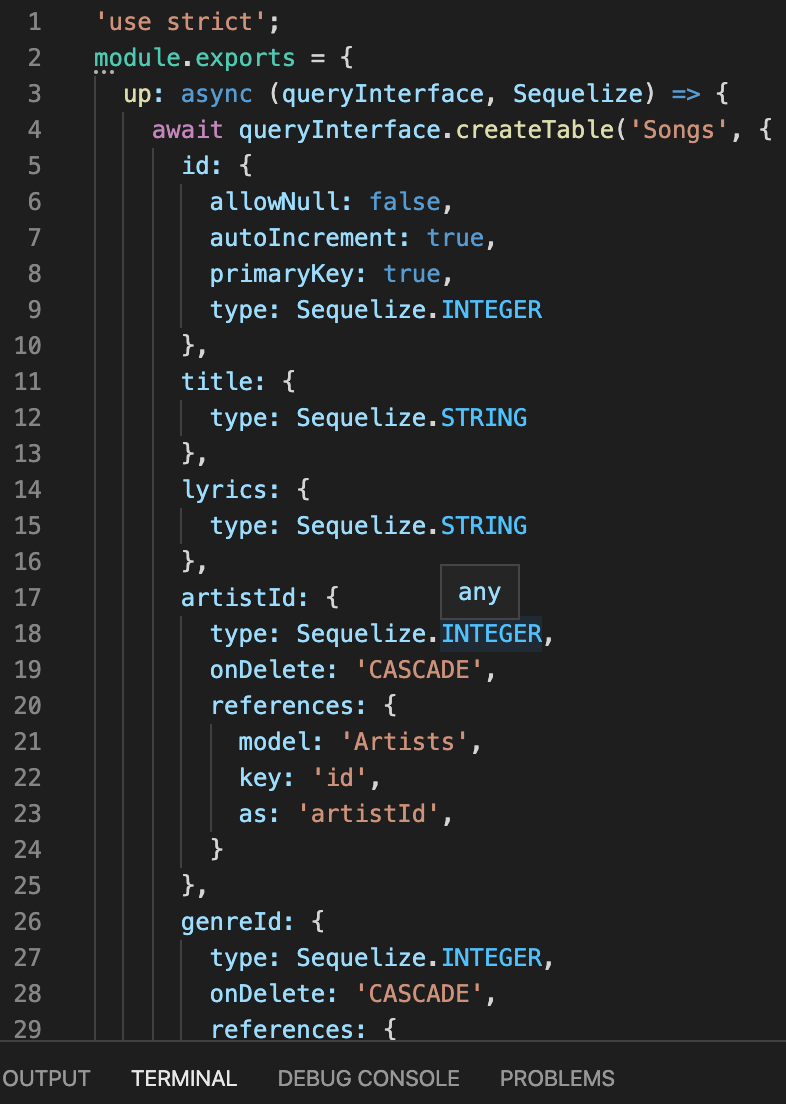
If you create your migrations without these lines of code, the song table in your database will lack columns corresponding to artist and genre id.
如果您在没有这些代码行的情况下创建迁移,则数据库中的歌曲表将缺少与艺术家和流派ID相对应的列。
Now, run
现在开始
sequelize db:migratein order to set up the tables in our database. At this point, I would recommend checking your database to see if the tables and columns have been set up properly. In order to do this, you can use the below psql commands.
为了在我们的数据库中建立表格。 在这一点上,我建议您检查数据库以查看表和列是否已正确设置。 为此,可以使用以下psql命令。
psql db_development\dtThe above command displays all tables
上面的命令显示所有表
\d “Artists”\d “Genres”\d “Songs”and the above 3 commands describe the tables.
上面的3个命令描述了这些表。
If everything is in order, you can proceed to the next step.
如果一切正常,则可以继续进行下一步。
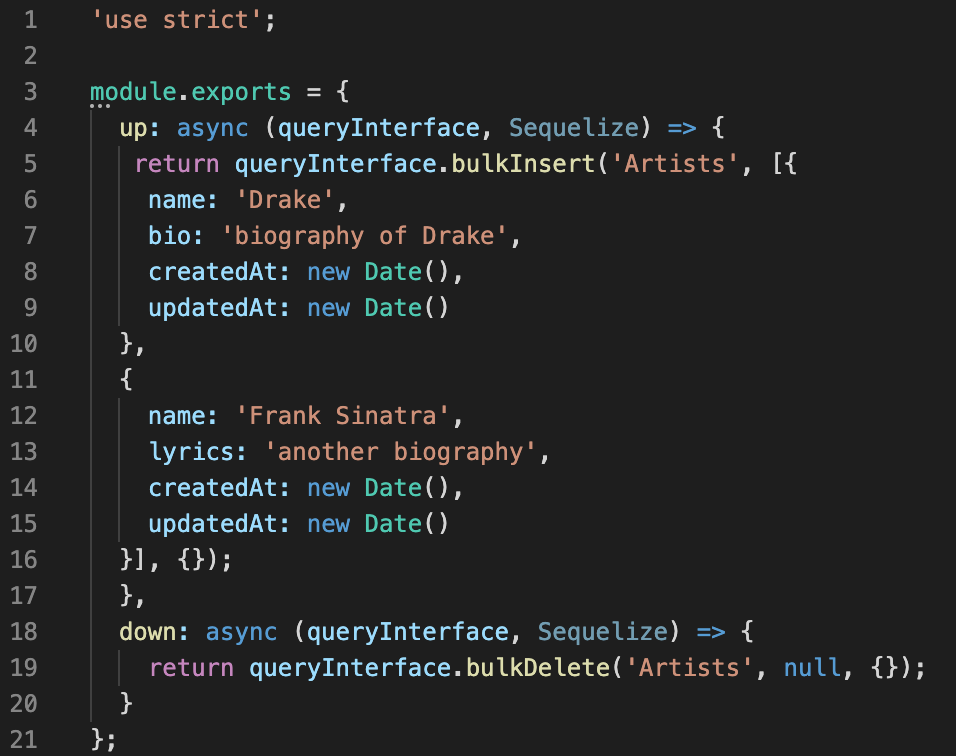
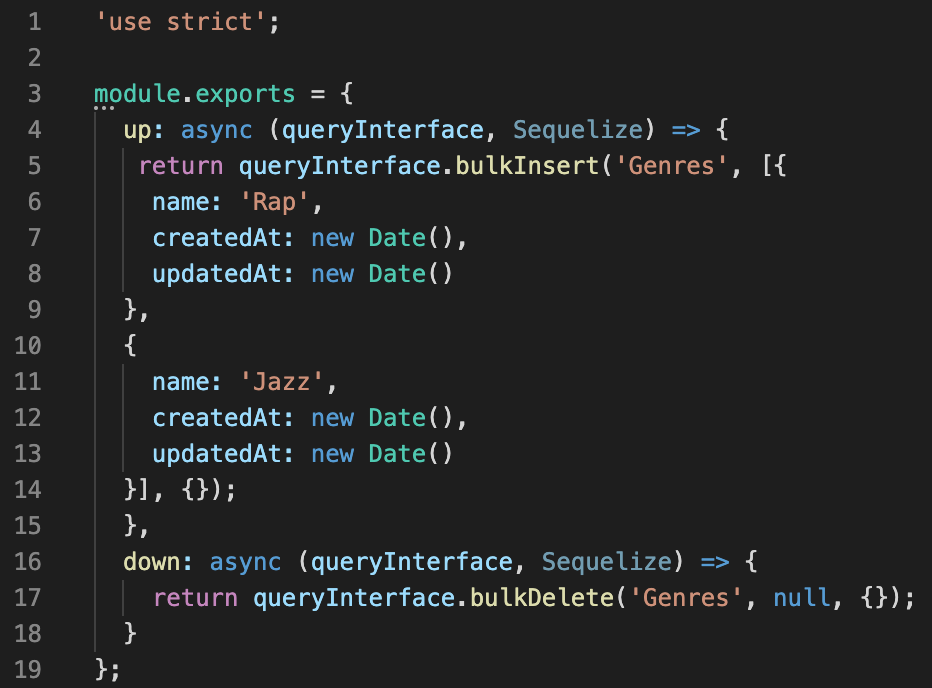
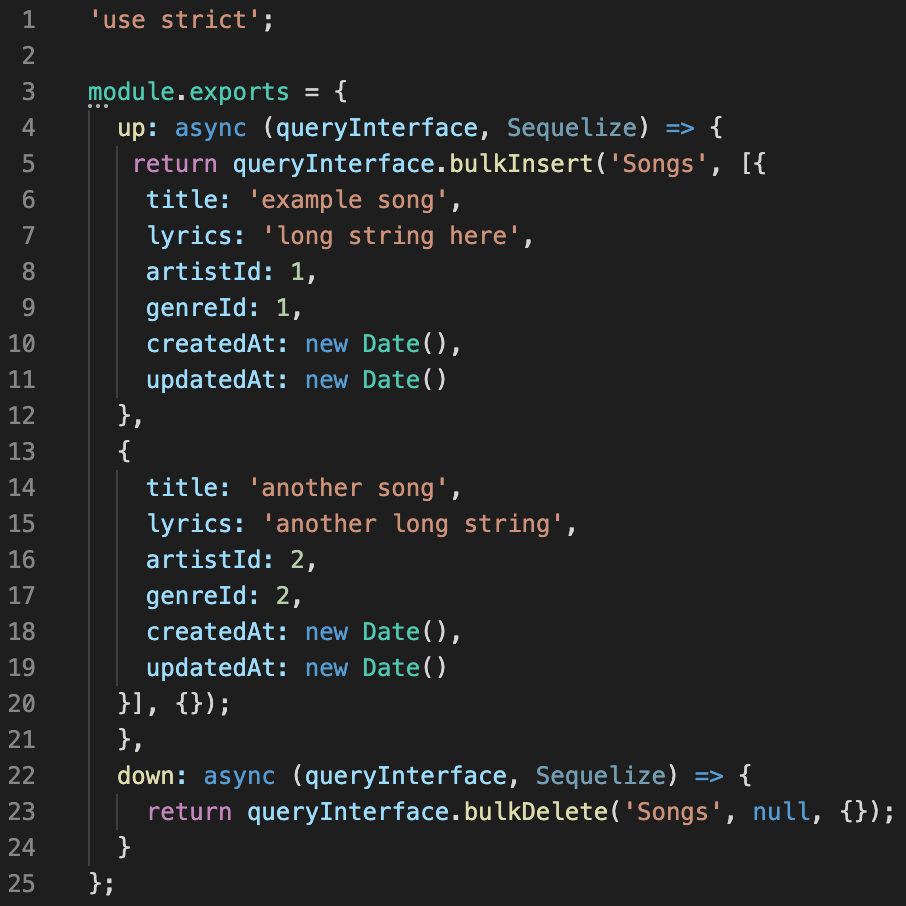
Now we will create our seed files for the database
现在我们将为数据库创建种子文件
sequelize seed:generate –-name artistssequelize seed:generate –-name genressequelize seed:generate –-name songsYou should now have 3 files within a folder named seeders. In each of these files, we will be creating seed data.
现在,在名为seeders的文件夹中应该有3个文件。 在每个文件中,我们将创建种子数据。
Once your seed data has been created, run this command:
创建种子数据后,请运行以下命令:
sequelize db:seed:allYour database should now be seeded!
现在应该为您的数据库设定种子!
Make sure everything is in order with the below commands.
使用以下命令确保一切正常。
psql db_developmentselect * from “Artists”;select * from “Songs”;select * from “Genres”;If the values displayed are to your liking, then move on to the next step.
如果显示的值符合您的喜好,请继续执行下一步。
Now create the following folders and files:
现在创建以下文件夹和文件:
mkdir controllersmkdir routestouch server.jsIt would also behoove us to modify the package.json file so as to more easily allow us to use nodemon.
我们也应该修改package.json文件,以便更轻松地允许我们使用nodemon。
Add line 8 into the “scripts” portion of your package.json file.
将第8行添加到package.json文件的“脚本”部分。
Now inside of the routes folder, create a new file called index.js
现在在routes文件夹中,创建一个名为index.js的新文件。
touch routes/index.jsThis file will hold our API endpoints
该文件将包含我们的API端点
And then add the following files to the controllers.js folder
然后将以下文件添加到controllers.js文件夹
touch controllers/artists.jstouch controllers/genres.jstouch controllers/songs.jsThese files will give us access to CRUD actions once completed. Additionally, you have now created all the files and folders that will be used in this tutorial.
一旦完成,这些文件将使我们能够访问CRUD操作。 此外,您现在已经创建了将在本教程中使用的所有文件和文件夹。
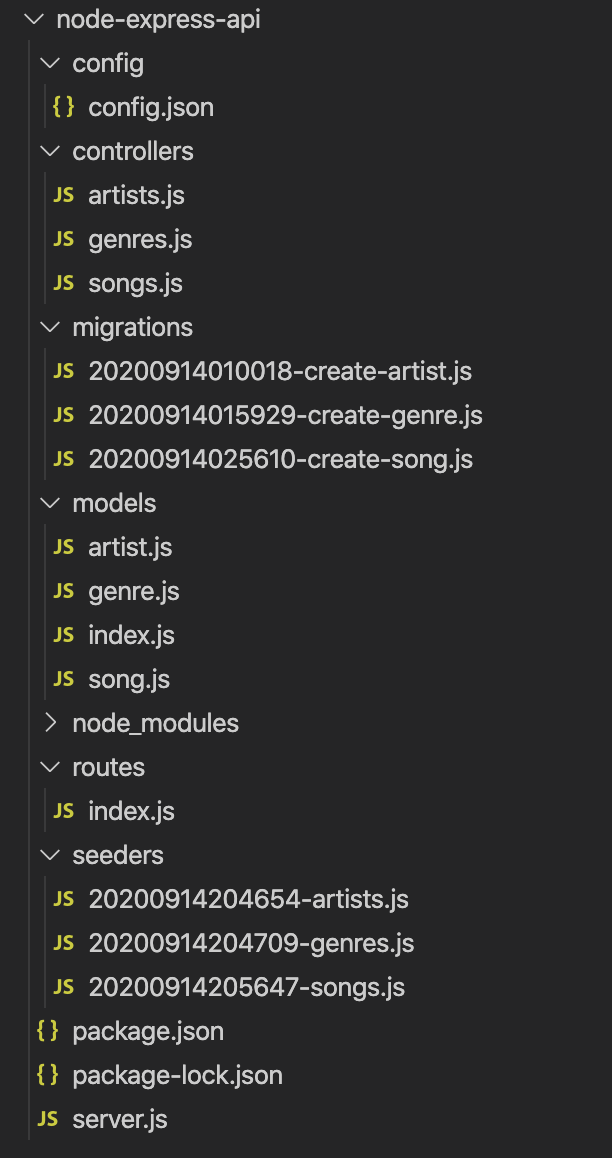
Ensure that your file and folder structure looks like this:
确保您的文件和文件夹结构如下所示:
Inside of the server.js file, enter the following code:
在server.js文件中,输入以下代码:
const express = require(‘express’);const routes = require(‘./routes’);const bodyParser = require(‘body-parser’)const PORT = process.env.PORT || 3000;const app = express();app.use(bodyParser.json())app.use(‘/’, routes);app.listen(PORT, () => console.log(`Listening on port: ${PORT}`))Next, inside of the routes/index.js file, enter the following code:
接下来,在routes / index.js文件中,输入以下代码:
const { Router } = require(‘express’);
const controllers = require(‘../controllers’);const router = Router();router.get(‘/’, (req, res) => res.send(‘Server running!’))module.exports = router
to get the server up and running.
使服务器启动并运行。
Now to check if the server is running type either
现在检查服务器是否正在运行,键入
npm startor
要么
npx nodemon server.jsinto your terminal and then open http://localhost:3000/ in your browser.
进入终端,然后在浏览器中打开http:// localhost:3000 / 。
If you see the message “Server running!” in the top left, then you have successfully created an express server.
如果看到消息“服务器正在运行!” 在左上角,那么您已经成功创建了快递服务器。
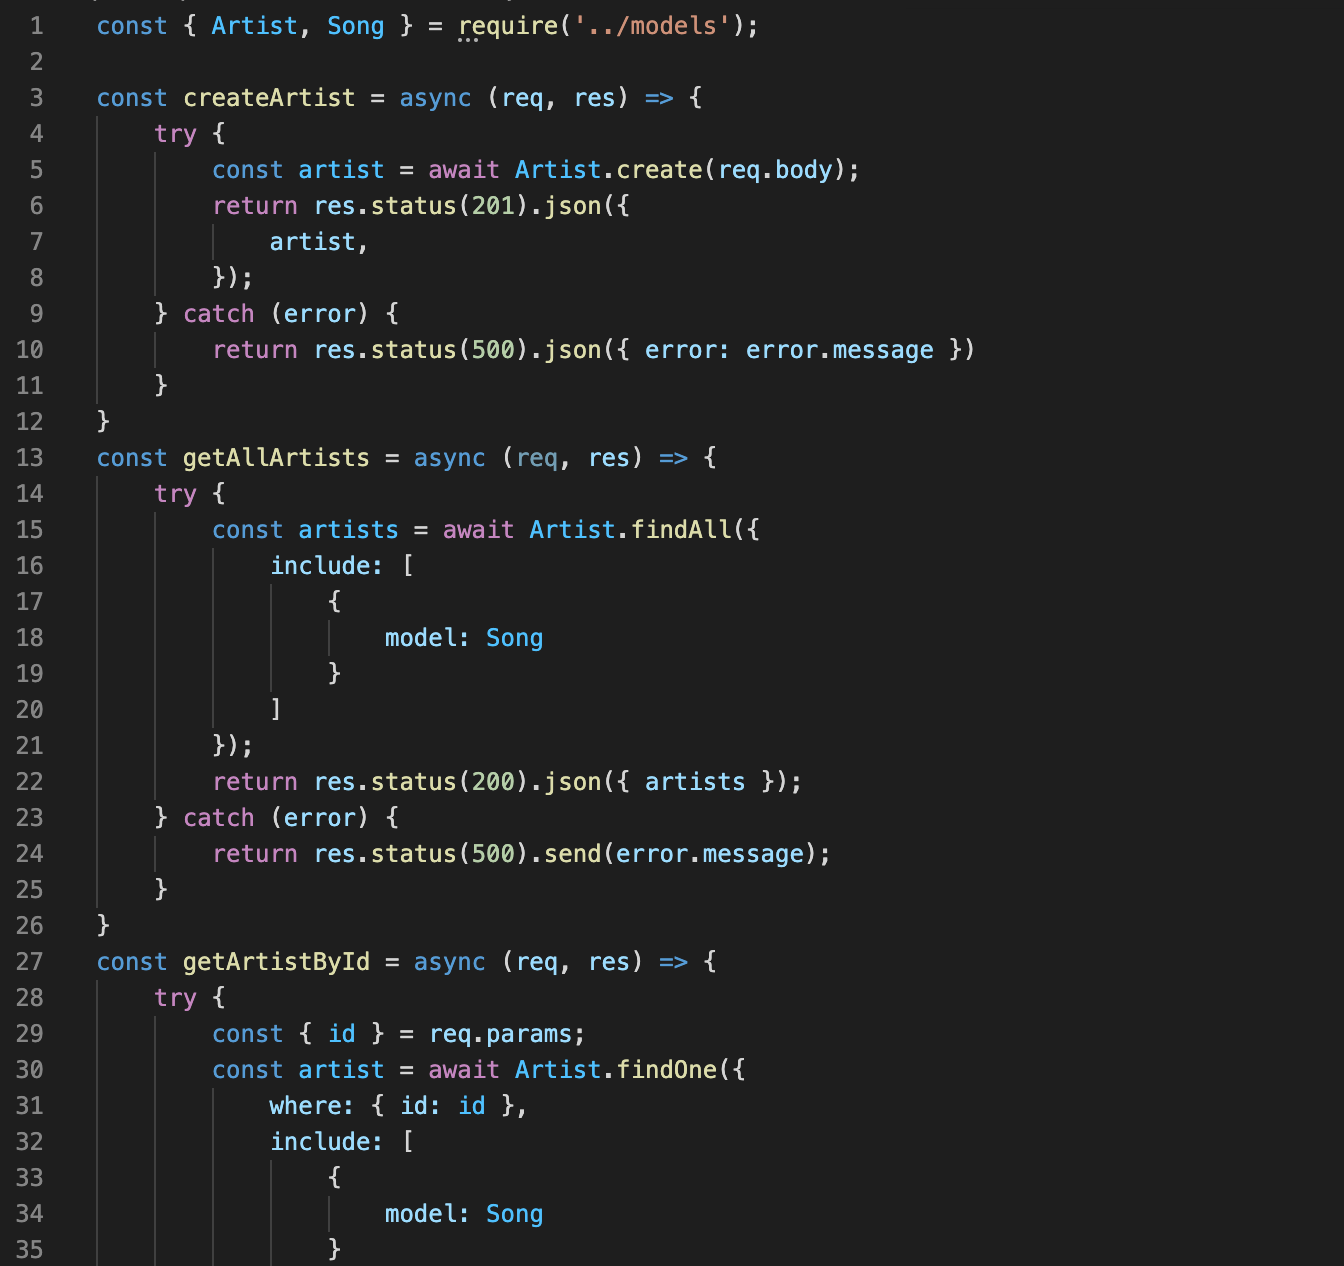
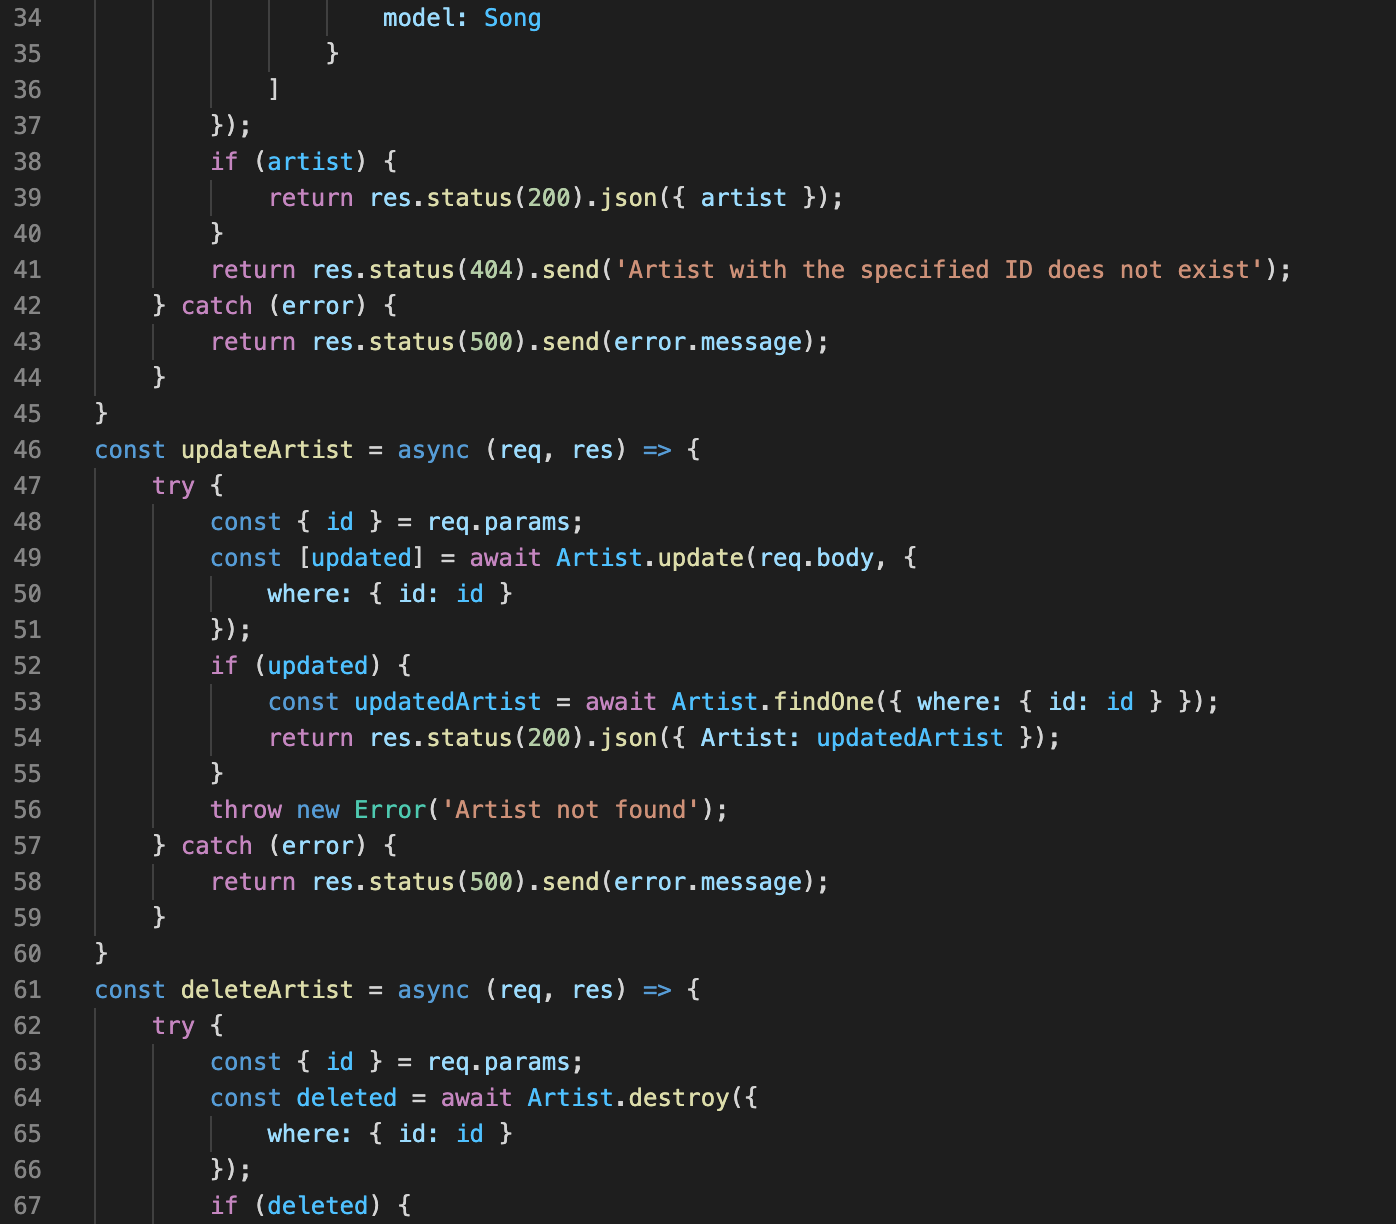
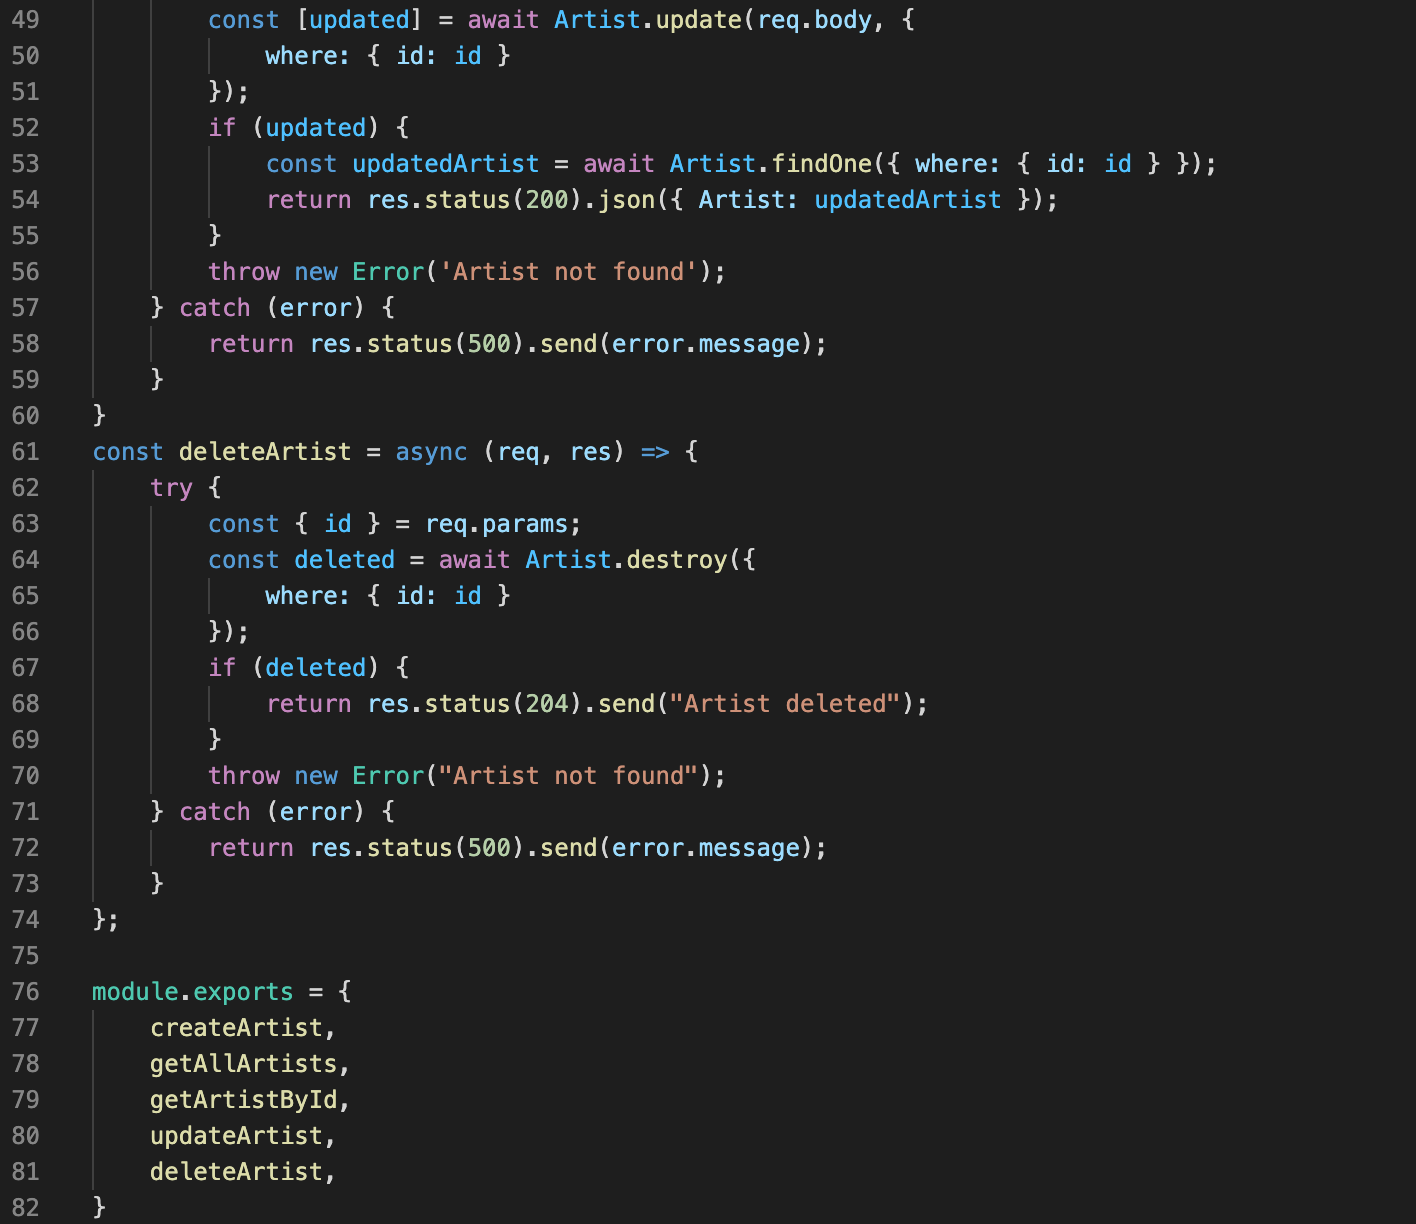
Begin filling out the files in your controllers folder so that the logic for handling your CRUD actions will be implemented.
开始填写controllers文件夹中的文件,以便实施用于处理CRUD动作的逻辑。
Make sure that you do the same for the genre and song controllers as well!
确保对流派和歌曲控制器也执行相同的操作!
Now that you have finished with that, it is time to move on to the routes!
现在您已经完成了,现在该走上路线了!
Copy the below lines of code into your routes/index.js file so that you can access the various crud actions you wrote in your controllers folder.
将以下代码行复制到route / index.js文件中,以便您可以访问在controllers文件夹中编写的各种crud操作。
// routes/index.js
const { Router } = require(‘express’);const artists = require(‘../controllers/artists’);const genres = require(‘../controllers/genres’);const songs = require(‘../controllers/songs’);const router = Router();
router.get(‘/’, (req, res) => res.send(‘Server running!’))router.get(‘/artists’, artists.getAllArtists)router.get(‘/artists/:id’, artists.getArtistById)router.patch(‘/artists/:id’, artists.updateArtist)router.delete(‘/artists/:id’, artists.deleteArtist)router.post(‘/artists’, artists.createArtist)
router.get(‘/genres’, genres.getAllGenres)router.get(‘/genres/:id’, genres.getGenreById)router.patch(‘/genres/:id’, genres.updateGenre)router.delete(‘/genres/:id’, genres.deleteGenre)router.post(‘/genres’, genres.createGenre)
router.get(‘/songs’, songs.getAllSongs)router.get(‘/songs/:id’, songs.getSongById)router.patch(‘/songs/:id’, songs.updateSong)router.delete(‘/songs/:id’, songs.deleteSong)router.post(‘/songs’, songs.createSong)
module.exports = router
At this point you should be able to access these routes using a REST client like Postman. Alternatively, you should also be able to access your API via localhost if you do not wish to utilize a REST client.
此时,您应该能够使用REST客户端(如Postman)访问这些路由。 另外,如果您不希望使用REST客户端,则还应该能够通过本地主机访问API。
As always, I hope this will be useful to you.
与往常一样,我希望这对您有用。
Github repository for the completed code: https://github.com/sdornel/node-many-to-many-relationship
Github存储库以获取完整代码: https : //github.com/sdornel/node-many-to-many-relationship
翻译自: https://medium.com/swlh/set-up-an-express-api-using-sequelize-and-postgresql-70d8c03cf928
相关文章:
这篇关于使用sequelize和postgresql设置Express api的文章就介绍到这儿,希望我们推荐的文章对编程师们有所帮助!


