本文主要是介绍在线云原生边缘计算KubeEdge安装配置(二),希望对大家解决编程问题提供一定的参考价值,需要的开发者们随着小编来一起学习吧!
1. K8S集群部署,可以参考如下博客
请安装k8s集群,centos安装k8s集群
请安装k8s集群,ubuntu安装k8s集群
请安装kubeedge cloudcore centos安装K8S
2.安装kubEedge
2.1 编辑kube-proxy使用ipvs代理
kubectl edit configmaps kube-proxy -n kube-system #修改kube-proxy
#大约在40多行37 ipvs:38 excludeCIDRs: null39 minSyncPeriod: 0s40 scheduler: ""41 strictARP: true #这里由原来的false修改为true42 syncPeriod: 0s43 tcpFinTimeout: 0s44 tcpTimeout: 0s45 udpTimeout: 0s46 kind: KubeProxyConfiguration47 metricsBindAddress: ""48 mode: "ipvs" #这里原来是空的修改为ipvs49 nodePortAddresses: null50 oomScoreAdj: null51 portRange: ""52 showHiddenMetricsForVersion: ""53 winkernel:54 enableDSR: false55 forwardHealthCheckVip: false56 networkName: ""57 rootHnsEndpointName: ""58 sourceVip: ""kubectl rollout restart daemonset kube-proxy -n kube-system
kubectl get pods -n kube-system
2.2 基础服务提供,负载均衡器metallb
#无网络情况下,先上传kubeedge.tar 和 metallb-native.yaml文件
docker load -i kubeedge.tar  #导入镜像#有网络可以直接拉去镜像
docker pull quay.io/metallb/controller:v0.13.5
docker pull quay.io/metallb/speaker:v0.13.5
wget https://raw.githubusercontent.com/metallb/metallb/v0.13.5/config/manifests/metallb-native.yaml
kubectl apply -f metallb-native.yaml
kubectl get pods -n metallb-system
[root@k8s-master01 ~]# kubectl get pods -n metallb-system
NAME                         READY   STATUS    RESTARTS   AGE
controller-8d9cf599f-m4x27   1/1     Running   0          23s
speaker-zm7w4                1/1     Running   0          23s
speaker-zww5l                1/1     Running   0          23s
[root@k8s-master01 ~]#
#具体参考官网地址:https://metallb.universe.tf/configuration/#layer-2-configuration
#创建IP地址资源池,原则是跟主机在同一个网段,没有使用的地址,根据自己项目的规模我合理预留了21个IP
cat > first-ippool.yaml << EOF
apiVersion: metallb.io/v1beta1
kind: IPAddressPool
metadata:name: first-poolnamespace: metallb-system
spec:addresses:- 192.168.186.200-192.168.186.220
EOF
kubectl apply -f first-ippool.yaml
kubectl get ipaddresspools -n metallb-system
[root@k8s-master01 ~]# kubectl get ipaddresspools -n metallb-system
NAME         AGE
first-pool   2m1s
[root@k8s-master01 ~]#
#开启二层转发,实现k8s集群节点外访问
cat > l2forward.yaml << EOF
apiVersion: metallb.io/v1beta1
kind: L2Advertisement
metadata:name: examplenamespace: metallb-system
EOFkubectl apply -f l2forward.yaml
#二层转发案例测试
cat > nginx.yaml << EOF
apiVersion: apps/v1
kind: Deployment
metadata:name: nginx
spec:replicas: 1selector:matchLabels:app: nginxtemplate:metadata:labels:app: nginxspec:containers:- image: nginxname: nginximagePullPolicy: IfNotPresent
---
apiVersion: v1
kind: Service
metadata:name: nginx-svc
spec:type: LoadBalancerports:- port: 80targetPort: 80selector:app: nginx
EOFkubectl apply -f nginx.yaml
[root@k8s-master01 ~]# kubectl get pods,svc #svc的ip从地址池中分配的
NAME                         READY   STATUS    RESTARTS   AGE
pod/nginx-5f5c64f949-bhpvf   1/1     Running   0          50sNAME                 TYPE           CLUSTER-IP     EXTERNAL-IP       PORT(S)        AGE
service/kubernetes   ClusterIP      10.96.0.1      <none>            443/TCP        5h43m
service/nginx-svc    LoadBalancer   10.99.41.146   192.168.186.200   80:30293/TCP   50s
[root@k8s-master01 ~]#

测试通过
kubectl delete -f nginx.yaml #删除无用的pod和svc
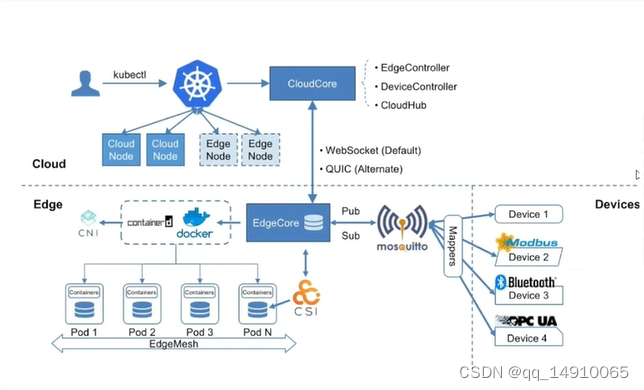
3. 对于kubeEdge概述
KubeEdge由云和边缘组成。它建立在Kubernetes之上,为联网应用部署和云与边缘之间的元数据同步提供核心基础设施支持。所以如果我们想要设置KubeEdge,我们需要设置Kubernetes集群(可以使用现有的集群),云端和边缘端在cloud side, 我们需要安装
Docker
Kubernetes cluster
cloudcore
在 edge side, 我们需要安装
Docker
MQTT (配置可以选用,不是一定需要)
edgecore
3.部署kubeedge cloudcore
3.1 获取keadm工具
wget https://github.com/kubeedge/kubeedge/releases/download/v1.10.1/keadm-v1.12.1-linux-amd64.tar.gztar -zxvf keadm-v1.12.1-linux-amd64.tar.gz
cp keadm-v1.12.1-linux-amd64/keadm/keadm  /usr/local/bin/
keadm version
3.2 部署cloudcore
#在master上部署
#设置云端  使用keadm初始化,安装cloudcore
docker pull kubeedge/cloudcore:v1.14.2
docker pull  kubeedge/iptables-manager:v1.14.2keadm init --advertise-address=192.168.110.100 --kubeedge-version=1.12.1   #这是master的ip,互联网用这种形式keadm init --advertise-address=192.168.186.200 --set iptablesManager.mode="external" --profile version=v1.12.1 #这里的IP是负载均衡器metallb分配的IP#以上参数分别为master节点地址和要安装的KubeEdge版本。#keadm reset  #安装错误可以重置
keadm gettoken  #获取token
[root@k8s-master01 ~]# keadm init --advertise-address=192.168.186.200 --set iptablesManager.mode="external" --profile version=v1.14.2
Kubernetes version verification passed, KubeEdge installation will start...
CLOUDCORE started
=========CHART DETAILS=======
NAME: cloudcore
LAST DEPLOYED: Mon Oct  9 15:25:36 2023
NAMESPACE: kubeedge
STATUS: deployed
REVISION: 1
[root@k8s-master ~]# keadm gettoken
3b917d79963d290608f00b2c567808bbf37f99379efdb4a2848ddd2d2713cb52.eyJhbGciOiJIUzI1NiIsInR5cCI6IkpXVCJ9.eyJleHAiOjE2OTY5NDc2NTl9.1DQ6GwR687bpyR_8q-Xf2HwFfLeUdZ2oqYrYkEyNEEo[root@k8s-master ~]# [root@k8s-master01 ~]# kubectl get ns
NAME STATUS AGE
default Active 58d
kube-node-lease Active 58d
kube-public Active 58d
kube-system Active 58d
kubeedge Active 8m44s #在这个空间中中
kubernetes-dashboard Active 58d
metallb-system Active 57d
[root@k8s-master ~]# kubectl get pods,svc -n kubeedge
NAME READY STATUS RESTARTS AGE
pod/cloud-iptables-manager-8kh6q 1/1 Running 0 109m
pod/cloudcore-5876c76687-tkkzx 1/1 Running 0 109mNAME TYPE CLUSTER-IP EXTERNAL-IP PORT(S) AGE
service/cloudcore ClusterIP 10.101.140.171 <none> 10000/TCP,10001/TCP,10002/TCP,10003/TCP,10004/TCP 109m
[root@k8s-master ~]#
kubectl edit svc cloudcore -n kubeedge #修改大概在51行 49 selector:50 k8s-app: kubeedge51 kubeedge: cloudcore52 sessionAffinity: None53 type: LoadBalancer #修改后的54 status:55 loadBalancer: {}[root@k8s-master ~]# kubectl get pods,svc -n kubeedge
NAME READY STATUS RESTARTS AGE
pod/cloud-iptables-manager-8kh6q 1/1 Running 0 110m
pod/cloudcore-5876c76687-tkkzx 1/1 Running 0 110mNAME TYPE CLUSTER-IP EXTERNAL-IP PORT(S) AGE
service/cloudcore LoadBalancer 10.101.140.171 192.168.186.200 10000:31953/TCP,10001:32329/TCP,10002:31154/TCP,10003:30807/TCP,10004:31038/TCP 110m
[root@k8s-master ~]# [root@k8s-master kubernetes]# kubectl get pods -n kube-system -o wide #metrics-server不正常
NAME READY STATUS RESTARTS AGE IP NODE NOMINATED NODE READINESS GATES
calico-kube-controllers-67bb5696f5-sfhs6 1/1 Running 0 4h3m 10.244.235.195 k8s-master <none> <none>
calico-node-2w8jn 1/1 Running 0 4h3m 192.168.186.128 k8s-master <none> <none>
calico-node-vt8g4 1/1 Running 0 4h3m 192.168.186.129 k8s-node1 <none> <none>
coredns-7f6cbbb7b8-q8z29 1/1 Running 0 4h5m 10.244.235.193 k8s-master <none> <none>
coredns-7f6cbbb7b8-qc8d2 1/1 Running 0 4h5m 10.244.235.194 k8s-master <none> <none>
etcd-k8s-master 1/1 Running 0 4h5m 192.168.186.128 k8s-master <none> <none>
kube-apiserver-k8s-master 1/1 Running 0 4h5m 192.168.186.128 k8s-master <none> <none>
kube-controller-manager-k8s-master 1/1 Running 0 4h5m 192.168.186.128 k8s-master <none> <none>
kube-proxy-2vt4s 1/1 Running 0 3h52m 192.168.186.129 k8s-node1 <none> <none>
kube-proxy-99x2t 1/1 Running 0 3h52m 192.168.186.128 k8s-master <none> <none>
kube-scheduler-k8s-master 1/1 Running 0 4h5m 192.168.186.128 k8s-master <none> <none>
metrics-server-5f85c44dcd-kpnpk 1/1 Running 0 4m4s 10.244.36.85 k8s-node1 <none> <none> #如果状态和READY不正确,就执行如下的语句
[root@k8s-master kubernetes]#
kubectl patch deploy metrics-server -n kube-system --type='json' -p='[{"op":"add","path":"/spec/template/spec/containers/0/args/-","value":"--kubelet-insecure-tls"}]' #修改为不认证
4. 部署edgecore(边缘节点)
[root@k8s-master ~]# kubectl get nodes
NAME         STATUS   ROLES                  AGE     VERSION
k8s-master   Ready    control-plane,master   4h12m   v1.22.6
k8s-node1    Ready    <none>                 4h9m    v1.22.6
[root@k8s-master ~]#
4.1 获取keadm工具
#注意边缘节点配置都很低,只需要运行业务容器
#边缘节点只需要安装docker就可以了
hostnamectl set-hostname edge-node1  && bashwget https://github.com/kubeedge/kubeedge/releases/download/v1.10.1/keadm-v1.12.1-linux-amd64.tar.gztar -zxvf keadm-v1.12.1-linux-amd64.tar.gz
cp keadm-v1.12.1-linux-amd64/keadm/keadm  /usr/local/bin/
keadm version
#提前拉去镜像
docker pull kubeedge/installation-package:v1.12.1
docker pull kubeedge/pause:3.1
docker pull eclipse-mosquitto:1.6.15
TOKEN=3b917d79963d290608f00b2c567808bbf37f99379efdb4a2848ddd2d2713cb52.eyJhbGciOiJIUzI1NiIsInR5cCI6IkpXVCJ9.eyJleHAiOjE2OTY5NDc2NTl9.1DQ6GwR687bpyR_8q-Xf2HwFfLeUdZ2oqYrYkEyNEEo  #这串数字是在cloudcore执行keadm gettoken获取的SERVER=192.168.186.200:10000
keadm join --token=$TOKEN --cloudcore-ipport=$SERVER --kubeedge-version=1.12.1#如果添加失败了,请在edgecore中执行
#docker rm -f mqtt   && rm -fr /etc/kubeedge/
#keadm join --token=$TOKEN --cloudcore-ipport=$SERVER --kubeedge-version=1.12.1[root@edgenode1 ~]# TOKEN=3b917d79963d290608f00b2c567808bbf37f99379efdb4a2848ddd2d2713cb52.eyJhbGciOiJIUzI1NiIsInR5cCI6IkpXVCJ9.eyJleHAiOjE2OTY5NDc2NTl9.1DQ6GwR687bpyR_8q-Xf2HwFfLeUdZ2oqYrYkEyNEEo
[root@edgenode1 ~]# SERVER=192.168.186.200:10000
[root@edgenode1 ~]# keadm join --token=$TOKEN --cloudcore-ipport=$SERVER --kubeedge-version=1.12.1
I1009 13:40:18.319594 2217 command.go:845] 1. Check KubeEdge edgecore process status
I1009 13:40:18.480783 2217 command.go:845] 2. Check if the management directory is clean
I1009 13:40:18.480907 2217 join.go:100] 3. Create the necessary directories
I1009 13:40:18.484206 2217 join.go:176] 4. Pull Images
Pulling kubeedge/installation-package:v1.12.1 ...
Successfully pulled kubeedge/installation-package:v1.12.1
Pulling eclipse-mosquitto:1.6.15 ...
Successfully pulled eclipse-mosquitto:1.6.15
Pulling kubeedge/pause:3.1 ...
Successfully pulled kubeedge/pause:3.1
I1009 13:42:56.611776 2217 join.go:176] 5. Copy resources from the image to the management directory
I1009 13:42:59.996519 2217 join.go:176] 6. Start the default mqtt service
I1009 13:43:02.033426 2217 join.go:100] 7. Generate systemd service file
I1009 13:43:02.034038 2217 join.go:100] 8. Generate EdgeCore default configuration
I1009 13:43:02.034469 2217 join.go:230] The configuration does not exist or the parsing fails, and the default configuration is generated
W1009 13:43:02.051996 2217 validation.go:71] NodeIP is empty , use default ip which can connect to cloud.
I1009 13:43:02.055240 2217 join.go:100] 9. Run EdgeCore daemon
I1009 13:43:02.733562 2217 join.go:317]
I1009 13:43:02.733581 2217 join.go:318] KubeEdge edgecore is running, For logs visit: journalctl -u edgecore.service -xe
[root@edgenode1 ~]#
这篇关于在线云原生边缘计算KubeEdge安装配置(二)的文章就介绍到这儿,希望我们推荐的文章对编程师们有所帮助!


