本文主要是介绍Koa2使用sequelize操作Mysql(一) sequelize,希望对大家解决编程问题提供一定的参考价值,需要的开发者们随着小编来一起学习吧!
Sequelize是用于Postgres,MySQL,MariaDB,SQLite和Microsoft SQL Server的基于promise的Node.js ORM工具。它具有可靠的事务支持,关系,急切和延迟加载,读取复制等功能。
Sequelize遵循语义版本控制,并支持Node v10及更高版本。
sequelize的npm地址:https://www.npmjs.com/package/sequelize
安装:
npm i sequelize其要和一个数据库结合使用,这里我们选择mysql, 而在我们的koa2工程中, 我们使用mysql2库来操作数据库
npm i mysql2一. 连接MySQL数据库
- 首先导入模块
const { Sequelize } = require('sequelize');- 用导入的Sequelize 实例化一个sequelize对象:
const sequelize = new Sequelize('db1', 'root', 'xxxxx', {host: 'localhost', //数据库地址dialect: 'mysql', //指定连接的数据库类型pool: {max: 5, //连接池最大连接数量min: 0, //最小连接数量idle: 10000, //如果一个线程 10秒内么有被使用过的话,就释放},
})
这样就完成了数据库链接了
我们可以测试一下:
sequelize对象提供了一个authenticate方法,可以测试数据库链接https://sequelize.org/master/class/lib/sequelize.js~Sequelize.html#instance-method-authenticate
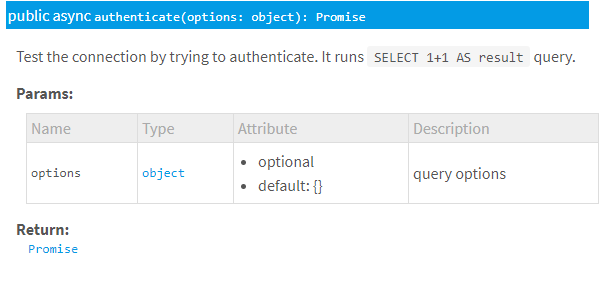
我们可以看到它return 一个promise, 所以我们应该在一个async方法里处理这个promise
例如: 我们在index.js里写一个访问127.0.0.1就告诉我们数据库连接是否成功的API,可以:
const router = require('koa-router')()
const { Sequelize } = require('sequelize');const sequelize = new Sequelize('db1', 'root', 'xxxxxx', {host: 'localhost', //数据库地址dialect: 'mysql', //指定连接的数据库类型pool: {max: 5, //连接池最大连接数量min: 0, //最小连接数量idle: 10000, //如果一个线程 10秒内么有被使用过的话,就释放},
})router.get('/', async (ctx, next) => {let str1str1 = await sequelize.authenticate().then(() => {return '连接数据库成功'}).catch(err => {return '连接数据库失败' + err});ctx.body = str1
})module.exports = router
二. 创建模型:(获取表)
https://sequelize.org/master/manual/model-basics.html
1. 创建模型
连接数据库成功后, 怎么使用ORM的方式把数据库用起来呢? 答: 创建模型
模型是Sequelize的本质。模型是代表数据库中表的抽象。
Sequelize中的模型有一个名称。此名称不必与它在数据库中表示的表的名称相同。通常,模型具有单数名称(例如User),而表具有复数名称(例如Users),尽管这是完全可配置的。
通过创建模型,我们将MySQL中的表和模型对应起来
class Student extends Model { }//创建一个类,继承Model
Student.init({id: { type:DataTypes.INTEGER, primaryKey: true },name: DataTypes.STRING,age: DataTypes.INTEGER,score: DataTypes.FLOAT,brithday: DataTypes.DATE,
}, { sequelize, modelName: 'Student' })除了这种声明方法,还有一种方法把一张表声明为一个model,这种方法本质上还是在调用init函数, 用哪种随你喜欢
const Student = sequelize.define('Student111', {id: { type: DataTypes.INTEGER, primaryKey: true },name: DataTypes.STRING,age: DataTypes.INTEGER,score: DataTypes.FLOAT,brithday: DataTypes.DATE,
}, {sequelize})
2. 模型同步
定义模型时,您要告诉Sequelize有关数据库中表的一些信息。但是,如果该表实际上甚至不存在于数据库中怎么办?如果存在,但具有不同的列,较少的列或任何其他差异,该怎么办?这就需要模型同步。
- User.sync() -如果表不存在,则会创建表(如果已经存在,则不执行任何操作)
- User.sync({ force: true }) -这将创建表,如果该表已经存在,则将其首先删除
- User.sync({ alter: true }) -这将检查数据库中表的当前状态(它具有哪些列,它们的数据类型是什么,等等),然后在表中进行必要的更改以使其与模型匹配。
Student.sync({ alter: true })3. 注意一个sequelize的默认行为:时间戳记
默认情况下,Sequelize使用数据类型自动将字段createdAt和添加updatedAt到每个模型中(DataTypes.DATE类型)。
这些字段也会自动进行管理-每当您使用Sequelize创建或更新内容时,这些字段都会被正确设置。该createdAt字段将包含代表创建时刻的时间戳,并且updatedAt将包含最新更新的时间戳。
注意:这是在Sequelize级别完成的(即,不使用SQL触发器完成)。使用者无需干预。
但是通过不使用Sequelize的情况下执行的查询, 将不会导致这些字段自动更新。
可以使用以下timestamps: false选项为模型禁用此行为:
sequelize.define('User', {// ... (attributes)
}, {timestamps: false
});
上面我们得到了数据库的映射对象sequelize,以及表的映射对象User, 接下来, 我们先尝试操作表
三. 创建模型实例 (表中插入数据) // 增
数据就相当于''模型类''的实例化
3.1 build方法
尽管模型是类,但是您不应new直接使用运算符来创建实例。相反,应使用build方法:
const ldy = Student.build({name:"林黛玉",age:17, score:100,brithday: new Date('2010-12-05')})console.log(ldy instanceof Student); ldy.save()注意:build根本不与数据库通信(请注意: 它甚至不是异步的)
build完成后应该用save方法保存到数据库中

3.2 create方法
Sequelize提供了create方法将以上的build和save方法组合为一个方法:
const yyh = await Student.create({name:"杨玉环",age:25, score:95,brithday: new Date('2009-12-05')})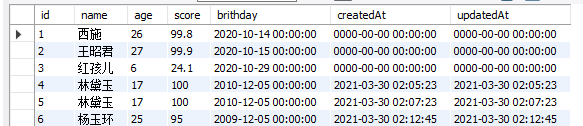
3.3 Sequelize提供了Model.bulkCreate方法,该方法一次就可以创建多个记录。
Model.bulkCreate与Model.create极为相似,方法接收对象数组而不是单个对象。
const captains = await Captain.bulkCreate([{ name: 'Jack Sparrow' },{ name: 'Davy Jones' }
]);
默认情况下,bulkCreate不会在要创建的每个对象上运行验证(create会验证)。要bulkCreate运行验证,您必须传递validate: true选项。但这会降低性能。
const Foo = sequelize.define('foo', {bar: {type: DataTypes.TEXT,validate: {len: [4, 6]}}
});
四. 查找模型中的数据 (查表) //查
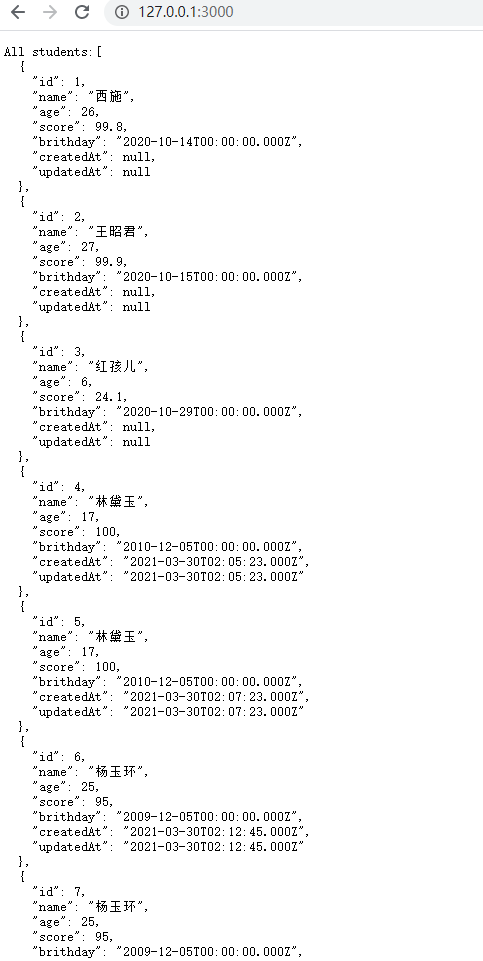
4.1 查找模型中所有数据 findAll
相当于
SELECT * FROM ...
router.get('/', async (ctx, next) => {const students = await Student.findAll();console.log(students.every(student => student instanceof Student)); // truectx.body = "All students:" + JSON.stringify(students, null, 2)
})
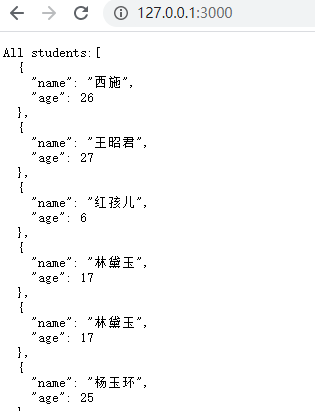
4.1.1 findAll指定查询的属性
相当于: SELECT foo, bar FROM ...
router.get('/', async (ctx, next) => {const students = await Student.findAll({ attributes: ['name', 'age'] });console.log(students.every(student => student instanceof Student)); // truectx.body = "All students:" + JSON.stringify(students, null, 2)
})
4.1.2 取别名
相当于: SELECT foo, bar AS baz, qux FROM ...
Model.findAll({attributes: ['foo', ['bar', 'baz'], 'qux']
});
4.2 按条件查找模型 //应用WHERE子句
4.2.1 按条件查找模型
相当于SELECT * FROM post WHERE authorId = 2
router.get('/', async (ctx, next) => {const students = await Student.findAll({where: { id: 2 }});ctx.body = "All students:" + JSON.stringify(students, null, 2)
})
如果有多个筛选条件,也是可以的
const students = await Student.findAll({where: {age: 17, score: 100}});4.2.2 where and 条件
如果引入Op对象, 可以用and 筛选多个条件, 效果同上
const { Op } = require("sequelize");
router.get('/', async (ctx, next) => {const students = await Student.findAll({where: {[Op.and]: [{ age: 17 },{ score: 100 }]}});ctx.body = "All students:" + JSON.stringify(students, null, 2)
})
4.2.2 where or 条件
如果需要OR限定, 也应该使用Op对象,对象的列表里写的是同一个属性
const students = await Student.findAll({where: {[Op.or]: [{ age: 17 },{ age: 25 }]}});还有一种写法,功能是一样的:
const students = await Student.findAll({where: {age: {[Op.or]: [17, 25]}}});4.2.3 Op对象有好多种用法:
onst { Op } = require("sequelize");
Post.findAll({where: {[Op.and]: [{ a: 5 }, { b: 6 }],            // (a = 5) AND (b = 6)[Op.or]: [{ a: 5 }, { b: 6 }],             // (a = 5) OR (b = 6)someAttribute: {// Basics[Op.eq]: 3,                              // = 3[Op.ne]: 20,                             // != 20[Op.is]: null,                           // IS NULL[Op.not]: true,                          // IS NOT TRUE[Op.or]: [5, 6],                         // (someAttribute = 5) OR (someAttribute = 6)// Using dialect specific column identifiers (PG in the following example):[Op.col]: 'user.organization_id',        // = "user"."organization_id"// Number comparisons[Op.gt]: 6,                              // > 6[Op.gte]: 6,                             // >= 6[Op.lt]: 10,                             // < 10[Op.lte]: 10,                            // <= 10[Op.between]: [6, 10],                   // BETWEEN 6 AND 10[Op.notBetween]: [11, 15],               // NOT BETWEEN 11 AND 15// Other operators[Op.all]: sequelize.literal('SELECT 1'), // > ALL (SELECT 1)[Op.in]: [1, 2],                         // IN [1, 2][Op.notIn]: [1, 2],                      // NOT IN [1, 2][Op.like]: '%hat',                       // LIKE '%hat'[Op.notLike]: '%hat',                    // NOT LIKE '%hat'[Op.startsWith]: 'hat',                  // LIKE 'hat%'[Op.endsWith]: 'hat',                    // LIKE '%hat'[Op.substring]: 'hat',                   // LIKE '%hat%'[Op.iLike]: '%hat',                      // ILIKE '%hat' (case insensitive) (PG only)[Op.notILike]: '%hat',                   // NOT ILIKE '%hat'  (PG only)[Op.regexp]: '^[h|a|t]',                 // REGEXP/~ '^[h|a|t]' (MySQL/PG only)[Op.notRegexp]: '^[h|a|t]',              // NOT REGEXP/!~ '^[h|a|t]' (MySQL/PG only)[Op.iRegexp]: '^[h|a|t]',                // ~* '^[h|a|t]' (PG only)[Op.notIRegexp]: '^[h|a|t]',             // !~* '^[h|a|t]' (PG only)[Op.any]: [2, 3],                        // ANY ARRAY[2, 3]::INTEGER (PG only)// In Postgres, Op.like/Op.iLike/Op.notLike can be combined to Op.any:[Op.like]: { [Op.any]: ['cat', 'hat'] }  // LIKE ANY ARRAY['cat', 'hat']// There are more postgres-only range operators, see below}}
});
4.2.4 Op.in可以简写
const students = await Student.findAll({where: {age: [17, 25]}});五. 更多查询方法
1. findByPk 按主键查询
const student = await Student.findByPk(2)2. findOne 找到第一个条目
const student = await Student.findOne({ where: { age: 17 } })3. findOrCreate 查询或创建
findOrCreate将在表中找满足查询选项的条目, 没有则创建一个条目。
在这两种情况下,它都会返回一个实例(找到的实例或创建的实例)和一个布尔值,指示该实例是已创建还是已经存在。
const [student, created] = await Student.findOrCreate({where: { name: "范冰冰" },defaults: {age: 35, score: 100,brithday: new Date('2020-03-05')}})不知道是不是我用的不对, 创建时会在服务器控制台报错, 但仍旧能创建成功
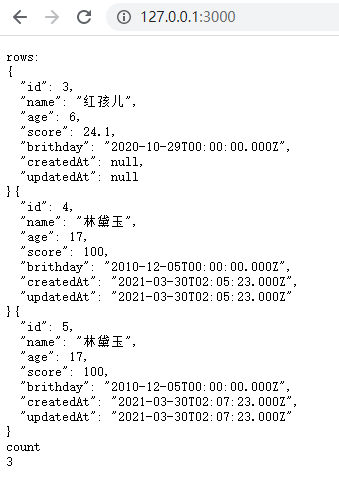
3. findAndCountAll
findAndCountAll方法是组合findAll和的便捷方法count。
该findAndCountAll方法返回一个具有两个属性的对象:
count -整数-符合查询条件的记录总数
rows -对象数组-获得的记录
router.get('/', async (ctx, next) => {const {count, rows} = await Student.findAndCountAll({where: {age: {[Op.lt]: 25}}})let str1 = ''rows.forEach((row) => str1 += JSON.stringify(row, null, 2))ctx.body = 'rows:\n' + str1 + '\ncount\n' + count
})
五. order排序查询
order选项采用一项或一个sequelize方法进行排序。
例如:
const students = await Student.findAll({order: ['age']})order有好多用法:
Subtask.findAll({order: [// Will escape title and validate DESC against a list of valid direction parameters['title', 'DESC'],// Will order by max(age)sequelize.fn('max', sequelize.col('age')),// Will order by max(age) DESC[sequelize.fn('max', sequelize.col('age')), 'DESC'],// Will order by  otherfunction(`col1`, 12, 'lalala') DESC[sequelize.fn('otherfunction', sequelize.col('col1'), 12, 'lalala'), 'DESC'],// Will order an associated model's createdAt using the model name as the association's name.[Task, 'createdAt', 'DESC'],// Will order through an associated model's createdAt using the model names as the associations' names.[Task, Project, 'createdAt', 'DESC'],// Will order by an associated model's createdAt using the name of the association.['Task', 'createdAt', 'DESC'],// Will order by a nested associated model's createdAt using the names of the associations.['Task', 'Project', 'createdAt', 'DESC'],// Will order by an associated model's createdAt using an association object. (preferred method)[Subtask.associations.Task, 'createdAt', 'DESC'],// Will order by a nested associated model's createdAt using association objects. (preferred method)[Subtask.associations.Task, Task.associations.Project, 'createdAt', 'DESC'],// Will order by an associated model's createdAt using a simple association object.[{model: Task, as: 'Task'}, 'createdAt', 'DESC'],// Will order by a nested associated model's createdAt simple association objects.[{model: Task, as: 'Task'}, {model: Project, as: 'Project'}, 'createdAt', 'DESC']],// Will order by max age descendingorder: sequelize.literal('max(age) DESC'),// Will order by max age ascending assuming ascending is the default order when direction is omittedorder: sequelize.fn('max', sequelize.col('age')),// Will order by age ascending assuming ascending is the default order when direction is omittedorder: sequelize.col('age'),// Will order randomly based on the dialect (instead of fn('RAND') or fn('RANDOM'))order: sequelize.random()
});Foo.findOne({order: [// will return `name`['name'],// will return `username` DESC['username', 'DESC'],// will return max(`age`)sequelize.fn('max', sequelize.col('age')),// will return max(`age`) DESC[sequelize.fn('max', sequelize.col('age')), 'DESC'],// will return otherfunction(`col1`, 12, 'lalala') DESC[sequelize.fn('otherfunction', sequelize.col('col1'), 12, 'lalala'), 'DESC'],// will return otherfunction(awesomefunction(`col`)) DESC, This nesting is potentially infinite![sequelize.fn('otherfunction', sequelize.fn('awesomefunction', sequelize.col('col'))), 'DESC']]
});
六. 分组查询
const students = await Student.findAll({group: 'name'})七. 查询的限制和分页
在limit和offset选项允许您使用限制/分页工作:
// Fetch 10 instances/rows
Project.findAll({ limit: 10 });// Skip 8 instances/rows
Project.findAll({ offset: 8 });// Skip 5 instances and fetch the 5 after that
Project.findAll({ offset: 5, limit: 5 });
通常,这些order选项与选项一起使用。
八. 更新模型中的数据(更新表中数据)
8.1. 简单的UPDATE
更新也接受where选项,就像上面的读取一样。
await Student.update({ age: 23 },{where: {name: '杨玉环'}})九. 删除表中数据
删除也接受where选项,就像上面的读取一样。
await Student.destroy({where: {name: '杨玉环'}})十. 使用原始SQL语句
在很多情况下执行原始SQL查询更加容易,此时可以使用sequelize.query方法。
默认情况下,该函数将返回两个参数: -一个结果数组和一个包含元数据的对象(例如,受影响的行数等), 但对于MySQL,它们将是对同一对象的两个引用。
const [results, metadata] = await sequelize.query("UPDATE users SET y = 42 WHERE x = 12");关于原始查询:详见:https://sequelize.org/master/manual/raw-queries.html
十一. 建立表间连接
表与表之间无外乎:
一对一 belongsto
外键一对一 hasone
一对多 hasmany
多对多 belongsToMany
Banner.belongsTo(Image, {foreignKey: 'img_id',targetKey: 'id'
})
今天我们熟悉了很多sequelize的特性和方法, 基本可以掌握sequelize的用法, 下一步: 我们将对sequelize进行封装, 具体请参考下一篇文章.
相关文章:
这篇关于Koa2使用sequelize操作Mysql(一) sequelize的文章就介绍到这儿,希望我们推荐的文章对编程师们有所帮助!


