本文主要是介绍使用深度学习进行脑肿瘤检测和定位:第 1 部分,希望对大家解决编程问题提供一定的参考价值,需要的开发者们随着小编来一起学习吧!

问题陈述
通过使用 Kaggle 的 MRI 数据集的图像分割来预测和定位脑肿瘤。
将本文分为两个部分,因为我们将针对相同的数据集,不同的任务训练两个深度学习模型。
这部分的模型是一个分类模型,它会从 MRI 图像中检测肿瘤,然后如果存在肿瘤,我们将在本系列的下一部分中进一步定位有肿瘤的大脑部分。
先决条件
深度学习
让我们入使用 python 的实现部分。
数据集:https : //www.kaggle.com/mateuszbuda/lgg-mri-segmentation
让我们从导入所需的库开始。
import pandas as pd
import numpy as np
import seaborn as sns
import matplotlib.pyplot as plt
import cv2
from skimage import io
import tensorflow as tf
from tensorflow.python.keras import Sequential
from tensorflow.keras import layers, optimizers
from tensorflow.keras.applications.resnet50 import ResNet50
from tensorflow.keras.layers import *
from tensorflow.keras.models import Model
from tensorflow.keras.callbacks import EarlyStopping, ModelCheckpoint
from tensorflow.keras import backend as K
from sklearn.preprocessing import StandardScaler
%matplotlib inline
将数据集的 CSV 文件转换为数据帧,对其进行特定的操作。
# data containing path to Brain MRI and their corresponding mask
brain_df = pd.read_csv('/Healthcare AI Datasets/Brain_MRI/data_mask.csv')
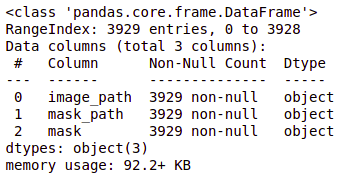
查看数据帧详细信息。
brain_df.info()
brain_df.head(5)
患者 ID:每条记录的患者 ID(dtype:对象)
图像路径:MRI 图像的路径(dtype:对象)
蒙版路径:对应图像蒙版的路径(dtype:Object)
蒙版:有两个值:0 和 1,具体取决于蒙版的图像。(数据类型:int64)
计算每个类的值。
brain_df['mask'].value_counts()
随机显示数据集中的 MRI 图像。
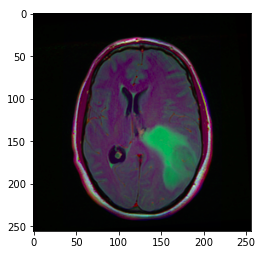
image = cv2.imread(brain_df.image_path[1301])
plt.imshow(image)
image_path 存储大脑 MRI 的路径,因此我们可以使用 matplotlib 显示图像。
提示:上图中的绿色部分可以认为是肿瘤。
此外,显示相应的蒙版图像。
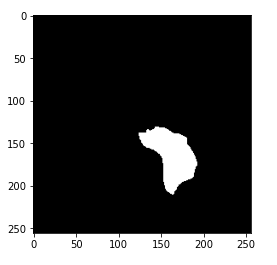
image1 = cv2.imread(brain_df.mask_path[1301])
plt.imshow(image1)
现在,你可能已经知道蒙版是什么了。蒙版是对应的 MRI 图像中受肿瘤影响的大脑部分的图像。这里,蒙版是上面显示的大脑 MRI。
分析蒙版图像的像素值。
cv2.imread(brain_df.mask_path[1301]).max()输出:255
蒙版图像中的最大像素值为 255,表示白色。
cv2.imread(brain_df.mask_path[1301]).min()输出:0
蒙版图像中的最小像素值为 0,表示黑色。
可视化大脑 MRI、相应的蒙版和带有蒙版的 MRI。
count = 0
fig, axs = plt.subplots(12, 3, figsize = (20, 50))
for i in range(len(brain_df)):if brain_df['mask'][i] ==1 and count <5:img = io.imread(brain_df.image_path[i])axs[count][0].title.set_text('Brain MRI')axs[count][0].imshow(img)mask = io.imread(brain_df.mask_path[i])axs[count][1].title.set_text('Mask')axs[count][1].imshow(mask, cmap = 'gray')img[mask == 255] = (255, 0, 0) #Red coloraxs[count][2].title.set_text('MRI with Mask')axs[count][2].imshow(img)count+=1fig.tight_layout()
删除 id,因为它不需要进一步处理。
# Drop the patient id column
brain_df_train = brain_df.drop(columns = ['patient_id'])
brain_df_train.shape
你将在输出中获得数据框的大小:(3929, 3)
将蒙版列中的数据从整数格式转换为字符串格式,因为我们需要字符串格式的数据。
brain_df_train['mask'] = brain_df_train['mask'].apply(lambda x: str(x))
brain_df_train.info()
如你所见,现在每个特征都将数据类型作为对象。
将数据拆分为训练集和测试集。
# split the data into train and test data
from sklearn.model_selection import train_test_split
train, test = train_test_split(brain_df_train, test_size = 0.15)
使用 ImageDataGenerator 扩充更多数据。ImageDataGenerator 通过实时数据增强生成批量的张量图像数据。
有关 ImageDataGenerator 和参数的详细信息,请参阅此处:https://www.tensorflow.org/api_docs/python/tf/keras/preprocessing/image/ImageDataGenerator
我们将从训练数据创建一个 train_generator 和 validation_generator,并从测试数据创建一个 test_generator。
# create an image generator
from keras_preprocessing.image import ImageDataGenerator#Create a data generator which scales the data from 0 to 1 and makes validation split of 0.15
datagen = ImageDataGenerator(rescale=1./255., validation_split = 0.15)train_generator=datagen.flow_from_dataframe(
dataframe=train,
directory= './',
x_col='image_path',
y_col='mask',
subset="training",
batch_size=16,
shuffle=True,
class_mode="categorical",
target_size=(256,256))valid_generator=datagen.flow_from_dataframe(
dataframe=train,
directory= './',
x_col='image_path',
y_col='mask',
subset="validation",
batch_size=16,
shuffle=True,
class_mode="categorical",
target_size=(256,256))# Create a data generator for test images
test_datagen=ImageDataGenerator(rescale=1./255.)test_generator=test_datagen.flow_from_dataframe(
dataframe=test,
directory= './',
x_col='image_path',
y_col='mask',
batch_size=16,
shuffle=False,
class_mode='categorical',
target_size=(256,256))
现在,我们将学习迁移学习和 ResNet50 模型的概念,它们将用于进一步训练模型。
顾名思义,迁移学习是一种在训练中使用预训练模型的技术。你可以在此预训练模型的基础上构建模型。这是一个可以帮助你减少开发时间并提高性能的过程。
ResNet(残差网络)是在 ImageNet 数据集上训练的 ANN,可用于在其之上训练模型。ResNet50 是 ResNet 模型的变体,它有 48 个卷积层以及 1 个 MaxPool 和 1 个平均池层。
在这里,我们使用的是 ResNet50 模型,它是一种迁移学习模型。使用它,我们将进一步添加更多层来构建我们的模型。
# Get the ResNet50 base model (Transfer Learning)
basemodel = ResNet50(weights = 'imagenet', include_top = False, input_tensor = Input(shape=(256, 256, 3)))
basemodel.summary()
你可以使用 .summary() 查看 resnet50 模型中的层,如上所示。
冻结模型权重。这意味着我们将保持权重不变,以便它不会进一步更新。这将避免在进一步训练期间破坏任何信息。
# freeze the model weights
for layer in basemodel.layers:layers.trainable = False
现在,如上所述,我们将在 ResNet50 层的顶部添加更多层。这些层会学习将旧特征转化为对我们数据集的预测。
headmodel = basemodel.output
headmodel = AveragePooling2D(pool_size = (4,4))(headmodel)
headmodel = Flatten(name= 'flatten')(headmodel)
headmodel = Dense(256, activation = "relu")(headmodel)
headmodel = Dropout(0.3)(headmodel)
headmodel = Dense(256, activation = "relu")(headmodel)
headmodel = Dropout(0.3)(headmodel)
headmodel = Dense(256, activation = "relu")(headmodel)
headmodel = Dropout(0.3)(headmodel)
headmodel = Dense(2, activation = 'softmax')(headmodel)model = Model(inputs = basemodel.input, outputs = headmodel)
model.summary()
这些图层已添加,你可以在摘要中看到它们。
池化层用于减少特征图的维度。平均池化层返回值的平均值。
Flatten 层将我们的数据转换为向量。
密集层是规则的深度连接神经网络层。基本上,它接受输入并计算输出 = activation(dot(input, kernel) + bias)
dropout 层可以防止模型过拟合。它在训练过程中将隐藏层的输入单元随机设置为 0。
编译上面构建的模型。Compile 定义了损失函数、优化器和指标。
# compile the model
model.compile(loss = 'categorical_crossentropy', optimizer='adam', metrics= ["accuracy"])
执行提前停止以保存具有最小验证损失的最佳模型。提前停止执行大量训练时期,一旦模型性能在验证数据集上没有进一步提高就停止训练。
在此处(https://keras.io/api/callbacks/early_stopping/)阅读有关 EarlyStopping 的更多信息。
ModelCheckpoint 回调与使用 model.fit() 的训练一起使用,以在某个时间间隔保存权重,因此可以稍后加载权重,以便从保存的状态继续训练。
在此处(https://keras.io/api/callbacks/model_checkpoint/)阅读有关 ModelCheckpoint 参数的更多信息。
# use early stopping to exit training if validation loss is not decreasing even after certain epochs
earlystopping = EarlyStopping(monitor='val_loss', mode='min', verbose=1, patience=20)# save the model with least validation loss
checkpointer = ModelCheckpoint(filepath="classifier-resnet-weights.hdf5", verbose=1, save_best_only=True)
现在,你训练模型并在参数中提供上面定义的回调。
model.fit(train_generator, steps_per_epoch= train_generator.n // 16, epochs = 1, validation_data= valid_generator, validation_steps= valid_generator.n // 16, callbacks=[checkpointer, earlystopping])预测并将预测数据转换为列表。
# make prediction
test_predict = model.predict(test_generator, steps = test_generator.n // 16, verbose =1)# Obtain the predicted class from the model prediction
predict = []
for i in test_predict:predict.append(str(np.argmax(i)))
predict = np.asarray(predict)
测量模型的准确性。
# Obtain the accuracy of the model
from sklearn.metrics import accuracy_scoreaccuracy = accuracy_score(original, predict)
accuracy
打印分类报告。
from sklearn.metrics import classification_report
report = classification_report(original, predict, labels = [0,1])
print(report)
☆ END ☆
如果看到这里,说明你喜欢这篇文章,请转发、点赞。微信搜索「uncle_pn」,欢迎添加小编微信「 woshicver」,每日朋友圈更新一篇高质量博文。
↓扫描二维码添加小编↓

这篇关于使用深度学习进行脑肿瘤检测和定位:第 1 部分的文章就介绍到这儿,希望我们推荐的文章对编程师们有所帮助!


