本文主要是介绍Qt中的水平|垂直布局管理器(QBoxLayout、QHboxLayout和QVBoxLayout),希望对大家解决编程问题提供一定的参考价值,需要的开发者们随着小编来一起学习吧!
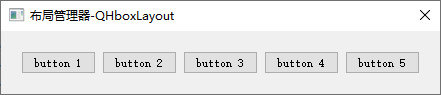
QHBoxLayout 类水平排列小部件。
下面介绍水平布局管理器的使用方法:
效果

源码:
QHBoxLayout* hLayout = new QHBoxLayout();QPushButton* pbtn1 = new QPushButton("button 1");QPushButton* pbtn2 = new QPushButton("button 2");QPushButton* pbtn3 = new QPushButton("button 3");QPushButton* pbtn4 = new QPushButton("button 4");QPushButton* pbtn5 = new QPushButton("button 5");hLayout->addWidget(pbtn1);hLayout->addWidget(pbtn2);hLayout->addWidget(pbtn3);hLayout->addWidget(pbtn4);hLayout->addWidget(pbtn5);setWindowTitle(QString::fromLocal8Bit("布局管理器-QHboxLayout"));setLayout(hLayout);qDebug() << "this: " << this;qDebug() << pbtn1->text() + " Parent:" << pbtn1->parent();qDebug() << pbtn2->text() + " Parent:" << pbtn2->parent();qDebug() << pbtn3->text() + " Parent:" << pbtn3->parent();qDebug() << pbtn4->text() + " Parent:" << pbtn4->parent();qDebug() << pbtn5->text() + " Parent:" << pbtn5->parent();
结果是 同一个QHBoxLayout管理的组件有相同的父组件。
接口分析
设置外边距的函数:
- void setMargin(int)
- void setContentsMargins(int left, int top, int right, int bottom)
- void setContentsMargins(const QMargins &margins)
hLayout->setContentsMargins(20, 20, 20, 20);运行效果:
设置间距:
此属性保存布局内小部件之间的间距
- void setSpacing(int)
hLayout->setSpacing(0);运行效果图:

设置组件伸缩比例系数:
- void setStretch(int index, int stretch)
- bool setStretchFactor(QWidget *widget, int stretch)
- bool setStretchFactor(QLayout *layout, int stretch)
hLayout->setStretch(0, 1);hLayout->setStretch(1, 2);hLayout->setStretch(2, 3);运行效果图:

添加一个伸缩空间:
将大小为 size 的不可拉伸空间(QSpacerItem)添加到此框布局的末尾。 QBoxLayout 提供默认的边距和间距。 此功能增加了额外的空间。
- void addSpacing(int size)
hLayout->addStretch(0);hLayout->addWidget(pbtn1);hLayout->addWidget(pbtn2);hLayout->addWidget(pbtn3);hLayout->addWidget(pbtn4);hLayout->addWidget(pbtn5);hLayout->addStretch(0);运行效果图:

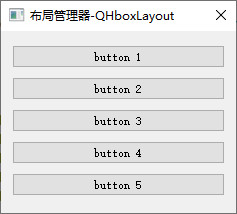
QVBoxLayout 类垂直排列小部件。
下面介绍QVBoxLayout使用方法:
效果图:
源码:
QVBoxLayout* vLayout = new QVBoxLayout();QPushButton* pbtn1 = new QPushButton("button 1");QPushButton* pbtn2 = new QPushButton("button 2");QPushButton* pbtn3 = new QPushButton("button 3");QPushButton* pbtn4 = new QPushButton("button 4");QPushButton* pbtn5 = new QPushButton("button 5");vLayout->addWidget(pbtn1);vLayout->addWidget(pbtn2);vLayout->addWidget(pbtn3);vLayout->addWidget(pbtn4);vLayout->addWidget(pbtn5);setWindowTitle(QString::fromLocal8Bit("布局管理器-QHboxLayout"));setLayout(vLayout);qDebug() << "this: " << this;qDebug() << pbtn1->text() + " Parent:" << pbtn1->parent();qDebug() << pbtn2->text() + " Parent:" << pbtn2->parent();qDebug() << pbtn3->text() + " Parent:" << pbtn3->parent();qDebug() << pbtn4->text() + " Parent:" << pbtn4->parent();qDebug() << pbtn5->text() + " Parent:" << pbtn5->parent(); 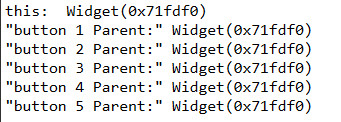
结果是 同一个QVBoxLayout管理的组件有相同的父组件。
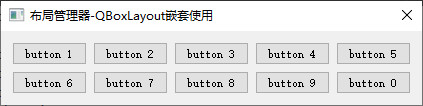
QHBoxLayout和QVBoxLayout嵌套使用:
运行效果图:
源码:
QVBoxLayout* vLayout = new QVBoxLayout();QHBoxLayout* hLayout1 = new QHBoxLayout();QHBoxLayout* hLayout2 = new QHBoxLayout();QPushButton* pbtn1 = new QPushButton("button 1");QPushButton* pbtn2 = new QPushButton("button 2");QPushButton* pbtn3 = new QPushButton("button 3");QPushButton* pbtn4 = new QPushButton("button 4");QPushButton* pbtn5 = new QPushButton("button 5");QPushButton* pbtn6 = new QPushButton("button 6");QPushButton* pbtn7 = new QPushButton("button 7");QPushButton* pbtn8 = new QPushButton("button 8");QPushButton* pbtn9 = new QPushButton("button 9");QPushButton* pbtn0 = new QPushButton("button 0");hLayout1->addWidget(pbtn1);hLayout1->addWidget(pbtn2);hLayout1->addWidget(pbtn3);hLayout1->addWidget(pbtn4);hLayout1->addWidget(pbtn5);hLayout2->addWidget(pbtn6);hLayout2->addWidget(pbtn7);hLayout2->addWidget(pbtn8);hLayout2->addWidget(pbtn9);hLayout2->addWidget(pbtn0);vLayout->addLayout(hLayout1);vLayout->addLayout(hLayout2);setLayout(vLayout);setWindowTitle(QString::fromLocal8Bit("布局管理器-QBoxLayout嵌套使用"));
这篇关于Qt中的水平|垂直布局管理器(QBoxLayout、QHboxLayout和QVBoxLayout)的文章就介绍到这儿,希望我们推荐的文章对编程师们有所帮助!


