本文主要是介绍[PyTorch][chapter 57][WGAN-GP 代码实现],希望对大家解决编程问题提供一定的参考价值,需要的开发者们随着小编来一起学习吧!
前言:
下图为WGAN 的效果图:
绿色为真实数据的分布: 8个高斯分布
红色: 为随机产生的数据分布,跟真实分布基本一致

WGAN-GP:
1 判别器D: 最后一层去掉sigmoid
2 生成器G 和判别器D: loss不取log
3 损失函数 增加了penalty,使用Adam
Wasserstein GAN
1 判别器D: 最后一层去掉sigmoid
2 生成器G 和判别器D: loss不取log
3 每次更新判别器的参数之后把它们的绝对值截断到不超过一个固定常数c
4 不要用基于动量的优化算法(包括momentum和Adam),推荐RMSProp,SGD也行
一 简介
1.1 模型结构

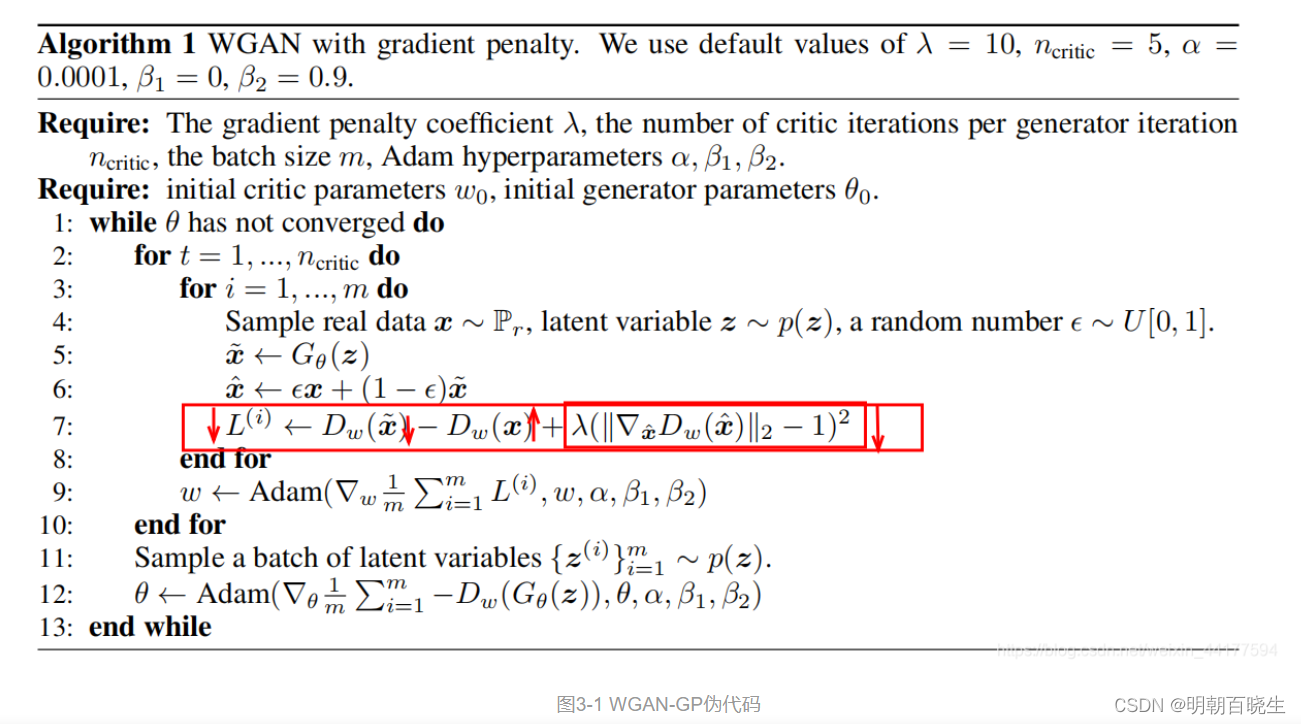
1.2 伪代码
二 wgan.py
主要变化:
Generator 中 去掉了之前的logit 函数
# -*- coding: utf-8 -*-
"""
Created on Thu Sep 28 11:10:19 2023@author: chengxf2
"""import torch
from   torch import nn#生成器模型
h_dim = 400
class Generator(nn.Module):def __init__(self):super(Generator,self).__init__()# z: [batch,input_features]self.net = nn.Sequential(nn.Linear(2, h_dim),nn.ReLU(True),nn.Linear( h_dim, h_dim),nn.ReLU(True),nn.Linear(h_dim, h_dim),nn.ReLU(True),nn.Linear(h_dim, 2))def forward(self, z):output = self.net(z)return output#鉴别器模型
class Discriminator(nn.Module):def __init__(self):super(Discriminator,self).__init__()hDim=400# x: [batch,input_features]self.net = nn.Sequential(nn.Linear(2, hDim),nn.ReLU(True),nn.Linear(hDim, hDim),nn.ReLU(True),nn.Linear(hDim, hDim),nn.ReLU(True),nn.Linear(hDim, 1),)def forward(self, x):#x:[batch,1]output = self.net(x)out = output.view(-1)return out
三 main.py
主要变化:
损失函数中增加了gradient_penalty
# -*- coding: utf-8 -*-
"""
Created on Thu Sep 28 11:28:32 2023@author: chengxf2
"""import visdom
from gan  import  Discriminator
from gan  import Generator
import numpy as np
import random
import torch
from   torch import nn, optim
from    matplotlib import pyplot as plt
from torch import autogradh_dim =400
batchsz = 256
viz = visdom.Visdom()
device = torch.device("cuda:0" if torch.cuda.is_available() else "cpu")def weights_init(net):if isinstance(net, nn.Linear):# net.weight.data.normal_(0.0, 0.02)nn.init.kaiming_normal_(net.weight)net.bias.data.fill_(0)def data_generator():"""8- gaussian destributionReturns-------None."""scale = 2a = np.sqrt(2.0)centers =[(1,0),(-1,0),(0,1),(0,-1),(1/a,1/a),(1/a,-1/a),(-1/a, 1/a),(-1/a,-1/a)]centers = [(scale*x, scale*y) for x,y in centers]while True:dataset =[]for i in range(batchsz):point = np.random.randn(2)*0.02center = random.choice(centers)point[0] += center[0]point[1] += center[1]dataset.append(point)dataset = np.array(dataset).astype(np.float32)dataset /=a#生成器函数是一个特殊的函数,可以返回一个迭代器yield datasetdef generate_image(D, G, xr, epoch):      #xr表示真实的sample"""Generates and saves a plot of the true distribution, the generator, and thecritic."""N_POINTS = 128RANGE = 3plt.clf()points = np.zeros((N_POINTS, N_POINTS, 2), dtype='float32')points[:, :, 0] = np.linspace(-RANGE, RANGE, N_POINTS)[:, None]points[:, :, 1] = np.linspace(-RANGE, RANGE, N_POINTS)[None, :]points = points.reshape((-1, 2))             # (16384, 2)x = y = np.linspace(-RANGE, RANGE, N_POINTS)N = len(x)# draw contourwith torch.no_grad():points = torch.Tensor(points)      # [16384, 2]disc_map = D(points).cpu().numpy() # [16384]plt.contour(x, y, disc_map.reshape((N, N)).transpose())#plt.clabel(cs, inline=1, fontsize=10)plt.colorbar()# draw sampleswith torch.no_grad():z = torch.randn(batchsz, 2)                 # [b, 2]samples = G(z).cpu().numpy()                # [b, 2]plt.scatter(xr[:, 0], xr[:, 1], c='green', marker='.')plt.scatter(samples[:, 0], samples[:, 1], c='red', marker='+')viz.matplot(plt, win='contour', opts=dict(title='p(x):%d'%epoch))def gradient_penalty(D, xr,xf):#[b,1]t =  torch.rand(batchsz, 1).to(device)       #[b,1]=>[b,2]  保证每个sample t 相同t =  t.expand_as(xr)#sample penalty interpoation [b,2]mid = t*xr +(1-t)*xfmid.requires_grad_()pred = D(mid) #[256]'''grad_outputs:   如果outputs 是向量,则此参数必须写retain_graph:  True 则保留计算图, False则释放计算图create_graph: 若要计算高阶导数,则必须选为Trueallow_unused: 允许输入变量不进入计算'''grads = autograd.grad(outputs= pred, inputs = mid,grad_outputs= torch.ones_like(pred),create_graph=True,retain_graph=True,only_inputs=True)[0]gp = torch.pow(grads.norm(2, dim=1)-1,2).mean()return gpdef main():lambd = 0.2 #超参数maxIter = 1000torch.manual_seed(10)np.random.seed(10)data_iter  = data_generator()G = Generator().to(device)D = Discriminator().to(device)G.apply(weights_init)D.apply(weights_init)optim_G = optim.Adam(G.parameters(),lr =5e-4, betas=(0.5,0.9))optim_D = optim.Adam(D.parameters(),lr =5e-4, betas=(0.5,0.9))K = 5viz.line([[0,0]], [0], win='loss', opts=dict(title='loss', legend=['D', 'G']))for epoch in range(maxIter):#1: train Discrimator fistlyfor k in range(K):#1.1: train on real dataxr = next(data_iter)xr = torch.from_numpy(xr).to(device)predr = D(xr)#max(predr) == min(-predr)lossr = -predr.mean()#1.2: train on fake dataz = torch.randn(batchsz,2).to(device) #[b,2] 随机产生的噪声xf = G(z).detach() #固定G,不更新G参数 tf.stop_gradient()predf =D(xf)lossf = predf.mean()#1.3 gradient_penaltygp = gradient_penalty(D, xr,xf.detach())#aggregate allloss_D = lossr + lossf +lambd*gpoptim_D.zero_grad()loss_D.backward()optim_D.step()#print("\n Discriminator 训练结束 ",loss_D.item())# 2 train  Generator#2.1 train on fake dataz = torch.randn(batchsz, 2).to(device)xf = G(z)predf =D(xf) #期望最大loss_G= -predf.mean()#optimizeoptim_G.zero_grad()loss_G.backward()optim_G.step()if epoch %100 ==0:viz.line([[loss_D.item(), loss_G.item()]], [epoch], win='loss', update='append')generate_image(D, G, xr, epoch)print("\n epoch: %d"%epoch,"\t lossD: %7.4f"%loss_D.item(),"\t lossG: %7.4f"%loss_G.item())if __name__ == "__main__":main()
参考:
课时130 WGAN-GP实战_哔哩哔哩_bilibili
WGAN基本原理及Pytorch实现WGAN-CSDN博客
CSDN
这篇关于[PyTorch][chapter 57][WGAN-GP 代码实现]的文章就介绍到这儿,希望我们推荐的文章对编程师们有所帮助!


