本文主要是介绍Linux配置proxychains-ng,希望对大家解决编程问题提供一定的参考价值,需要的开发者们随着小编来一起学习吧!
文章目录
- 具体步骤
- 编译安装proxychains-ng
- 遇到的问题debug过程
- 修改 proxychains.conf文件
- 使用 proxychains4
- 参考
具体步骤
编译安装proxychains-ng
https://github.com/rofl0r/proxychains-ng是用来让命令行被代理转发的。
使用git下载proxychains-ng的源码,不过我的服务器有问题,下载不了。
git clone https://github.com/rofl0r/proxychains-ng
所以本地电脑下载之后,手动上传到服务器。
然后按照如下的命令操作:如果没有遇到问题即可正常使用,而我用的时候会有问题,具体请参加下面的debug过程。
$ cd proxychains-ng
$ ./configure --prefix=/usr --sysconfdir=/etc
$ make
$ make install
$ make install-config #(安装proxychains.conf配置文件)
遇到的问题debug过程
遇到问题bash: ./configure: /bin/sh^M: bad interpreter: No such file or directory
(base) lishizheng@dell-PowerEdge-T640:~$ cd proxychains-ng/
(base) lishizheng@dell-PowerEdge-T640:~/proxychains-ng$ ls
AUTHORS  completions  configure  COPYING  Makefile  README  src  tests  TODO  tools  VERSION
(base) lishizheng@dell-PowerEdge-T640:~/proxychains-ng$ ./configure --prefix=/usr --sysconfdir=/etc
bash: ./configure: Permission denied
(base) lishizheng@dell-PowerEdge-T640:~/proxychains-ng$ chmod +x configure
(base) lishizheng@dell-PowerEdge-T640:~/proxychains-ng$ ls
AUTHORS  completions  configure  COPYING  Makefile  README  src  tests  TODO  tools  VERSION
(base) lishizheng@dell-PowerEdge-T640:~/proxychains-ng$ ./configure --prefix=/usr --sysconfdir=/etc
bash: ./configure: /bin/sh^M: bad interpreter: No such file or directory
这个问题的解决方法是:使用vim打开configure文件,然后设置ff=unix,如下所示:
vim configure
:set ff=unix
:wq
然后再执行,便不会报错
(base) lishizheng@dell-PowerEdge-T640:~/proxychains-ng$ ./configure --prefix=/usr --sysconfdir=/etc
checking whether C compiler works ... yes
checking whether libc headers are complete ... yes
checking whether C compiler understands -Wno-unknown-pragmas ... yes
checking whether getnameinfo() servlen argument is POSIX compliant (socklen_t) ... yes
checking whether we have GNU-style getservbyname_r() ... yes
checking whether we have pipe2() and O_CLOEXEC ... yes
checking whether we have SOCK_CLOEXEC ... yes
checking whether we have clock_gettime ... yes
checking whether $CC defines __APPLE__ ... no
checking whether $CC defines __FreeBSD__ ... no
checking whether $CC defines __OpenBSD__ ... no
checking whether $CC defines __sun ... no
checking whether $CC defines __HAIKU__ ... no
checking whether we can use -Wl,--no-as-needed ... yes
checking what's the option to use in linker to set library name ... --soname
checking checking whether we can use -ldl ... yes
checking checking whether we can use -lpthread ... yes
Done, now run make && make install
又遇到如下问题make: execvp: ./tools/install.sh: Permission denied:
(base) lishizheng@dell-PowerEdge-T640:~/proxychains-ng$ make install
./tools/install.sh -D -m 644 libproxychains4.so /usr/lib/libproxychains4.so
make: execvp: ./tools/install.sh: Permission denied
make: *** [Makefile:68: /usr/lib/libproxychains4.so] Error 127
(base) lishizheng@dell-PowerEdge-T640:~/proxychains-ng$ sudo make install
./tools/install.sh -D -m 644 libproxychains4.so /usr/lib/libproxychains4.so
make: execvp: ./tools/install.sh: Permission denied
make: *** [Makefile:68: /usr/lib/libproxychains4.so] Error 127
需要进入tools文件,修改install.sh的权限
(base) lishizheng@dell-PowerEdge-T640:~/proxychains-ng$ cd tools/
(base) lishizheng@dell-PowerEdge-T640:~/proxychains-ng/tools$ ls
install.sh  version.sh
(base) lishizheng@dell-PowerEdge-T640:~/proxychains-ng/tools$ ./install.sh
bash: ./install.sh: Permission denied
(base) lishizheng@dell-PowerEdge-T640:~/proxychains-ng/tools$ chmod +x install.sh
(base) lishizheng@dell-PowerEdge-T640:~/proxychains-ng/tools$ ls
install.sh  version.sh
(base) lishizheng@dell-PowerEdge-T640:~/proxychains-ng/tools$ ./install.sh
bash: ./install.sh: /bin/sh^M: bad interpreter: No such file or directory
(base) lishizheng@dell-PowerEdge-T640:~/proxychains-ng/tools$ vim install.sh
然后还是会报错:bash: ./install.sh: /bin/sh^M: bad interpreter: No such file or directory
这个处理方法和上述相同
vim install.sh
:set ff=unix
:wq
然后执行sudo make install 和sudo make install-config成功:
(base) lishizheng@dell-PowerEdge-T640:~/proxychains-ng/tools$ cd ..
(base) lishizheng@dell-PowerEdge-T640:~/proxychains-ng$ make install
./tools/install.sh -D -m 644 libproxychains4.so /usr/lib/libproxychains4.so
./tools/install.sh: 53: cannot create /usr/lib/libproxychains4.so.tmp.3951176: Permission denied
make: *** [Makefile:68: /usr/lib/libproxychains4.so] Error 2
(base) lishizheng@dell-PowerEdge-T640:~/proxychains-ng$ sudo make install
./tools/install.sh -D -m 644 libproxychains4.so /usr/lib/libproxychains4.so
./tools/install.sh -D -m 755 proxychains4 /usr/bin/proxychains4
./tools/install.sh -D -m 755 proxychains4-daemon /usr/bin/proxychains4-daemon
(base) lishizheng@dell-PowerEdge-T640:~/proxychains-ng$ sudo make install-config
./tools/install.sh -D -m 644 src/proxychains.conf /etc/proxychains.conf
修改 proxychains.conf文件
修改配置文件/etc/proxychains.conf,
vim /etc/proxychains.conf
划到最下边,删掉socks4 127.0.0.1 9050,只留下如下所示的两个端口7891和7890(Clash的默认端口)
[ProxyList]
# add proxy here ...
# meanwile
# defaults set to "tor"
socks5 127.0.0.1 7891
http 127.0.0.1 7890
遇到问题:"/etc/proxychains.conf" E212: Can't open file for writing
使用sudo打开:
(base) lishizheng@dell-PowerEdge-T640:~/proxychains-ng$ sudo vim /etc/proxychains.conf
使用 proxychains4
具体使用过程
proxychains4 命令
例如,使用proxychains4获取google.com中的index.html文件
proxychains4 wget google.com
测试成功,如下图所示
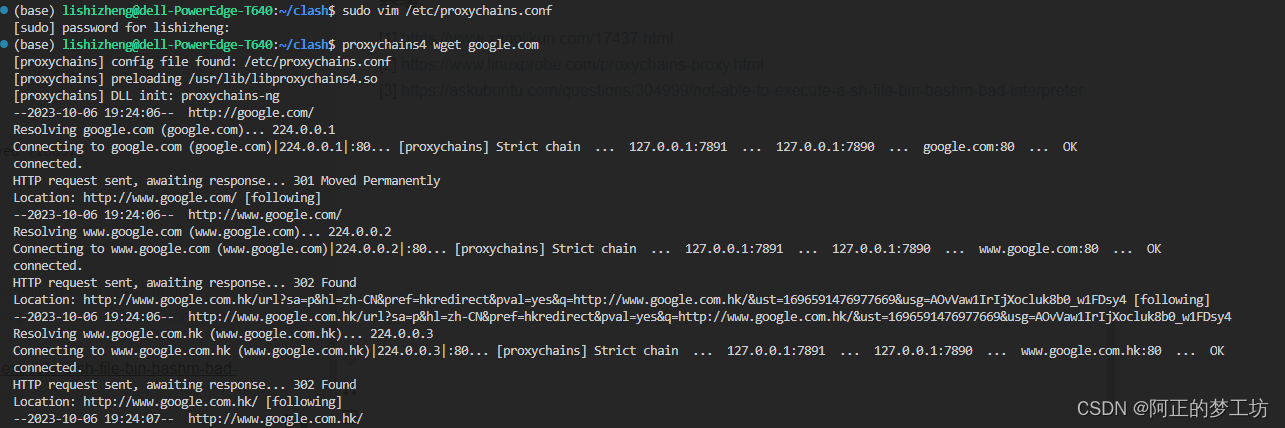
如下所示:
(base) lishizheng@dell-PowerEdge-T640:~/clash$ proxychains4 wget google.com
[proxychains] config file found: /etc/proxychains.conf
[proxychains] preloading /usr/lib/libproxychains4.so
[proxychains] DLL init: proxychains-ng
--2023-10-06 19:24:06--  http://google.com/
Resolving google.com (google.com)... 224.0.0.1
Connecting to google.com (google.com)|224.0.0.1|:80... [proxychains] Strict chain  ...  127.0.0.1:7891  ...  127.0.0.1:7890  ...  google.com:80  ...  OK
connected.
HTTP request sent, awaiting response... 301 Moved Permanently
Location: http://www.google.com/ [following]
--2023-10-06 19:24:06--  http://www.google.com/
Resolving www.google.com (www.google.com)... 224.0.0.2
Connecting to www.google.com (www.google.com)|224.0.0.2|:80... [proxychains] Strict chain  ...  127.0.0.1:7891  ...  127.0.0.1:7890  ...  www.google.com:80  ...  OK
connected.
HTTP request sent, awaiting response... 302 Found
Location: http://www.google.com.hk/url?sa=p&hl=zh-CN&pref=hkredirect&pval=yes&q=http://www.google.com.hk/&ust=1696591476977669&usg=AOvVaw1IrIjXocluk8b0_w1FDsy4 [following]
--2023-10-06 19:24:06--  http://www.google.com.hk/url?sa=p&hl=zh-CN&pref=hkredirect&pval=yes&q=http://www.google.com.hk/&ust=1696591476977669&usg=AOvVaw1IrIjXocluk8b0_w1FDsy4
Resolving www.google.com.hk (www.google.com.hk)... 224.0.0.3
Connecting to www.google.com.hk (www.google.com.hk)|224.0.0.3|:80... [proxychains] Strict chain  ...  127.0.0.1:7891  ...  127.0.0.1:7890  ...  www.google.com.hk:80  ...  OK
connected.
HTTP request sent, awaiting response... 302 Found
Location: http://www.google.com.hk/ [following]
--2023-10-06 19:24:07--  http://www.google.com.hk/
Reusing existing connection to www.google.com.hk:80.
HTTP request sent, awaiting response... 200 OK
Length: unspecified [text/html]
Saving to: ‘index.html’index.html                                           [ <=>                                                                                                    ]  17.63K  --.-KB/s    in 0.04s   2023-10-06 19:24:07 (410 KB/s) - ‘index.html’ saved [18057]
再例如,下载一个github仓库
(base) lishizheng@dell-PowerEdge-T640:~/code$ proxychains4 git clone https://github.com/shizhengLi/learning_python.git
[proxychains] config file found: /etc/proxychains.conf
[proxychains] preloading /usr/lib/libproxychains4.so
[proxychains] DLL init: proxychains-ng
Cloning into 'learning_python'...
[proxychains] DLL init: proxychains-ng
[proxychains] Strict chain  ...  127.0.0.1:7891  ...  127.0.0.1:7890  ...  github.com:443  ...  OK
[proxychains] DLL init: proxychains-ng
remote: Enumerating objects: 25, done.
remote: Counting objects: 100% (25/25), done.
remote: Compressing objects: 100% (21/21), done.
[proxychains] DLL init: proxychains-ng
remote: Total 25 (delta 2), reused 15 (delta 0), pack-reused 0
Unpacking objects: 100% (25/25), 5.48 MiB | 5.07 MiB/s, done.
[proxychains] DLL init: proxychains-ng
参考
[1] https://www.zanglikun.com/17437.html
[2] https://www.linuxprobe.com/proxychains-proxy.html
[3] https://askubuntu.com/questions/304999/not-able-to-execute-a-sh-file-bin-bashm-bad-interpreter
这篇关于Linux配置proxychains-ng的文章就介绍到这儿,希望我们推荐的文章对编程师们有所帮助!


