本文主要是介绍Java并发编程之——BlockingQueue(队列),希望对大家解决编程问题提供一定的参考价值,需要的开发者们随着小编来一起学习吧!
一、什么是BlockingQueue
BlockingQueue即阻塞队列,从阻塞这个词可以看出,在某些情况下对阻塞队列的访问可能会造成阻塞。被阻塞的情况主要有如下两种:
1. 当队列满了的时候进行入队列操作
2. 当队列空了的时候进行出队列操作
因此,当一个线程试图对一个已经满了的队列进行入队列操作时,它将会被阻塞,除非有另一个线程做了出队列操作;同样,当一个线程试图对一个空队列进行出队列操作时,它将会被阻塞,除非有另一个线程进行了入队列操作。
在Java中,BlockingQueue的接口位于java.util.concurrent 包中(在Java5版本开始提供),由上面介绍的阻塞队列的特性可知,阻塞队列是线程安全的。
二、BlockingQueue的用法
阻塞队列主要用在生产者/消费者的场景,下面这幅图展示了一个线程生产、一个线程消费的场景:
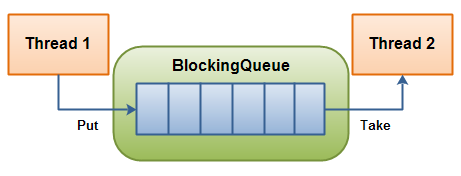
负责生产的线程不断的制造新对象并插入到阻塞队列中,直到达到这个队列的上限值。队列达到上限值之后生产线程将会被阻塞,直到消费的线程对这个队列进行消费。同理,负责消费的线程不断的从队列中消费对象,直到这个队列为空,当队列为空时,消费线程将会被阻塞,除非队列中有新的对象被插入。
三、BlockingQueue接口中的方法
阻塞队列一共有四套方法分别用来进行insert、remove和examine,当每套方法对应的操作不能马上执行时会有不同的反应,下面这个表格就分类列出了这些方法:
asdf
| - | Throws Exception | Special Value | Blocks | Times Out |
|---|
| Insert | add(o) | offer(o) | put(o) | offer(o, timeout, timeunit) |
| Remove | remove(o) | poll() | take() | poll(timeout, timeunit) |
| Examine | element() | peek() | | |
这四套方法对应的特点分别是:
1. ThrowsException:如果操作不能马上进行,则抛出异常
2. SpecialValue:如果操作不能马上进行,将会返回一个特殊的值,一般是true或者false
3. Blocks:如果操作不能马上进行,操作会被阻塞
4. TimesOut:如果操作不能马上进行,操作会被阻塞指定的时间,如果指定时间没执行,则返回一个特殊值,一般是true或者false
需要注意的是,我们不能向BlockingQueue中插入null,否则会报NullPointerException。
四、BlockingQueue的实现类
BlockingQueue只是java.util.concurrent包中的一个接口,而在具体使用时,我们用到的是它的实现类,当然这些实现类也位于java.util.concurrent包中。在Java6中,BlockingQueue的实现类主要有以下几种:
1. ArrayBlockingQueue
2. DelayQueue
3. LinkedBlockingQueue
4. PriorityBlockingQueue
5. SynchronousQueue
下面我们就分别介绍这几个实现类。
4.1 ArrayBlockingQueue
ArrayBlockingQueue是一个有边界的阻塞队列,它的内部实现是一个数组。有边界的意思是它的容量是有限的,我们必须在其初始化的时候指定它的容量大小,容量大小一旦指定就不可改变。
ArrayBlockingQueue是以先进先出的方式存储数据,最新插入的对象是尾部,最新移出的对象是头部。下面是一个初始化和使用ArrayBlockingQueue的例子:
BlockingQueue queue = new ArrayBlockingQueue(1024);
queue.put("1");
Object object = queue.take();
4.2 DelayQueue
DelayQueue阻塞的是其内部元素,DelayQueue中的元素必须实现 java.util.concurrent.Delayed接口,这个接口的定义非常简单:
public interface Delayed extends Comparable<Delayed> {
long getDelay(TimeUnit unit);
}
getDelay()方法的返回值就是队列元素被释放前的保持时间,如果返回0或者一个负值,就意味着该元素已经到期需要被释放,此时DelayedQueue会通过其take()方法释放此对象。
从上面Delayed 接口定义可以看到,它还继承了Comparable接口,这是因为DelayedQueue中的元素需要进行排序,一般情况,我们都是按元素过期时间的优先级进行排序。
例1:为一个对象指定过期时间
首先,我们先定义一个元素,这个元素要实现Delayed接口
public class DelayedElement implements Delayed {private long expired;private long delay;private String name;DelayedElement(String elementName, long delay) {this. name = elementName;this. delay= delay;expired = ( delay + System. currentTimeMillis());}@Overridepublic int compareTo(Delayed o) {DelayedElement cached=(DelayedElement) o;return cached.getExpired()> expired?1:-1;}@Overridepublic long getDelay(TimeUnit unit) {return ( expired - System. currentTimeMillis());}@Overridepublic String toString() {return "DelayedElement [delay=" + delay + ", name=" + name + "]";}public long getExpired() {return expired;}}
- 1
- 2
- 3
- 4
- 5
- 6
- 7
- 8
- 9
- 10
- 11
- 12
- 13
- 14
- 15
- 16
- 17
- 18
- 19
- 20
- 21
- 22
- 23
- 24
- 25
- 26
- 27
- 28
- 29
- 30
- 31
- 32
- 33
- 34
设置这个元素的过期时间为3s
public class DelayQueueExample {public static void main(String[] args) throws InterruptedException {DelayQueue<DelayedElement> queue= new DelayQueue<>();DelayedElement ele= new DelayedElement( "cache 3 seconds",3000);queue.put( ele);System. out.println( queue.take());}
}
运行这个main函数,我们可以发现,我们需要等待3s之后才会打印这个对象。
其实DelayQueue应用场景很多,比如定时关闭连接、缓存对象,超时处理等各种场景,下面我们就拿学生考试为例让大家更深入的理解DelayQueue的使用。
例2:把所有考试的学生看做是一个DelayQueue,谁先做完题目释放谁
首先,我们构造一个学生对象
public class Student implements Runnable,Delayed{private String name; //姓名private long costTime;//做试题的时间private long finishedTime;//完成时间public Student(String name, long costTime) {this. name = name;this. costTime= costTime;finishedTime = costTime + System. currentTimeMillis();}@Overridepublic void run() {System. out.println( name + " 交卷,用时" + costTime /1000);}@Overridepublic long getDelay(TimeUnit unit) {return ( finishedTime - System. currentTimeMillis());}@Overridepublic int compareTo(Delayed o) {Student other = (Student) o;return costTime >= other. costTime?1:-1;}}
- 1
- 2
- 3
- 4
- 5
- 6
- 7
- 8
- 9
- 10
- 11
- 12
- 13
- 14
- 15
- 16
- 17
- 18
- 19
- 20
- 21
- 22
- 23
- 24
- 25
- 26
- 27
- 28
- 29
然后在构造一个教师对象对学生进行考试
public class Teacher {static final int STUDENT_SIZE = 30;public static void main(String[] args) throws InterruptedException {Random r = new Random();//把所有学生看做一个延迟队列DelayQueue<Student> students = new DelayQueue<Student>();//构造一个线程池用来让学生们“做作业”ExecutorService exec = Executors.newFixedThreadPool(STUDENT_SIZE);for ( int i = 0; i < STUDENT_SIZE; i++) {//初始化学生的姓名和做题时间students.put( new Student( "学生" + (i + 1), 3000 + r.nextInt(10000)));}//开始做题while(! students.isEmpty()){exec.execute( students.take());}exec.shutdown();}
}
- 1
- 2
- 3
- 4
- 5
- 6
- 7
- 8
- 9
- 10
- 11
- 12
- 13
- 14
- 15
- 16
- 17
- 18
- 19
- 20
我们看一下运行结果:
学生2 交卷,用时3
学生1 交卷,用时5
学生5 交卷,用时7
学生4 交卷,用时8
学生3 交卷,用时11
通过运行结果我们可以发现,每个学生在指定开始时间到达之后就会“交卷”(取决于getDelay()方法),并且是先做完的先交卷(取决于compareTo()方法)。
通过查看其源码可以看到,DelayQueue内部实现用的是PriorityQueue和一个Lock:

4.3 LinkedBlockingQueue
LinkedBlockingQueue阻塞队列大小的配置是可选的,如果我们初始化时指定一个大小,它就是有边界的,如果不指定,它就是无边界的。说是无边界,其实是采用了默认大小为Integer.MAX_VALUE的容量 。它的内部实现是一个链表。
和ArrayBlockingQueue一样,LinkedBlockingQueue 也是以先进先出的方式存储数据,最新插入的对象是尾部,最新移出的对象是头部。下面是一个初始化和使LinkedBlockingQueue的例子:
BlockingQueue<String> unbounded = new LinkedBlockingQueue<String>();
BlockingQueue<String> bounded   = new LinkedBlockingQueue<String>(1024);
bounded.put("Value");
String value = bounded.take();
4.4 PriorityBlockingQueue
PriorityBlockingQueue是一个没有边界的队列,它的排序规则和 java.util.PriorityQueue一样。需要注意,PriorityBlockingQueue中允许插入null对象。
所有插入PriorityBlockingQueue的对象必须实现 java.lang.Comparable接口,队列优先级的排序规则就是按照我们对这个接口的实现来定义的。
另外,我们可以从PriorityBlockingQueue获得一个迭代器Iterator,但这个迭代器并不保证按照优先级顺序进行迭代。
下面我们举个例子来说明一下,首先我们定义一个对象类型,这个对象需要实现Comparable接口:
public class PriorityElement implements Comparable<PriorityElement> {
private int priority;//定义优先级
PriorityElement(int priority) {//初始化优先级this.priority = priority;
}
@Override
public int compareTo(PriorityElement o) {//按照优先级大小进行排序return priority >= o.getPriority() ? 1 : -1;
}
public int getPriority() {return priority;
}
public void setPriority(int priority) {this.priority = priority;
}
@Override
public String toString() {return "PriorityElement [priority=" + priority + "]";
}
}
- 1
- 2
- 3
- 4
- 5
- 6
- 7
- 8
- 9
- 10
- 11
- 12
- 13
- 14
- 15
- 16
- 17
- 18
- 19
- 20
- 21
- 22
- 23
然后我们把这些元素随机设置优先级放入队列中
public class PriorityBlockingQueueExample {
public static void main(String[] args) throws InterruptedException {PriorityBlockingQueue<PriorityElement> queue = new PriorityBlockingQueue<>();for (int i = 0; i < 5; i++) {Random random=new Random();PriorityElement ele = new PriorityElement(random.nextInt(10));queue.put(ele);}while(!queue.isEmpty()){System.out.println(queue.take());}
}
}
看一下运行结果:
PriorityElement [priority=3]
PriorityElement [priority=4]
PriorityElement [priority=5]
PriorityElement [priority=8]
PriorityElement [priority=9]
4.5 SynchronousQueue
SynchronousQueue队列内部仅允许容纳一个元素。当一个线程插入一个元素后会被阻塞,除非这个元素被另一个线程消费。
转自:http://blog.csdn.net/suifeng3051/article/details/48807423
这篇关于Java并发编程之——BlockingQueue(队列)的文章就介绍到这儿,希望我们推荐的文章对编程师们有所帮助!


