本文主要是介绍拼接数组/删除元素,希望对大家解决编程问题提供一定的参考价值,需要的开发者们随着小编来一起学习吧!
矩阵拼接的函数tf.stack()与矩阵分解的函数tf.unstack()
tf.unstack(value, num=None, axis=0, name='unstack')Unpacks the given dimension of a rank-`R` tensor into rank-`(R-1)` tensors.Unpacks `num` tensors from `value` by chipping it along the `axis` dimension.    Args:
      value: A rank `R > 0` `Tensor` to be unstacked.
      num: An `int`. The length of the dimension `axis`. Automatically inferred//一个“int”。尺寸“轴”的长度。自动推断为“无”(默认)。if `None` (the default).
      axis: An `int`. The axis to unstack along. Defaults to the firstdimension. Supports negative indexes.
      name: A name for the operation (optional).    Returns:The list of `Tensor` objects unstacked from `value`.    Raises:
      ValueError: If `num` is unspecified and cannot be inferred.
      ValueError: If `axis` is out of the range [-R, R).
import tensorflow as tf
a = tf.constant([1,2,3])
b = tf.constant([4,5,6])
c = tf.stack([a,b],axis=1)
d = tf.unstack(c,axis=0)
e = tf.unstack(c,axis=1)
print(c.get_shape())
with tf.Session() as sess:print(sess.run(c))print(sess.run(d))print(sess.run(e))(3, 2)[[1 4]
[2 5]
[3 6]][array([1, 4]), array([2, 5]), array([3, 6])][array([1, 2, 3]), array([4, 5, 6])]numpy.delete删除行或列
import numpy as np
A = np.delete(B, 2, axis=0)  # 删除B的第三行
B = np.delete(C, 1, axis=1) # 删除C的第2列- 删除一列
>>> dataset=[[1,2,3],[2,3,4],[4,5,6]]
>>> import numpy as np
>>> dataset = np.delete(dataset, -1, axis=1)
>>> dataset
array([[1, 2], [2, 3], [4, 5]]) - 删除多列
arr = np.array([[1,2,3,4], [5,6,7,8], [9,10,11,12]])
np.delete(arr, [1,2], axis=1)
array([[ 1,  4],  [ 5,  8],  [ 9, 12]])
拼接_numpy列表索引方式
a=np.array([[1,2],[3,4],[5,6],[7,8]])
b=a[:2]- numpy.concatenate
numpy.concatenate((a1, a2, …), axis=0)
Join a sequence of arrays along an existing axis.
Parameters:
a1, a2, … : sequence of array_like
The arrays must have the same shape, except in the dimension corresponding to axis (the first, by default).
axis : int, optional
The axis along which the arrays will be joined. Default is 0.
Returns:
res : ndarray
The concatenated array.
>>> a = np.array([[1, 2], [3, 4]])
>>> b = np.array([[5, 6]])
>>> np.concatenate((a, b), axis=0)
array([[1, 2],[3, 4],[5, 6]])
>>> np.concatenate((a, b.T), axis=1)
array([[1, 2, 5],[3, 4, 6]])
###############################
>>> a = np.ma.arange(3)
>>> a[1] = np.ma.masked
>>> b = np.arange(2, 5)
>>> a
masked_array(data = [0 -- 2],mask = [False  True False],fill_value = 999999)
>>> b
array([2, 3, 4])
>>> np.concatenate([a, b])
masked_array(data = [0 1 2 2 3 4],mask = False,fill_value = 999999)
>>> np.ma.concatenate([a, b])
masked_array(data = [0 -- 2 2 3 4],mask = [False  True False False False False],fill_value = 999999)
拼接_tf.concat
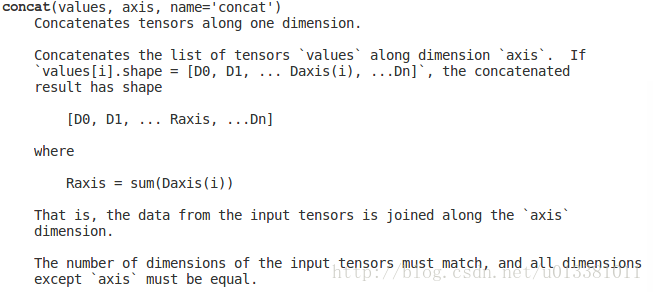
pythont1 = [[1, 2, 3], [4, 5, 6]]t2 = [[7, 8, 9], [10, 11, 12]]tf.concat([t1, t2], 0) ==> [[1, 2, 3], [4, 5, 6], [7, 8, 9], [10, 11, 12]]tf.concat([t1, t2], 1) ==> [[1, 2, 3, 7, 8, 9], [4, 5, 6, 10, 11, 12]]# tensor t3 with shape [2, 3]# tensor t4 with shape [2, 3]tf.shape(tf.concat([t3, t4], 0)) ==> [4, 3]tf.shape(tf.concat([t3, t4], 1)) ==> [2, 6]拼接_keras.legacy.layers.merge
Help on function merge in module keras.legacy.layers:merge(inputs, mode='sum', concat_axis=-1, dot_axes=-1, output_shape=None, output_mask=None, arguments=None, name=None)Functional merge, to apply to Keras tensors (NOT layers).Returns a Keras tensor.# Example# Argumentsmode: String or lambda/function. If string, must be oneof: 'sum', 'mul', 'concat', 'ave', 'cos', 'dot', 'max'.If lambda/function, it should take as input a list of tensorsand return a single tensor.concat_axis: Integer, axis to use in mode `concat`.dot_axes: Integer or tuple of integers,axes to use in mode `dot` or `cos`.output_shape: Shape tuple (tuple of integers), or lambda/functionto compute output_shape (only if merge mode is a lambda/function).If the latter case, it should take as input a list of shape tuples(1:1 mapping to input tensors) and return a single shape tuple,including the batch size(same convention as the `compute_output_shape` method of layers).node_indices: Optional list of integers containingthe output node index for each input layer(in case some input layers have multiple output nodes).will default to an array of 0s if not provided.tensor_indices: Optional list of indices of output tensorsto consider for merging(in case some input layer node returns multiple tensors).concat_feat = merge([concat_feat, x], mode='concat', concat_axis=concat_axis, name='concat_'+str(stage)+'_'+str(branch))拼接_keras.legacy.layers.merge.concatenate()
>>> import keras.legacy.layers as layers
>>> dir(layers)
['AtrousConvolution1D', 'AtrousConvolution2D', 'Highway', 'InputSpec', 'K', 'Layer', 'MaxoutDense', 'Merge', '__builtins__', '__doc__', '__file__', '__name__', '__package__', 'activations', 'constraints', 'func_dump', 'func_load', 'initializers', 'inspect', 'merge', 'python_types', 'regularizers', 'warnings']
>>>
>>> dir(layers.Merge)
['__call__', '__class__', '__delattr__', '__dict__', '__doc__', '__format__', '__getattribute__', '__hash__', '__init__', '__module__', '__new__', '__reduce__', '__reduce_ex__', '__repr__', '__setattr__', '__sizeof__', '__str__', '__subclasshook__', '__weakref__', '_add_inbound_node', '_arguments_validation', '_get_node_attribute_at_index', 'add_loss', 'add_update', 'add_weight', 'assert_input_compatibility', 'build', 'built', 'call', 'compute_mask', 'compute_output_shape', 'constraints', 'count_params', 'from_config', 'get_config', 'get_input_at', 'get_input_mask_at', 'get_input_shape_at', 'get_losses_for', 'get_output_at', 'get_output_mask_at', 'get_output_shape_at', 'get_updates_for', 'get_weights', 'input', 'input_mask', 'input_shape', 'losses', 'non_trainable_weights', 'output', 'output_mask', 'output_shape', 'set_weights', 'trainable_weights', 'updates', 'weights']
def concatenate(inputs, axis=-1, **kwargs):"""Functional interface to the `Concatenate` layer.# Argumentsinputs: A list of input tensors (at least 2).axis: Concatenation axis.**kwargs: Standard layer keyword arguments.# ReturnsA tensor, the concatenation of the inputs alongside axis `axis`."""return Concatenate(axis=axis, **kwargs)(inputs)x = layers.concatenate([branch1x1, branch5x5, branch3x3dbl, branch_pool],axis=channel_axis,name='mixed1')mxnet.ndarray.concat(*data, **kwargs)
x = [[1,1],[2,2]]
y = [[3,3],[4,4],[5,5]]
z = [[6,6], [7,7],[8,8]]concat(x,y,z,dim=0) = [[ 1.,  1.],[ 2.,  2.],[ 3.,  3.],[ 4.,  4.],[ 5.,  5.],[ 6.,  6.],[ 7.,  7.],[ 8.,  8.]]Note that you cannot concat x,y,z along dimension 1 since dimension
0 is not the same for all the input arrays.concat(y,z,dim=1) = [[ 3., 3., 6., 6.],[ 4., 4., 7., 7.],[ 5., 5., 8., 8.]]print('real...')
test_iter.reset()
batch = test_iter.next()
y_te = batch.label[0]
# print(batch.label[0], batch.data[0].shape)for batch in test_iter:y_te = mx.ndarray.concat(y_te, batch.label[0], dim=0)
print(len(batch.label[0]), len(y_te))mxnet.symbol.Concat(*data, **kwargs)
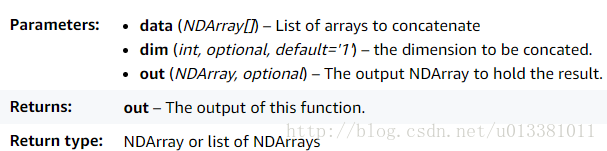
Parameters:
data (Symbol[]) – List of arrays to concatenate
dim (int, optional, default='1') – the dimension to be concated.
name (string, optional.) – Name of the resulting symbol.
Returns:
The result symbol.Return type:
SymbolExamplesConcat two (or more) inputs along a specific dimension:>>> a = Variable('a')
>>> b = Variable('b')
>>> c = Concat(a, b, dim=1, name='my-concat')
>>> c>>> SymbolDoc.get_output_shape(c, a=(128, 10, 3, 3), b=(128, 15, 3, 3))
{'my-concat_output': (128L, 25L, 3L, 3L)}
mxnet.symbol.slice_axis(data=None, axis=_Null, begin=_Null, end=_Null, name=None, attr=None, out=None, **kwargs)
Parameters:
data (Symbol) – Source input
axis (int, required) – Axis along which to be sliced, supports negative indexes.
begin (int, required) – The beginning index along the axis to be sliced, supports negative indexes.
end (int or None, required) – The ending index along the axis to be sliced, supports negative indexes.
name (string, optional.) – Name of the resulting symbol.
Returns:
The result symbol.Return type:Examples:x = [[  1.,   2.,   3.,   4.],[  5.,   6.,   7.,   8.],[  9.,  10.,  11.,  12.]]slice_axis(x, axis=0, begin=1, end=3) = [[  5.,   6.,   7.,   8.],[  9.,  10.,  11.,  12.]]slice_axis(x, axis=1, begin=0, end=2) = [[  1.,   2.],[  5.,   6.],[  9.,  10.]]slice_axis(x, axis=1, begin=-3, end=-1) = [[  2.,   3.],[  6.,   7.],[ 10.,  11.]]
这篇关于拼接数组/删除元素的文章就介绍到这儿,希望我们推荐的文章对编程师们有所帮助!


