本文主要是介绍Spinner使用方法,希望对大家解决编程问题提供一定的参考价值,需要的开发者们随着小编来一起学习吧!
Android中的Spinner和VC中的列表框很类似。这里做个小例子,是为笔记。
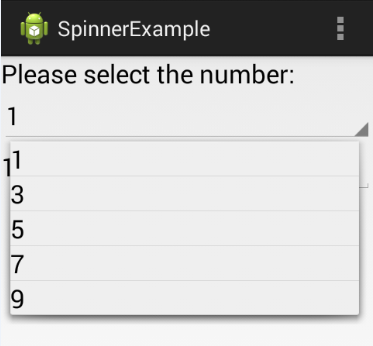
示例效果

下拉的效果:
布局文件
Activity的布局my_layout.xml
<?xml version="1.0" encoding="utf-8"?>
<LinearLayout xmlns:android="http://schemas.android.com/apk/res/android"android:layout_width="match_parent"android:layout_height="match_parent"android:orientation="vertical" ><LinearLayoutandroid:layout_width="match_parent"android:layout_height="wrap_content"android:orientation="vertical" ><TextViewandroid:id="@+id/textView1"android:layout_width="wrap_content"android:layout_height="wrap_content"android:textAppearance="?android:attr/textAppearanceLarge"android:text="@string/spinner_hint" /><Spinnerandroid:id="@+id/spinner"android:layout_width="match_parent"android:layout_height="wrap_content"android:textAppearance="?android:attr/textAppearanceLarge"/></LinearLayout><LinearLayoutandroid:layout_width="match_parent"android:layout_height="wrap_content" ><TextViewandroid:id="@+id/result_hint"android:layout_width="wrap_content"android:layout_height="wrap_content"android:textAppearance="?android:attr/textAppearanceLarge"android:text="@string/result_hint" /><!-- android:hint="@string/result" --><EditTextandroid:id="@+id/result"android:layout_width="match_parent"android:layout_height="wrap_content"android:inputType="none"android:textAppearance="?android:attr/textAppearanceLarge"/></LinearLayout></LinearLayout>
Spinner显示的布局spinner_layout.xml
这里直接简化了,显示一个简单的TextView。
<?xml version="1.0" encoding="utf-8"?>
<LinearLayout xmlns:android="http://schemas.android.com/apk/res/android"android:layout_width="match_parent"android:layout_height="match_parent"android:orientation="vertical" ><TextViewandroid:id="@+id/calculate_result"android:layout_width="wrap_content"android:layout_height="wrap_content"android:textAppearance="?android:attr/textAppearanceLarge"/></LinearLayout>
注:可以增加padding属性,优化显示效果。如:
<!--
android:layout_marginBottom="6dip"
android:layout_marginLeft="10dip"
android:layout_marginTop="6dip"
android:layout_marginRight="2dip"
--><!--
android:paddingBottom="3dip"
android:paddingEnd="4dip"
android:paddingStart="4dip"
android:paddingTop="3dip"
-->
代码
省略一些自动生成的代码。
public static final String TAG = "MainActivity";private int[] values = {1, 3, 5, 7, 9};private Spinner spinner = null;
private EditText result = null;
private TextView result_hint = null;@Override
protected void onCreate(Bundle savedInstanceState) {super.onCreate(savedInstanceState);setContentView(R.layout.my_layout);spinner = (Spinner) this.findViewById(R.id.spinner);spinner.setAdapter(new MySpinnerAdapter());spinner.setOnItemSelectedListener(new OnItemSelectedListener() {public void onItemSelected(AdapterView<?> parent, View view,int position, long id) {int value = values[position];int cal_result = value * value;result.setText("" + cal_result);result_hint.setText(value + " * " + value + "=");}public void onNothingSelected(AdapterView<?> parent) {}});result = (EditText) this.findViewById(R.id.result);result.setInputType(InputType.TYPE_NULL);  result.setTextColor(Color.GRAY); result_hint = (TextView) this.findViewById(R.id.result_hint);
}private class MySpinnerAdapter extends BaseAdapter {public int getCount() {return values.length;}public Object getItem(int position) {return values[position];}public long getItemId(int position) {return position;}public View getView(int position, View convertView, ViewGroup parent) {if (convertView == null) {convertView = LayoutInflater.from(MainActivity.this).inflate(R.layout.spinner_layout,null);}TextView textView = (TextView) convertView.findViewById(R.id.calculate_result);textView.setText("" + values[position]);return convertView;}}
要点
- 在布局文件中增加Spinner
- 为Spinner定义一个布局文件
- 为Spinner定义一个Adapter,实现数据和视图的映射(MVC)
- 为Spinner定义事件处理,通常即为OnItemSelectedListener。
ArrayAdapter
使用场景
在上面的例子中,使用的数据源是一个数组,而且只是让每个数字显示在Spinner的layout(spinner_layout.xml)的一个TextView中。
对于这种情况,直接使用ArrayAdapter以及android.R.layout.simple_spinner_item就够了。但需要修改values的类型为Integer[]:
private Integer[] values = {1, 3, 5, 7, 9};
适配器部分改为:
spinner = (Spinner) this.findViewById(R.id.spinner);ArrayAdapter<Integer> arrayAdapter = new ArrayAdapter<Integer>(this, android.R.layout.simple_spinner_item,values);
arrayAdapter.setDropDownViewResource(android.R.layout.simple_spinner_dropdown_item);
spinner.setAdapter(arrayAdapter);//spinner.setAdapter(new MySpinnerAdapter());
simple_spinner_item
android.R.layout.simple_spinner_item是Android平台提供的,定义如下:
<?xml version="1.0" encoding="utf-8"?>
<!--
/* //device/apps/common/assets/res/any/layout/simple_spinner_item.xml
**
** Copyright 2006, The Android Open Source Project
**
** Licensed under the Apache License, Version 2.0 (the "License");
** you may not use this file except in compliance with the License.
** You may obtain a copy of the License at
**
**     http://www.apache.org/licenses/LICENSE-2.0
**
** Unless required by applicable law or agreed to in writing, software
** distributed under the License is distributed on an "AS IS" BASIS,
** WITHOUT WARRANTIES OR CONDITIONS OF ANY KIND, either express or implied.
** See the License for the specific language governing permissions and
** limitations under the License.
*/
-->
<TextView xmlns:android="http://schemas.android.com/apk/res/android" android:id="@android:id/text1"style="?android:attr/spinnerItemStyle"android:singleLine="true"android:layout_width="match_parent"android:layout_height="wrap_content"android:ellipsize="marquee"android:textAlignment="inherit"/>
simple_spinner_dropdown_item
R.layout.simple_spinner_dropdown_item也是Android平台定义的,如下:
<CheckedTextView xmlns:android="http://schemas.android.com/apk/res/android" android:id="@android:id/text1"style="?android:attr/spinnerDropDownItemStyle"android:singleLine="true"android:layout_width="match_parent"android:layout_height="?android:attr/dropdownListPreferredItemHeight"android:ellipsize="marquee"android:textAlignment="inherit"/>
这篇关于Spinner使用方法的文章就介绍到这儿,希望我们推荐的文章对编程师们有所帮助!


