本文主要是介绍仿宝宝树孕育的圆形ListView的实现,希望对大家解决编程问题提供一定的参考价值,需要的开发者们随着小编来一起学习吧!
仿宝宝树孕育的圆形ListView的实现
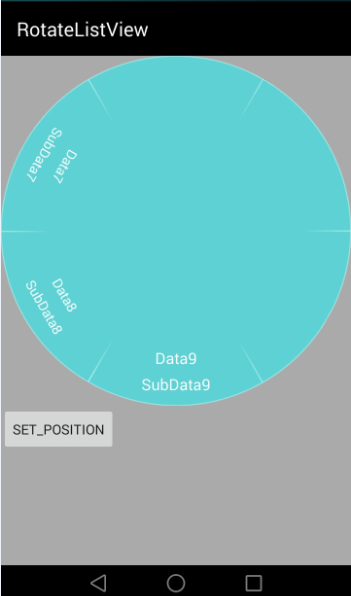
宝宝树孕育首页有一个圆形的转盘,可以旋转,点击,快速滑动等功能,选择某一项后,可以很平滑地显示选择项。如图所示:

参考别人写的类似圆形的组件,都不能很好的实现该功能,只好在别人的基础上做一些修改。该组件继承自ViewGroup类,并重写了它的onMeasure和onLayout方法。
@Override
protected void onMeasure(int widthMeasureSpec, int heightMeasureSpec) {int maxChildWidth = 0;int maxChildHeight = 0;// Measure once to find the maximum child size.int childWidthMeasureSpec = MeasureSpec.makeMeasureSpec(MeasureSpec.getSize(widthMeasureSpec), MeasureSpec.AT_MOST);int childHeightMeasureSpec = MeasureSpec.makeMeasureSpec(MeasureSpec.getSize(widthMeasureSpec), MeasureSpec.AT_MOST);final int count = getChildCount();for (int i = 0; i < count; i++) {final View child = getChildAt(i);if (child.getVisibility() == GONE) {continue;}child.measure(childWidthMeasureSpec, childHeightMeasureSpec);maxChildWidth = Math.max(maxChildWidth, child.getMeasuredWidth());maxChildHeight = Math.max(maxChildHeight, child.getMeasuredHeight());}// Measure again for each child to be exactly the same size.childWidthMeasureSpec = MeasureSpec.makeMeasureSpec(maxChildWidth,MeasureSpec.EXACTLY);childHeightMeasureSpec = MeasureSpec.makeMeasureSpec(maxChildHeight,MeasureSpec.EXACTLY);for (int i = 0; i < count; i++) {final View child = getChildAt(i);if (child.getVisibility() == GONE) {continue;}child.measure(childWidthMeasureSpec, childHeightMeasureSpec);}setMeasuredDimension(resolveSize(maxChildWidth, widthMeasureSpec),resolveSize(maxChildHeight, heightMeasureSpec));}@Overrideprotected void onLayout(boolean changed, int l, int t, int r, int b) {int layoutWidth = r - l;int layoutHeight = b - t;// Laying out the child viewsfinal int childCount = getChildCount();int left, top;radius = (layoutWidth <= layoutHeight) ? layoutWidth * 2 / 5: layoutHeight * 2 / 5;childWidth = radius;childHeight = radius / 2;float angleDelay = 360.0f / getChildCount();for (int i = 0; i < childCount; i++) {final ItemView child = (ItemView) getChildAt(i);if (child.getVisibility() == GONE) {continue;}if (angle > 360) {angle -= 360;} else {if (angle < 0) {angle += 360;}}child.setPosition(i);left = Math.round((float) (((layoutWidth / 2) - childWidth / 2) + radius* Math.cos(Math.toRadians(angle))));top = Math.round((float) (((layoutHeight / 2) - childHeight / 2) + radius* Math.sin(Math.toRadians(angle))));child.layout(left, top, left + childWidth, top + childHeight);angle += angleDelay;}}
并规定组件的正下方为旋转基准,通过记录旋转的角度值来计算旋转了几圈。组件写死了六个View,这六个View根据旋转的角度和勾股定理公式来刷新它的位置,并显示不同的数据:
private void setItems() {removeAllViews();for (int i = 0; i < ITEM_COUNT; i++) {ItemView itemView = new ItemView(getContext());itemView.setLayoutParams(new LayoutParams(LayoutParams.WRAP_CONTENT, LayoutParams.WRAP_CONTENT));itemView.setPosition(i);itemView.setText(null);itemView.setTextVisible(true);itemView.setTextColor(textColor);itemView.setTextSize(textSize);itemView.setSmallText(null);if (i == 0) {itemView.setDataIndex(0);itemView.setIncreaseId(0);} else {itemView.setDataIndex(ITEM_COUNT - i);itemView.setIncreaseId(ITEM_COUNT - i);}addView(itemView, i);}}
该组件通过GestureDetector类来监听手势的tap事件,通过重写ViewGroup的onTouchEvent方法来监听用户的点击和滑动事件:
@Overridepublic boolean onTouchEvent(@NonNull MotionEvent event) {if (isEnabled()) {gestureDetector.onTouchEvent(event);if (isRotating) {switch (event.getAction()) {case MotionEvent.ACTION_DOWN:if (circleUpView != null && inRangeOfView(circleUpView, event)) {return false;}// reset the touched quadrantsfor (int i = 0; i < quadrantTouched.length; i++) {quadrantTouched[i] = false;}stopAnimation();touchStartAngle = getPositionAngle(event.getX(),event.getY());didMove = false;break;case MotionEvent.ACTION_MOVE:if (circleUpView != null && inRangeOfView(circleUpView, event)) {return false;}double currentAngle = getPositionAngle(event.getX(),event.getY());float deltAngle = (float) (touchStartAngle - currentAngle);if (deltAngle < 0) {//anti clockwiseif (isFirstItem) {return false;}} else if (deltAngle > 0) {//clockwiseif (isEndItem) {return false;}}rotateButtons(deltAngle);touchStartAngle = currentAngle;didMove = true;break;case MotionEvent.ACTION_UP:if (didMove) {rotateViewToCenter((ItemView) getChildAt(selected));}break;}}// set the touched quadrant to truequadrantTouched[getPositionQuadrant(event.getX()- (circleWidth / 2), circleHeight - event.getY()- (circleHeight / 2))] = true;return true;}return false;}组件的平滑移动是通过ObjectAnimator和NineOldAndroids来实现的:
private void animateTo(float endDegree, long duration) {if (animator != null && animator.isRunning()|| Math.abs(angle - endDegree) < 1) {return;}animator = ObjectAnimator.ofFloat(this, "angle", angle,endDegree);animator.setDuration(duration);animator.setInterpolator(new DecelerateInterpolator());animator.addListener(new Animator.AnimatorListener() {private boolean wasCanceled = false;@Overridepublic void onAnimationStart(Animator animation) {}@Overridepublic void onAnimationRepeat(Animator animation) {}@Overridepublic void onAnimationEnd(Animator animation) {if (wasCanceled) {return;}if (onRotationFinishedListener != null) {onRotationFinishedListener.onRotationFinished(getSelectedItem());}}@Overridepublic void onAnimationCancel(Animator animation) {wasCanceled = true;}});animator.start();}该组件整体上实现了相似功能,但和宝宝孕育树相比还是有一点瑕疵,不过整体效果是可以的。
本项目已经托管到github上面,详细说明和源码直接clone下来就可以。
github项目地址
这篇关于仿宝宝树孕育的圆形ListView的实现的文章就介绍到这儿,希望我们推荐的文章对编程师们有所帮助!


