本文主要是介绍GNU/Linux - RSYSLOG,希望对大家解决编程问题提供一定的参考价值,需要的开发者们随着小编来一起学习吧!
Getting started with RSYSLOG in Linux
用于日志处理的 Rocket-fast 系统(rsyslog)是 Linux 中提供的一个系统实用程序,支持消息日志。它具有高性能、出色的安全性和模块化设计。这是一个非常有用的工具,可以接受来自各种来源的输入,并将其转换和存储到多个不同的目的地。
The Rocket-fast System for log processing (rsyslog) is a system utility provided in Linux which provides support for message logging. It offers high performance and comes with excellent security and has a modular design. This is a very useful utility that can accept input from a wide variety of sources and transform them and store them in multiple and diverse destinations.

Rsyslog 是一款 GPL 版本的增强型 syslogd。除其他功能外,它还支持可靠的 Syslog over TCP、写入 MySQL 数据库以及完全可配置的输出格式(包括出色的时间戳)。Rsyslog 由 GroBrinderfeld 的 Rainer Gerhards 发起。
早期世界使用的是以下任一版本
* 老一套的 syslogd,如 sysklogd
* Syslog-ng
* 另一种解决方案
因此,基本上,Rainer Gerhard 把所有东西都放在了另一个解决方案中,并创建了一个名为 rsyslog 的新 Syslog。
Rsyslog is a GPL-ed, enhanced syslogd. Among others, it offers support for reliable Syslog over TCP, writing to MySQL databases, and fully configurable output formats (including great timestamps). Rsyslog was initiated by Rainer Gerhards, GroBrinderfeld.
The earlier world was using either one of the following
* The stock syslogd, e.g sysklogd
* Syslog-ng
* Another-solution
So basically, Rainer Gerhard’s club everything in another solution and created a new Syslog called rsyslog.
Let’s start with the rsyslog
我们使用 Cent-OS 7 进行演示。您可以使用任何发行版。
We are using Cent-OS 7 for the demo. You can use any distro you want.
Step 1: Check if you have rsyslog installed. 我使用的是Ubuntu.
$ systemctl status rsyslog.service
● rsyslog.service - System Logging Service
Loaded: loaded (/lib/systemd/system/rsyslog.service; enabled; vendor preset: enabled)
Active: active (running) since Sun 2024-08-25 20:52:46 EDT; 2h 58min ago
TriggeredBy: ● syslog.socket
Docs: man:rsyslogd(8)
man:rsyslog.conf(5)
https://www.rsyslog.com/doc/
Main PID: 895 (rsyslogd)
Tasks: 4 (limit: 9382)
Memory: 4.4M
CPU: 199ms
CGroup: /system.slice/rsyslog.service
└─895 /usr/sbin/rsyslogd -n -iNONE
8月 25 20:52:46 ubuntu-yocto systemd[1]: Starting System Logging Service...
8月 25 20:52:46 ubuntu-yocto systemd[1]: Started System Logging Service.
8月 25 20:52:46 ubuntu-yocto rsyslogd[895]: imuxsock: Acquired UNIX socket '/run/systemd/journal/syslog' (fd 3) from systemd. [v8.2112.0]
8月 25 20:52:46 ubuntu-yocto rsyslogd[895]: rsyslogd's groupid changed to 111
8月 25 20:52:46 ubuntu-yocto rsyslogd[895]: rsyslogd's userid changed to 104
8月 25 20:52:46 ubuntu-yocto rsyslogd[895]: [origin software="rsyslogd" swVersion="8.2112.0" x-pid="895" x-info="https://www.rsyslog.com"] start
8月 25 20:52:47 ubuntu-yocto systemd[1]: rsyslog.service: Sent signal SIGHUP to main process 895 (rsyslogd) on client request.
8月 25 21:02:47 ubuntu-yocto rsyslogd[895]: [origin software="rsyslogd" swVersion="8.2112.0" x-pid="895" x-info="https://www.rsyslog.com"] rsyslogd was HUPed

如果没有安装,请使用 yum、dnf 或发行版中的软件包管理器进行安装并启用。
If it is not installed, please install using yum, dnf or package manager that you have in your distro and enable it.
1.1 To install rsyslog on centos use the following command.
[root@centos ~]# sudo yum install rsyslog
1.2 Enable rsyslog utility.
[root@centos ~]# systemctl enable rsyslog.service
1.3 Start the service.
[root@centos ~]# systemctl start rsyslog.service
1.4 Check the status of the service.
[root@centos ~]# systemctl status rsyslog.service
这里有一点需要注意,如果无法使状态激活并运行,请使用上述命令中的“-l ”选项检查错误,以检查故障。
Here is one thing you should note if you are not able to get the status active and running please check the error with the “-l” option in the above command to check the failures.
Step 2: Check the configuration file and default configurations.
您可以在“/etc/rsyslog.conf ”中查看 rsyslog 的默认配置。每项配置都有注释,注释本身就很好解释。在此,我们只关注 rsyslog 的设置,并进一步了解 rsyslog。
The default configuration for rsyslog you can check in “/etc/rsyslog.conf”. With every configuration, you can see the comments which are much explanatory themselves. Here let’s focus only on setting up rsyslog and getting to know about rsyslog more.
我的Ubunbu为例:
$ cat /etc/rsyslog.conf
# /etc/rsyslog.conf configuration file for rsyslog
#
# For more information install rsyslog-doc and see
# /usr/share/doc/rsyslog-doc/html/configuration/index.html
#
# Default logging rules can be found in /etc/rsyslog.d/50-default.conf
#################
#### MODULES ####
#################
module(load="imuxsock") # provides support for local system logging
#module(load="immark") # provides --MARK-- message capability
# provides UDP syslog reception
#module(load="imudp")
#input(type="imudp" port="514")
# provides TCP syslog reception
#module(load="imtcp")
#input(type="imtcp" port="514")
# provides kernel logging support and enable non-kernel klog messages
module(load="imklog" permitnonkernelfacility="on")
###########################
#### GLOBAL DIRECTIVES ####
###########################
#
# Use traditional timestamp format.
# To enable high precision timestamps, comment out the following line.
#
$ActionFileDefaultTemplate RSYSLOG_TraditionalFileFormat
# Filter duplicated messages
$RepeatedMsgReduction on
#
# Set the default permissions for all log files.
#
$FileOwner syslog
$FileGroup adm
$FileCreateMode 0640
$DirCreateMode 0755
$Umask 0022
$PrivDropToUser syslog
$PrivDropToGroup syslog
#
# Where to place spool and state files
#
$WorkDirectory /var/spool/rsyslog
#
# Include all config files in /etc/rsyslog.d/
#
$IncludeConfig /etc/rsyslog.d/*.conf
要为我们的项目配置 rsyslog,最好在以下目录中添加项目特定的配置,而不是在 rsyslog.conf 中添加这些配置。这将避免配置文件的混乱。 /etc/rsyslog.conf 是 rsyslog 的默认配置,要添加任何用户配置,需要指定 rsyslog.d 目录,并在默认配置中添加该目录,以便从该目录加载所有配置文件
To configure the rsyslog for our project it is better to add project-specific configurations in the following directory rather than adding those configurations in the rsyslog.conf. This will avoid the mess in config files. /etc/rsyslog.conf is the default configuration for the rsyslog and to add any user configuration rsyslog.d directory is given and it is added in the default configuration to load all config files from this directory.
我的Ubuntu:
$ ls /etc/rsyslog.d/
20-ufw.conf 50-default.conf
例子的CentOS:

正如你所看到的,我有两个独立的配置文件,分别与两个不同的项目相关。这就是如何管理单个 rsyslog 守护进程的多个项目配置。
As you can see I have two separate config files related to two different projects. This is how you can manage multiple project configurations to a single rsyslog daemon.
Step 3: Test rsyslog with CLI
Rsyslog 不仅支持大多数编程语言,还支持记录信息的 CLI 命令。让我们测试一下 rsyslog 是否正常运行。
Rsyslog not only supports most of the programming languages it also supports the CLI command to log messages. Let’s test whether our rsyslog is up and running.
logger 是使用 rsyslog 记录信息的 cli 命令。
logger is the cli command to log the message’s using rsyslog.
Ubuntu:
$ logger -h
Usage:
logger [options] [<message>]
Enter messages into the system log.
Options:
-i log the logger command's PID
--id[=<id>] log the given <id>, or otherwise the PID
-f, --file <file> log the contents of this file
-e, --skip-empty do not log empty lines when processing files
--no-act do everything except the write the log
-p, --priority <prio> mark given message with this priority
--octet-count use rfc6587 octet counting
--prio-prefix look for a prefix on every line read from stdin
-s, --stderr output message to standard error as well
-S, --size <size> maximum size for a single message
-t, --tag <tag> mark every line with this tag
-n, --server <name> write to this remote syslog server
-P, --port <port> use this port for UDP or TCP connection
-T, --tcp use TCP only
-d, --udp use UDP only
--rfc3164 use the obsolete BSD syslog protocol
--rfc5424[=<snip>] use the syslog protocol (the default for remote);
<snip> can be notime, or notq, and/or nohost
--sd-id <id> rfc5424 structured data ID
--sd-param <data> rfc5424 structured data name=value
--msgid <msgid> set rfc5424 message id field
-u, --socket <socket> write to this Unix socket
--socket-errors[=<on|off|auto>]
print connection errors when using Unix sockets
--journald[=<file>] write journald entry
-h, --help display this help
-V, --version display version
For more details see logger(1).
日志记录器支持本地 rsyslog 日志记录和远程 rsyslog 服务器日志记录。不仅如此,如果我们在 rsyslog 中监听任何特定的 UNIX 套接字,也可以使用此命令。总之,我们几乎可以用 rsyslog 命令测试所有内容。
Logger supports local rsyslog logging as well as remote rsyslog server logging as well. Not only if we are listening to any specific UNIX socket in rsyslog that can also be used with this command. Overall we can test almost everything with this rsyslog command.
3.1 Let’s send a message to rsyslog .
我们将发送一条简单的 rsyslog 消息,并在 /var/log/message 中检查是否已记录。
We are going to send a simple rsyslog message and will check in /var/log/message whether it is logged or not.

$ logger "Hi this is a message"
$ cat /var/log/syslog
......
Aug 26 00:37:47 ubuntu-yocto NetworkManager[881]: <info> [1724647067.4130] dhcp4 (ens33): state changed new lease, address=192.168.124.141
Aug 26 00:52:47 ubuntu-yocto NetworkManager[881]: <info> [1724647967.4117] dhcp4 (ens33): state changed new lease, address=192.168.124.141
Aug 26 00:59:26 ubuntu-yocto dev: Hi this is a message
我们向 rsyslog 发送了一条信息,rsyslog 将其记录在 /var/log/message 日志文件中,因为这是默认配置。该日志文件包含数千条日志,因此最好使用 “grep ”来检查我们的信息。
We have sent a message to rsyslog and rsyslog log it in the /var/log/message log file as this is the default configuration. The log file contains thousands of logs so it’s better to use “grep” to check our message.
3.2 Send messages with priority.
优先级在日志记录中最为重要。我们需要根据每条信息的严重性设置其优先级。
rsyslog 有以下从高到低的严重性和优先级
* 紧急
* 警报
* 危急
* 错误
* 警告
* 通知
* 信息
* 调试
我们将在下一篇文章中详细介绍这些严重性和优先级。
rsyslog 中有近 8 种主要优先级,但本次测试将只使用紧急优先级。紧急优先级被配置为所有具有紧急优先级的日志都会被转发到控制台、终端和 ssh 会话。
The priority is the most important in logging. We need to set the priority of every message according to its severity.
rsyslog has the following severity and priorities is high to low
* Emergency
* Alert
* Critical
* Error
* Warning
* Notice
* Information
* Debug
Will talk more about these severities and priorities in detail in an upcoming article.
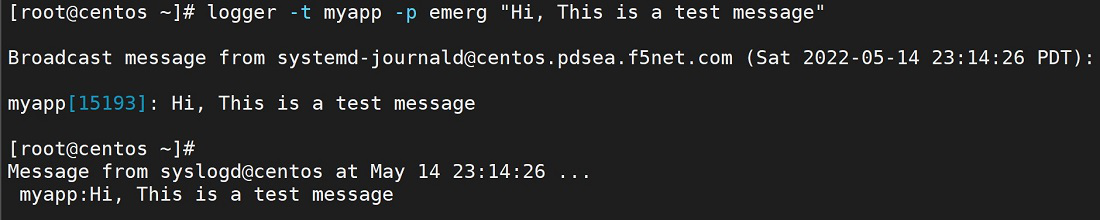
There are almost 8 main priorities in rsyslog but for this testing will going to use only emergency. Emergency priority is configured such that all logs with emergency priority get rerouted to console, terminals, and ssh sessions.
[root@centos ~]# logger -p emerg "Hi, This is a test message"

从man logger查询的priority信息:
emerg
alert
crit
err
warning
notice
info
debug
panic deprecated synonym for emerg
error deprecated synonym for err
warn deprecated synonym for warning
3.3 Send messages with tags.
你已经注意到,上面的信息是普通信息,带有用户名和日志记录器命令的进程 ID。我们需要提高这些消息的可读性,同时还应该能够找到记录该消息的进程。当你有 2 个或更多的微服务,并为所有服务维护中央日志时,所有日志都会被记录到同一个日志文件中,这将对你有所帮助。rsyslog 及其与所有编程语言的接口提供了为消息添加标签的自由。通过 CLI,您可以使用以下命令进行检查。
The thing you have noticed above is that messages are coming as general messages with the user name and the process id of the logger command. We need to make these messages more readable also we should be able to find which process is logging that message. This will help you when you have let’s say 2 or more microservices and you are maintaining the central logging for all services in which all logs get logged to the same logfile. rsyslog and its interface to all programming languages provide the liberty to add tags to messages. from CLI you can check with the following command.
[root@centos ~]# logger -t myapp -p emerg “Hi, This is a test message”
Let’s send message to logfile.

注意到我们在信息中标注了 “my_App”,当日志文件中有成千上万条日志时,该信息就会脱颖而出。如果有多个服务记录到同一个文件,我们可以配置此标记来处理名称。
Noticed that We have tagged the message with “my_App” which stands this message out in the logfile when there are thousands of logs present. If we have multiple services logging to the same file we can configure this tag to process the name.
参考:
Getting started with RSYSLOG in Linux - GeeksforGeeks
这篇关于GNU/Linux - RSYSLOG的文章就介绍到这儿,希望我们推荐的文章对编程师们有所帮助!


