本文主要是介绍Android自定义裁剪图片的View,希望对大家解决编程问题提供一定的参考价值,需要的开发者们随着小编来一起学习吧!
前些天,分析了开源框架zxing的源码。里边有一个自定义的view,扫描界面的蒙层。这给我做自定义裁剪图片view的一些启发。因为,其实原理很相似,都是中间显示的图片没有被遮盖,四周有蒙层的效果。接下来,就按照这个思路实现这个自定义的view。
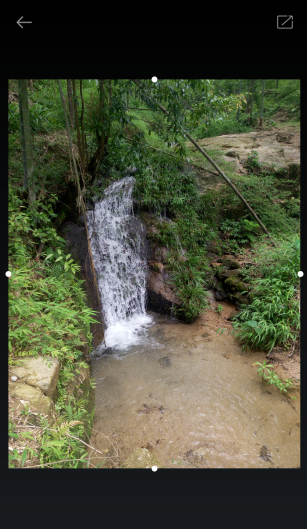
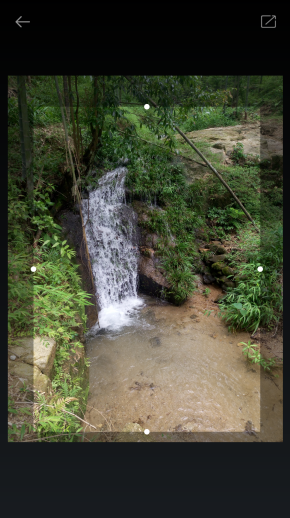
上图
效果分析
1 刚进来,设置蒙层刚好包裹图片显示的大小
2 当触摸的是边界的时候,增大蒙层的范围,即缩小透明区域的大小。
3 当触摸的是透明区域的内部时,移动手指,拖动整个透明的区域
实现细节
1 根据图片显示的大小,描绘蒙层
// 画阴影
canvas.drawRect(0, 0, frame.left, height, paint);
canvas.drawRect(frame.left, 0, frame.right, frame.top, paint);
canvas.drawRect(frame.right, 0, width, height, paint);
canvas.drawRect(frame.left, frame.bottom, frame.right, height,paint);
// 画圆点标注
canvas.drawCircle(frame.left, (frame.top + frame.bottom) / 2, 10,tipPaint);
canvas.drawCircle(frame.right, (frame.top + frame.bottom) / 2, 10,tipPaint);
canvas.drawCircle((frame.left + frame.right) / 2, frame.top, 10,tipPaint);
canvas.drawCircle((frame.left + frame.right) / 2, frame.bottom, 10,tipPaint);
2 判断是否触摸发生在边界上
2.1 判断
case MotionEvent.ACTION_DOWN:downX = (int) event.getX();downY = (int) event.getY();if (checkContainsPoint(downX, downY)) {touchInFrame = true;if ((downX > frame.left - 10 && downX < frame.left + 10)&& downY > frame.top && downY < frame.bottom) {touchFrameLeft = true;}if ((downX > frame.right - 10 && downX < frame.right + 10)&& downY > frame.top && downY < frame.bottom) {touchFrameRight = true;}if ((downX > frame.left && downX < frame.right)&& downY > frame.top - 10 && downY < frame.top + 10) {touchFrameTop = true;}if ((downX > frame.left && downX < frame.right)&& downY > frame.bottom - 10&& downY < frame.bottom + 10) {touchFrameBottom = true;}} else {touchInFrame = false;}break;通过四个标志位,标识触摸发生在哪条边界上
2.2 在边界上移动的操作
int currentX = (int) event.getX();
int currentY = (int) event.getY();
// 是否在边界上判断
if (touchFrameLeft) {frame.left += currentX - downX;if (frame.left <= bitmapRect.left) {frame.left = bitmapRect.left;}frameWidth = frame.right - frame.left;downX = currentX;invalidate();return true;
}
if (touchFrameRight) {frame.right += currentX - downX;if (frame.right >= bitmapRect.right) {frame.right = bitmapRect.right;}frameWidth = frame.right - frame.left;downX = currentX;invalidate();return true;
}
if (touchFrameTop) {frame.top += currentY - downY;if (frame.top <= bitmapRect.top) {frame.top = bitmapRect.top;}frameHeight = frame.bottom - frame.top;downY = currentY;invalidate();return true;
}
if (touchFrameBottom) {frame.bottom += currentY - downY;if (frame.bottom >= bitmapRect.bottom) {frame.bottom = bitmapRect.bottom;}frameHeight = frame.bottom - frame.top;downY = currentY;invalidate();return true;
}
3 判断是否触摸发生在透明区域内
3.1 判断
private boolean checkContainsPoint(int x, int y) {Rect boundsRect = new Rect();boundsRect.left = frame.left - 10;boundsRect.top = frame.top - 10;boundsRect.right = frame.right + 10;boundsRect.bottom = frame.bottom + 10;if (boundsRect.contains(x, y)) {return true;}return false;}通过点击位置与透明区域的四条边界(rect),标识触摸发生在透明区域内
3.2 在透明区域内移动的操作
// 触摸发生不属于边界
frame.left += currentX - downX;
frame.right += currentX - downX;
frame.top += currentY - downY;
frame.bottom += currentY - downY;
if (frame.left <= bitmapRect.left) {frame.left = bitmapRect.left;frame.right = bitmapRect.left + frameWidth;
}
if (frame.right >= bitmapRect.right) {frame.left = bitmapRect.right - frameWidth;frame.right = bitmapRect.right;
}
if (frame.top <= bitmapRect.top) {frame.top = bitmapRect.top;frame.bottom = bitmapRect.top + frameHeight;
}
if (frame.bottom >= bitmapRect.bottom) {frame.top = bitmapRect.bottom - frameHeight;frame.bottom = bitmapRect.bottom;
}
downX = currentX;
downY = currentY;
invalidate();
上边的操作都是通过onTouchEvent来实现的,移动的过程必须要注意不能让透明区域超过图片显示的边界
4 当点击了裁剪的按钮,通过透明区域与图片的显示比例,裁剪图片,并将裁剪的图片保存在本地,然后将图片的路径返回给上一个activity
4.1 通过Bitmap.createBitmap裁剪图片
4.2 由于部分图片过大,在裁剪界面预览的图片需要通过等比压缩再显示
这篇关于Android自定义裁剪图片的View的文章就介绍到这儿,希望我们推荐的文章对编程师们有所帮助!


