SpringBoot的RabbitMQ消息队列: 三、第二模式Work queues

本文主要是介绍SpringBoot的RabbitMQ消息队列: 三、第二模式Work queues,希望对大家解决编程问题提供一定的参考价值,需要的开发者们随着小编来一起学习吧!

  上一节的两个工程,一个负责发送,一个负责接收,也就是一一对于的关系。

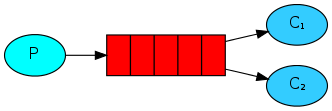
     只要消息发出了,接收者就处理;当接收效率较低时,就会出现接收者处理不过来,我们就可能会处理不过来,于是我们就可能多配置接受者。这个模式就是"Work queues",它的结构如下


    多个接收者,它们会出现什么情况呢?是否像大锅饭,有的人撑死,有的人饿死。这个通过例子验证。

一、再建一个接收者工程 HelloReceiving2


1、把HelloReceiver工程中的HelloRabbitConfig、HelloReceiver、logback.xml依次拷贝过去

2、修改application.properties为

[html]  view plain copy
  1. #服务器配置  
  2. spring.application.name=rabbitmq-hello-receiving  
  3. server.port=9092   
  4. #rabbitmq连接参数  
  5. spring.rabbitmq.host=localhost  
  6. spring.rabbitmq.port=5672  
  7. spring.rabbitmq.username=test  
  8. spring.rabbitmq.password=123456  

二、运行工程

1、在工程HelloSending所在文件夹打开cmd,运行mvn spring-boot:run

2、在工程HelloReceiving所在文件夹打开cmd,运行mvn spring-boot:run

3、在工程HelloReceiving2所在文件夹打开cmd,运行mvn spring-boot:run
4、在浏览器中输入http://localhost:9080/send/上帝1,http://localhost:9080/send/上帝2,http://localhost:9080/send/上帝3
观察两个Receiving的日志.

查看出不均衡吧,为了突出这个不公平,我们修改发送代码如下

[html]  view plain copy
  1. package com.example;  
  2.   
  3. import java.util.Date;  
  4.   
  5. import org.slf4j.Logger;  
  6. import org.slf4j.LoggerFactory;  
  7. import org.springframework.amqp.core.AmqpTemplate;  
  8. import org.springframework.beans.factory.annotation.Autowired;  
  9. import org.springframework.stereotype.Component;  
  10.   
  11. @Component  
  12. public class HelloSender {  
  13.   
  14.     protected static Logger logger=LoggerFactory.getLogger(HelloSender.class);   
  15.       
  16.     @Autowired  
  17.     private AmqpTemplate rabbitTemplate;  
  18.   
  19.     public String send(String name) {  
  20.         String context = "hello "+name+" --" + new Date();  
  21.         String sendStr;  
  22.         for(int i=1;i<=100;i++){  
  23.             sendStr="第["+i+"]个 hello "+name+" --" + new Date();   
  24.             logger.debug("HelloSender: " + sendStr);  
  25.             this.rabbitTemplate.convertAndSend("hello", sendStr);  
  26.         }  
  27.         return context;  
  28.     }  
  29. }  

再次http://localhost:9080/send/上帝,会发现更多的不公平。

三、Message acknowledgment 消息确认

1、默认情况下,RabbitMQ 会顺序的分发每个Message。当分发后,会将该Message删除,然后将下一个Message分发到下一个Consumer。这种分发方式叫做round-robin

2、每个Consumer可能需要一段时间才能处理完收到的数据。如果在这个过程中,Consumer出错了,异常退出了,而数据还没有处理完成,那么非常不幸,这段数据就丢失了。因为我们采用no-ack的方式进行确认,也就是说,每次Consumer接到数据后,而不管是否处理完成,RabbitMQ Server会立即把这个Message标记为完成,然后从queue中删除了。

3、如果一个Consumer异常退出了,它处理的数据能够被另外的Consumer处理,这样数据在这种情况下就不会丢失了(注意是这种情况下)。

4、为了保证数据不被丢失,RabbitMQ支持消息确认机制,即acknowledgments。为了保证数据能被正确处理而不仅仅是被Consumer收到,那么我们不能采用no-ack。而应该是在处理完数据后发送ack。

5、在处理数据后发送的ack,就是告诉RabbitMQ数据已经被接收,处理完成,RabbitMQ可以去安全的删除它了。

6、如果Consumer退出了但是没有发送ack,那么RabbitMQ就会把这个Message发送到下一个Consumer。这样就保证了在Consumer异常退出的情况下数据也不会丢失。

7、这里并没有用到超时机制。RabbitMQ仅仅通过Consumer的连接中断来确认该Message并没有被正确处理。也就是说,RabbitMQ给了Consumer足够长的时间来做数据处理。

    消息确认,对于spring-boot来说,就是一个开关,它就是spring.rabbitmq.listener.acknowledge-mode

    acknowledgeMode有三值:

    A、NONE = no acks will be sent (incompatible with channelTransacted=true).

          RabbitMQ calls this "autoack" because the broker assumes all messages are acked without any action from the consumer.

    B、MANUAL = the listener must acknowledge all messages by calling Channel.basicAck().

    C、AUTO = the container will acknowledge the message automatically, unless the MessageListener throws an exception.

Note that acknowledgeMode is complementary to channelTransacted - if the channel is transacted then the broker requires a commit notification in addition to the ack. This is the default mode. See also txSize.

    非常简单,在application.properties中增加spring.rabbitmq.listener.acknowledge-mode=AUTO

为了更好的演示异常,我们把生产者、消费者都做了sleep.代码如下:

sending

[html]  view plain copy
  1. package com.example;  
  2.   
  3. import java.util.Date;  
  4.   
  5. import org.slf4j.Logger;  
  6. import org.slf4j.LoggerFactory;  
  7. import org.springframework.amqp.core.AmqpTemplate;  
  8. import org.springframework.beans.factory.annotation.Autowired;  
  9. import org.springframework.stereotype.Component;  
  10.   
  11. @Component  
  12. public class HelloSender {  
  13.   
  14.     protected static Logger logger=LoggerFactory.getLogger(HelloSender.class);   
  15.       
  16.     @Autowired  
  17.     private AmqpTemplate rabbitTemplate;  
  18.   
  19.     public String send(String name) throws InterruptedException {  
  20.         String context = "hello "+name+" --" + new Date();  
  21.         String sendStr;  
  22.         for(int i=1;i<=100;i++){  
  23.             sendStr="第["+i+"]个 hello "+name+" --" + new Date();   
  24.             logger.debug("HelloSender: " + sendStr);  
  25.             this.rabbitTemplate.convertAndSend("hello", sendStr);  
  26.             Thread.sleep(1000);  
  27.         }  
  28.         return context;  
  29.     }  
  30. }  
Receiving

[html]  view plain copy
  1. package com.example;  
  2.   
  3. import org.slf4j.Logger;  
  4. import org.slf4j.LoggerFactory;  
  5. import org.springframework.amqp.rabbit.annotation.RabbitHandler;  
  6. import org.springframework.amqp.rabbit.annotation.RabbitListener;  
  7. import org.springframework.stereotype.Component;  
  8.   
  9. @Component  
  10. @RabbitListener(queues = "hello")  
  11. public class HelloReceiver {  
  12.     protected static Logger logger = LoggerFactory.getLogger(HelloReceiver.class);  
  13.   
  14.     @RabbitHandler  
  15.     public void process(String hello) {  
  16.         logger.debug("HelloReceiver : " + hello);  
  17.         try {  
  18.             Thread.sleep(2000);  
  19.         } catch (InterruptedException e) {  
  20.             // TODO Auto-generated catch block  
  21.             e.printStackTrace();  
  22.         }  
  23.     }  
  24. }  

Receiving2

[html]  view plain copy
  1. package com.example;  
  2.   
  3. import org.slf4j.Logger;  
  4. import org.slf4j.LoggerFactory;  
  5. import org.springframework.amqp.rabbit.annotation.RabbitHandler;  
  6. import org.springframework.amqp.rabbit.annotation.RabbitListener;  
  7. import org.springframework.stereotype.Component;  
  8.   
  9. @Component  
  10. @RabbitListener(queues = "hello")  
  11. public class HelloReceiver {  
  12.     protected static Logger logger = LoggerFactory.getLogger(HelloReceiver.class);  
  13.   
  14.     @RabbitHandler  
  15.     public void process(String hello) {  
  16.         logger.debug("HelloReceiver : " + hello);  
  17.         try {  
  18.             Thread.sleep(3000);  
  19.         } catch (InterruptedException e) {  
  20.             // TODO Auto-generated catch block  
  21.             e.printStackTrace();  
  22.         }  
  23.     }  
  24. }  
你会注意到两个消费者的sleep时间不一样,这是为了方便异常退出一个之后,查看另一个是否接收并处理。

四、消息持久化

在上一节中我们知道了即使Consumer异常退出,Message也不会丢失。但是如果RabbitMQ Server退出呢?软件都有bug,即使RabbitMQ Server是完美毫无bug的(当然这是不可能的,是软件就有bug,没有bug的那不叫软件),它还是有可能退出的:被其它软件影响,或者系统重启了,系统panic了。。。

为了保证在RabbitMQ退出或者crash了数据仍没有丢失,需要将queue和Message都要持久化。

queue持久化,就是在实例时调用具有参数durable的构造函数.

[java]  view plain copy
  1. package com.example;  
  2.   
  3. import org.springframework.amqp.core.Queue;  
  4. import org.springframework.context.annotation.Bean;  
  5. import org.springframework.context.annotation.Configuration;  
  6.   
  7. @Configuration  
  8. public class HelloRabbitConfig {  
  9.   
  10.     @Bean  
  11.     public Queue helloQueue() {  
  12.         return new Queue("hello",true);  
  13.     }  
  14. }  

五、单消费者,排他队列

个人理解: 这个是queue的重载构造方法,要使用单消费者,就得使用这个构造方法

消息只能一个消费者接收处理,其它消费者只能看着,这也是队列实例时调用具有参数exclusive 的构造函数。

    /**
     * Construct a new queue, given a name, durability, exclusive and auto-delete flags.
     * @param name the name of the queue.
     * @param durable true if we are declaring a durable queue (the queue will survive a server restart)
     * @param exclusive true if we are declaring an exclusive queue (the queue will only be used by the declarer's
     * connection)
     * @param autoDelete true if the server should delete the queue when it is no longer in use
     */
    public Queue(String name, boolean durable, boolean exclusive, boolean autoDelete) {
        this(name, durable, exclusive, autoDelete, null);
    } 

六、参数


个人理解: 这个应该是配置文件里面的相关配置.

  • spring.rabbitmq.addresses指定client连接到的server的地址,多个以逗号分隔.

  • spring.rabbitmq.dynamic是否创建AmqpAdmin bean. 默认为: true)

  • spring.rabbitmq.host指定RabbitMQ host.默认为: localhost)

  • spring.rabbitmq.listener.acknowledge-mode指定Acknowledge的模式.

  • spring.rabbitmq.listener.auto-startup是否在启动时就启动mq,默认: true)

  • spring.rabbitmq.listener.concurrency指定最小的消费者数量.

  • spring.rabbitmq.listener.max-concurrency指定最大的消费者数量.

  • spring.rabbitmq.listener.prefetch指定一个请求能处理多少个消息,如果有事务的话,必须大于等于transaction数量.

  • spring.rabbitmq.listener.transaction-size指定一个事务处理的消息数量,最好是小于等于prefetch的数量.

  • spring.rabbitmq.password指定broker的密码.

  • spring.rabbitmq.port指定RabbitMQ 的端口,默认: 5672)

  • spring.rabbitmq.requested-heartbeat指定心跳超时,0为不指定.

  • spring.rabbitmq.ssl.enabled是否开始SSL,默认: false)

  • spring.rabbitmq.ssl.key-store指定持有SSL certificate的key store的路径

  • spring.rabbitmq.ssl.key-store-password指定访问key store的密码.

  • spring.rabbitmq.ssl.trust-store指定持有SSL certificates的Trust store.

  • spring.rabbitmq.ssl.trust-store-password指定访问trust store的密码.

  • spring.rabbitmq.username指定登陆broker的用户名.

  • spring.rabbitmq.virtual-host指定连接到broker的Virtual host.

这篇关于SpringBoot的RabbitMQ消息队列: 三、第二模式Work queues的文章就介绍到这儿,希望我们推荐的文章对编程师们有所帮助!


http://www.chinasem.cn/article/1095398

相关文章

SpringBoot整合Flowable实现工作流的详细流程

《SpringBoot整合Flowable实现工作流的详细流程》Flowable是一个使用Java编写的轻量级业务流程引擎,Flowable流程引擎可用于部署BPMN2.0流程定义,创建这些流程定义的... 目录1、流程引擎介绍2、创建项目3、画流程图4、开发接口4.1 Java 类梳理4.2 查看流程图4

一文详解如何在idea中快速搭建一个Spring Boot项目

《一文详解如何在idea中快速搭建一个SpringBoot项目》IntelliJIDEA作为Java开发者的‌首选IDE‌,深度集成SpringBoot支持,可一键生成项目骨架、智能配置依赖,这篇文... 目录前言1、创建项目名称2、勾选需要的依赖3、在setting中检查maven4、编写数据源5、开启热

Java对异常的认识与异常的处理小结

《Java对异常的认识与异常的处理小结》Java程序在运行时可能出现的错误或非正常情况称为异常,下面给大家介绍Java对异常的认识与异常的处理,本文给大家介绍的非常详细,对大家的学习或工作具有一定的参... 目录一、认识异常与异常类型。二、异常的处理三、总结 一、认识异常与异常类型。(1)简单定义-什么是

Redis Cluster模式配置

《RedisCluster模式配置》:本文主要介绍RedisCluster模式配置,本文给大家介绍的非常详细,对大家的学习或工作具有一定的参考借鉴价值,需要的朋友参考下吧... 目录分片 一、分片的本质与核心价值二、分片实现方案对比 ‌三、分片算法详解1. ‌范围分片(顺序分片)‌2. ‌哈希分片3. ‌虚

SpringBoot项目配置logback-spring.xml屏蔽特定路径的日志

《SpringBoot项目配置logback-spring.xml屏蔽特定路径的日志》在SpringBoot项目中,使用logback-spring.xml配置屏蔽特定路径的日志有两种常用方式,文中的... 目录方案一:基础配置(直接关闭目标路径日志)方案二:结合 Spring Profile 按环境屏蔽关

Java使用HttpClient实现图片下载与本地保存功能

《Java使用HttpClient实现图片下载与本地保存功能》在当今数字化时代,网络资源的获取与处理已成为软件开发中的常见需求,其中,图片作为网络上最常见的资源之一,其下载与保存功能在许多应用场景中都... 目录引言一、Apache HttpClient简介二、技术栈与环境准备三、实现图片下载与保存功能1.

SpringBoot排查和解决JSON解析错误(400 Bad Request)的方法

《SpringBoot排查和解决JSON解析错误(400BadRequest)的方法》在开发SpringBootRESTfulAPI时,客户端与服务端的数据交互通常使用JSON格式,然而,JSON... 目录问题背景1. 问题描述2. 错误分析解决方案1. 手动重新输入jsON2. 使用工具清理JSON3.

java中long的一些常见用法

《java中long的一些常见用法》在Java中,long是一种基本数据类型,用于表示长整型数值,接下来通过本文给大家介绍java中long的一些常见用法,感兴趣的朋友一起看看吧... 在Java中,long是一种基本数据类型,用于表示长整型数值。它的取值范围比int更大,从-922337203685477

java Long 与long之间的转换流程

《javaLong与long之间的转换流程》Long类提供了一些方法,用于在long和其他数据类型(如String)之间进行转换,本文将详细介绍如何在Java中实现Long和long之间的转换,感... 目录概述流程步骤1:将long转换为Long对象步骤2:将Longhttp://www.cppcns.c

SpringBoot集成LiteFlow实现轻量级工作流引擎的详细过程

《SpringBoot集成LiteFlow实现轻量级工作流引擎的详细过程》LiteFlow是一款专注于逻辑驱动流程编排的轻量级框架,它以组件化方式快速构建和执行业务流程,有效解耦复杂业务逻辑,下面给大... 目录一、基础概念1.1 组件(Component)1.2 规则(Rule)1.3 上下文(Conte