本文主要是介绍Kurento模块开发指南之二:开发示例 Pointer Detector Filter,希望对大家解决编程问题提供一定的参考价值,需要的开发者们随着小编来一起学习吧!
17.1.2 模块教程1- Pointer Detector Filter这个页面应用由一个带有指针跟踪滤镜组件的WebRTC视频通信回看组成。
Java 模块教程 1 - Pointer Detector Filter
这个页面应用由一个带有指针跟踪滤镜组件的WebRTC视频通信回看组成。
首先: 运行这个示例程序
首先,需要安装Kurento Media Server来运行这个示例,可以参看前面的安装指南。
另外,内建模块kms-pointerdetector-6.0 也需要被安装:
$ sudo apt-get install kms-pointerdetector-6.0
为了加载这个应用,需要从GitHub上克隆这个工程并运行,命令如下:
$ git clone https://github.com/Kurento/kurento-tutorial-java.git
$ cd kurento-tutorial-java/kurento-pointerdetector
$ mvn compile exec:java
在本机上用 (Chrome, Firefox)浏览器输入网址http://localhost:8080/即可看到这个示例应用。
Note:
These instructions work only if Kurento Media Server is up and running in the same machine than the tutorial. However, it is possible to locate the KMS in other machine simple adding the argument kms.ws.uri to the Maven execution command, as follows:
mvn compile exec:java -Dkms.ws.uri=ws://kms_host:kms_port/kurento
理解这个示例应用
这个应用程序使用了计算机视觉和虚拟现实技术,它是基于颜色跟踪的方式检测WebRTC流中的指针。
这个应用程序(一个HTML页面)的接口由两个HTML5视频标签组成:
一个用于显示本地的视频摄像头的流;
一个用于显示远端的镜像的流。
本地视频摄像头的流被发送到KMS, 经过处理后再发回到客户端。我们需要创建的媒体管道由下列媒体组件组成:
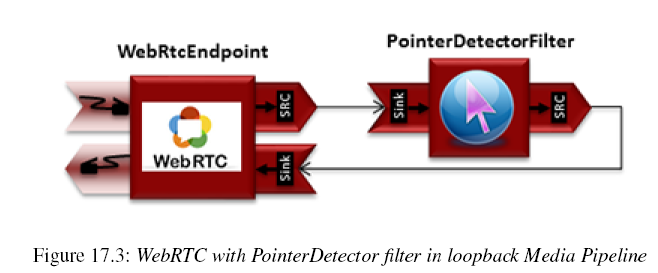
Figure 17.3: WebRTC with PointerDetector filter in loopback Media Pipeline
这个示例应用的完整代码在GitHub上。
这个示例应用程序,是Magic Mirror教程的改版,它使用了PointerDetector 代替FaceOverlay 滤镜。
为了实现指针检测,它必须有一个校准阶段,即先要把指针处的颜色注册到滤镜中。为了实现这个步骤,指针需要先位于视频框的左上角,如下所示:
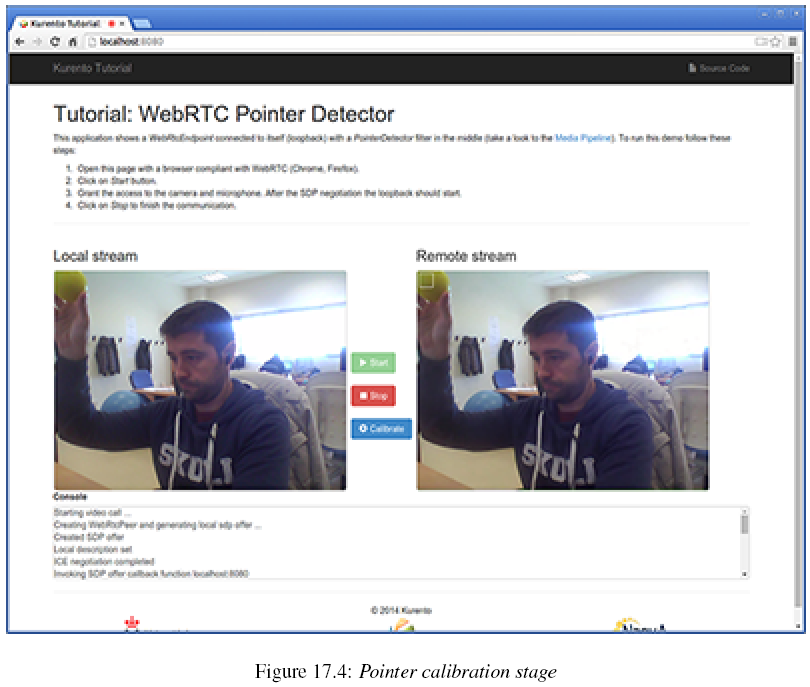
Figure 17.4: Pointer calibration stage
在这个时刻,服务端将会发送一个校准消息给客户端。
这可以通过点击页面的校准蓝色按钮实现。
在这之后,指针所指处的颜色就会被KMS实时跟踪。
PointerDetectorFilter 同样能定义屏幕上的一个区域,称之为窗口,当某些操作导致指针进入这个区域时会执行一些动作, 当指针进入时是WindowInEvent事件,退出时是WindowOutEvent事件。
服务端的代码逻辑如下:
// Media Logic (Media Pipeline and Elements)
UserSession user = new UserSession();
MediaPipeline pipeline = kurento.createMediaPipeline();
user.setMediaPipeline(pipeline);
WebRtcEndpoint webRtcEndpoint = new WebRtcEndpoint.Builder(pipeline).build();
user.setWebRtcEndpoint(webRtcEndpoint);
users.put(session.getId(), user);
webRtcEndpoint.addOnIceCandidateListener(new EventListener<OnIceCandidateEvent>() {
@Override
public void onEvent(OnIceCandidateEvent event) {
JsonObject response = new JsonObject();
response.addProperty("id", "iceCandidate");
response.add("candidate", JsonUtils.toJsonObject(event.getCandidate()));
try {
synchronized (session) {
session.sendMessage(new TextMessage(response.toString()));
}
} catch (IOException e) {
log.debug(e.getMessage());
}
}
});
pointerDetectorFilter = new PointerDetectorFilter.Builder(pipeline,new WindowParam(5, 5, 30, 30)).build();
pointerDetectorFilter.addWindow(new PointerDetectorWindowMediaParam("window0",50, 50, 500, 150));
pointerDetectorFilter.addWindow(new PointerDetectorWindowMediaParam("window1",50, 50, 500, 250));
webRtcEndpoint.connect(pointerDetectorFilter);
pointerDetectorFilter.connect(webRtcEndpoint);
pointerDetectorFilter.addWindowInListener(new EventListener<WindowInEvent>() {
@Override
public void onEvent(WindowInEvent event) {
JsonObject response = new JsonObject();
response.addProperty("id", "windowIn");
response.addProperty("roiId", event.getWindowId());
try {
session.sendMessage(new TextMessage(response.toString()));
} catch (Throwable t) {
sendError(session, t.getMessage());
}
}
});
pointerDetectorFilter.addWindowOutListener(new EventListener<WindowOutEvent>() {
@Override
public void onEvent(WindowOutEvent event) {
JsonObject response = new JsonObject();
response.addProperty("id", "windowOut");
response.addProperty("roiId", event.getWindowId());
try {
session.sendMessage(new TextMessage(response.toString()));
} catch (Throwable t) {
sendError(session, t.getMessage());
}
}
});
// SDP negotiation (offer and answer)
String sdpOffer = jsonMessage.get("sdpOffer").getAsString();
String sdpAnswer = webRtcEndpoint.processOffer(sdpOffer);
// Sending response back to client
JsonObject response = new JsonObject();
response.addProperty("id", "startResponse");
response.addProperty("sdpAnswer", sdpAnswer);
synchronized (session) {
session.sendMessage(new TextMessage(response.toString()));
}
webRtcEndpoint.gatherCandidates();
下图显示了在一个定义窗口中的指针检测:
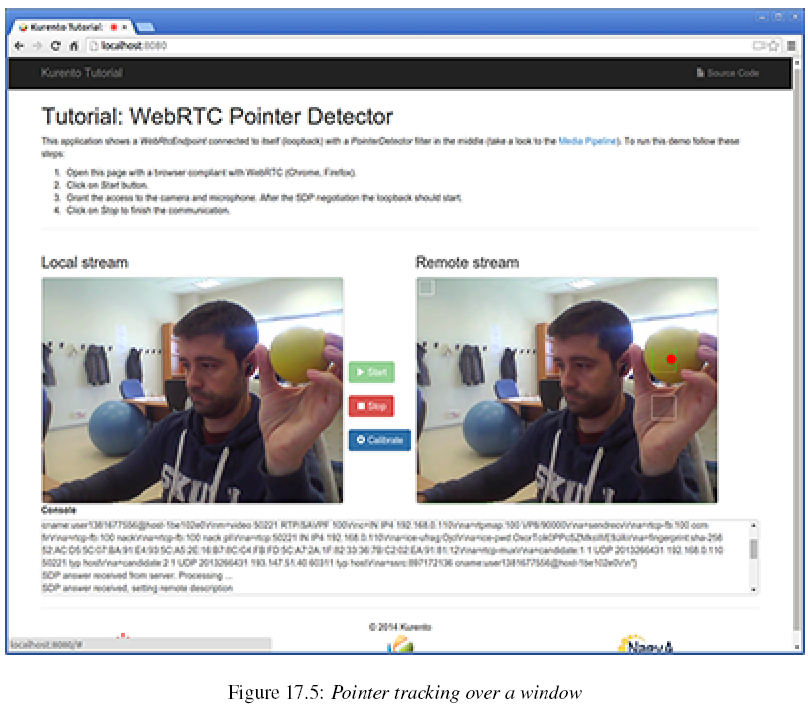
Figure 17.5: Pointer tracking over a window
为了从客户端发送校准消息到服务端,这个示例程序的JavaScripte使用了下面的函数:
function calibrate() {
console.log("Calibrate color");
var message = {
id : 'calibrate'
}
sendMessage(message);
}
当应用程序服务端收到消息后,下面的代码被执行来进行校准:
private void calibrate(WebSocketSession session, JsonObject jsonMessage) {
if (pointerDetectorFilter != null) {
pointerDetectorFilter.trackColorFromCalibrationRegion();
}
}
依赖项
Java Spring是由Maven实现,另外还需要三个依赖项:
the Kurento Client Java dependency (kurento-client),
the JavaScript Kurento utility library (kurento-utils) for the client-side,
and the pointer detector module (pointerdetector):
<parent>
<groupId>org.kurento</groupId>
<artifactId>kurento-parent-pom</artifactId>
<version>|CLIENT_JAVA_VERSION|</version>
</parent>
<dependencies>
<dependency>
<groupId>org.kurento</groupId>
<artifactId>kurento-client</artifactId>
</dependency>
<dependency>
<groupId>org.kurento</groupId>
<artifactId>kurento-utils-js</artifactId>
</dependency>
<dependency>
<groupId>org.kurento.module</groupId>
<artifactId>pointerdetector</artifactId>
</dependency>
</dependencies>
Note:
We are in active development. You can find the latest versions at Maven Central.
这篇关于Kurento模块开发指南之二:开发示例 Pointer Detector Filter的文章就介绍到这儿,希望我们推荐的文章对编程师们有所帮助!


