本文主要是介绍【Python办公自动化之Word】,希望对大家解决编程问题提供一定的参考价值,需要的开发者们随着小编来一起学习吧!
python办公⾃动化之-Word
python-docx库
文章目录
- python办公⾃动化之-Word
- 1、安装python-docx库
- 2、⽂档的结构说明
- 3、基本操作语法
- 3.1 打开⽂档
- 3.2加⼊不同等级的标题
- 3.3 添加⽂本
- 3.4 设置字号
- 插曲1:实战演示
- 3.5 设置中⽂字体
- 3.6 设置斜体
- 3.7 设置粗体
- 3.8⾸⾏缩进
- 插曲2:实战演示
- 插曲3:实战演示
- 3.9 对⻬⽅式
- 插曲4:实战演示
- 3.10 增加列表
- 3.11 增加图片
- 3.12 增加表格
- 插曲5:实战演示
- 3.13 再增加3行表格元素
- 3.14 增加分页
- 3.15 保存文件
- 3.16 完整代码
- 3.17 获取文档操作
- 3.18 获取段落数量
- 4、案例
- 4.1 请假条
- 4.2 Excel转换为word
1、安装python-docx库
cmd窗⼝或终端输⼊pip install python-docx按下回⻋等待安装完成。
说明
2、⽂档的结构说明
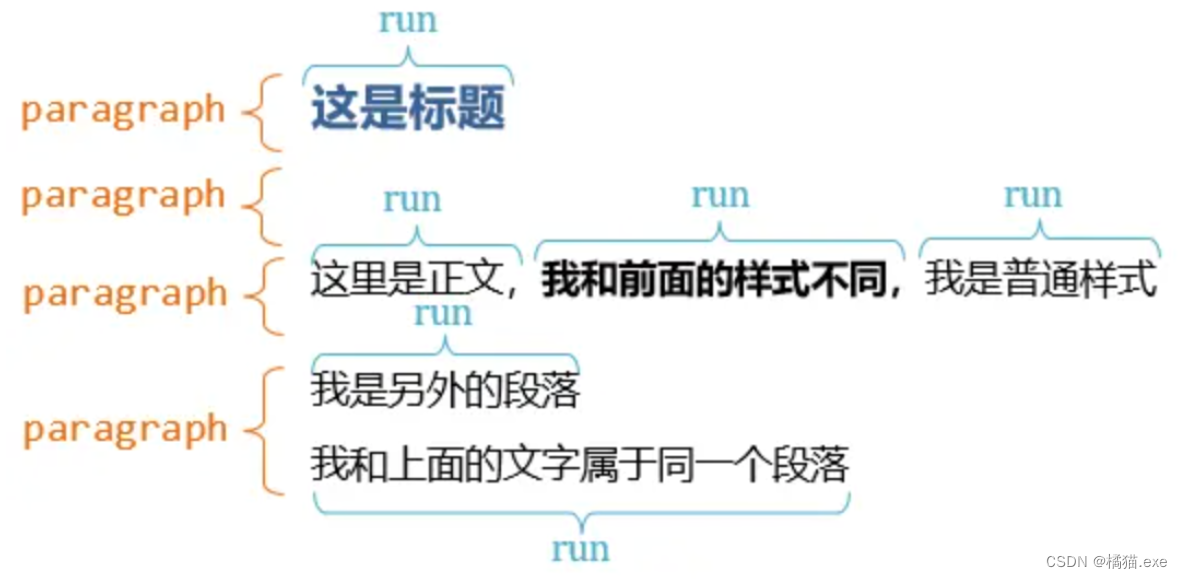
在word⽂档中,其主要结构如下所述:
- 每个document包含多个paragraph,每个paragraph有多个run,每个run包含有(text⽂本,font字体,color颜⾊,字号)
- 每个document包含多个tables,table中有多个rows,每个row包含多个cells,每个cell中包含多个paragraph。对于写word表格不论是 head 还是paragraph 基本操作都是先添加对象,然后再添加run就好了
- word表格的结构包含head标题、normal 正⽂、Caption表
3、基本操作语法
3.1 打开⽂档
document = Document
不填默认为新建⼀个⽂档
3.2加⼊不同等级的标题
document.add_heading('总标题',0)
document.add_heading('⼀级标题',1)
document.add_heading('⼆级标题',2)
3.3 添加⽂本
paragraph = document.add_paragraph('⽂本内容')
3.4 设置字号
run = paragraph.add_run('设置字号、')
run.font.size = Pt(34)
插曲1:实战演示
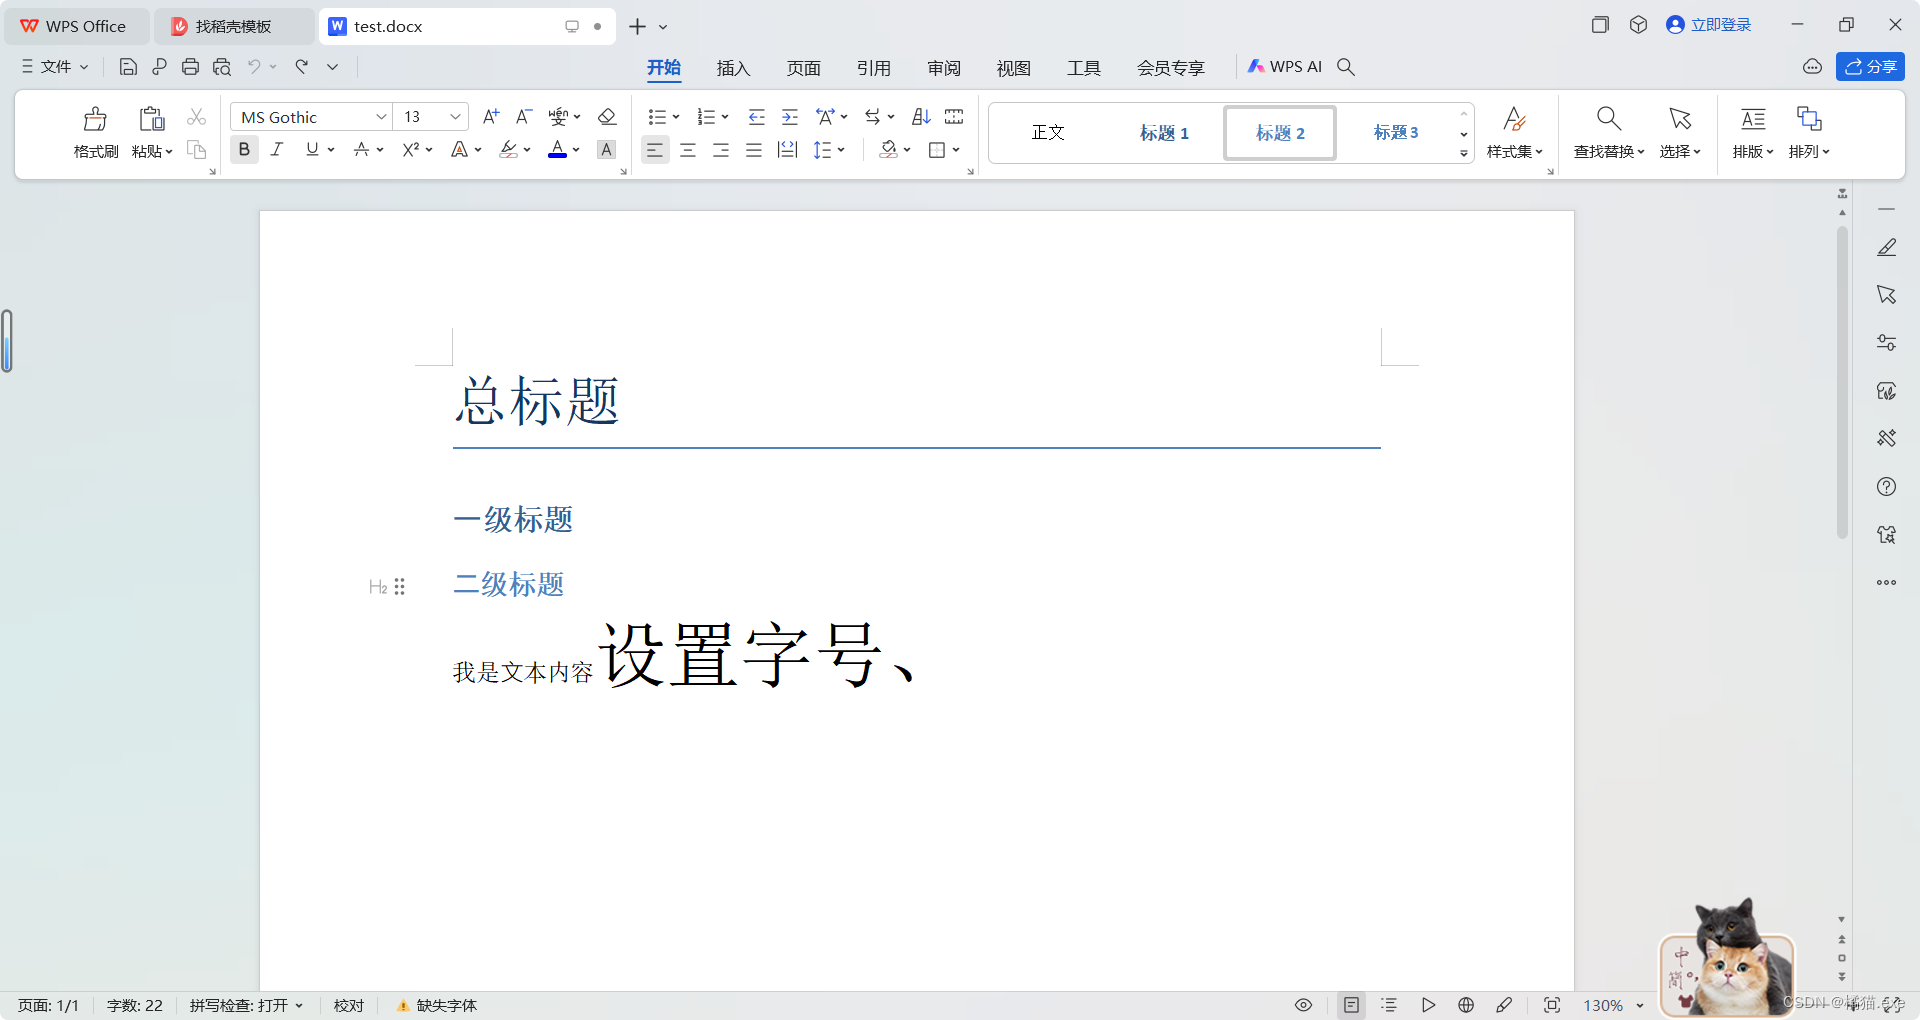
from docx import Document
from docx.shared import Ptdocument = Document()# 添加标题
document.add_heading('总标题', 0)
document.add_heading('一级标题', 1)
document.add_heading('二级标题', 2)paragraph = document.add_paragraph('我是⽂本内容')run = paragraph.add_run('设置字号、')
run.font.size = Pt(34)document.save('test.docx')	#生成的文件名+路径,不设路径默认在工程目录下
运行结果:
3.5 设置中⽂字体
run = paragraph.add_run('设置中⽂字体、')
run.font.name = '宋体'
r = run._element
r.rPr.rFonts.set(qn('w:eastAsia'), '宋体')
3.6 设置斜体
run = paragraph.add_run('斜体、')
run.italic = True
3.7 设置粗体
paragraph.add_run('粗体').bold = True
3.8⾸⾏缩进
| 缩进⽅式 | 属性 |
|---|---|
| 左边缩进 | left_indent |
| 右边缩进 | right_indent |
| ⾸⾏缩进 | first_line_indent |
插曲2:实战演示
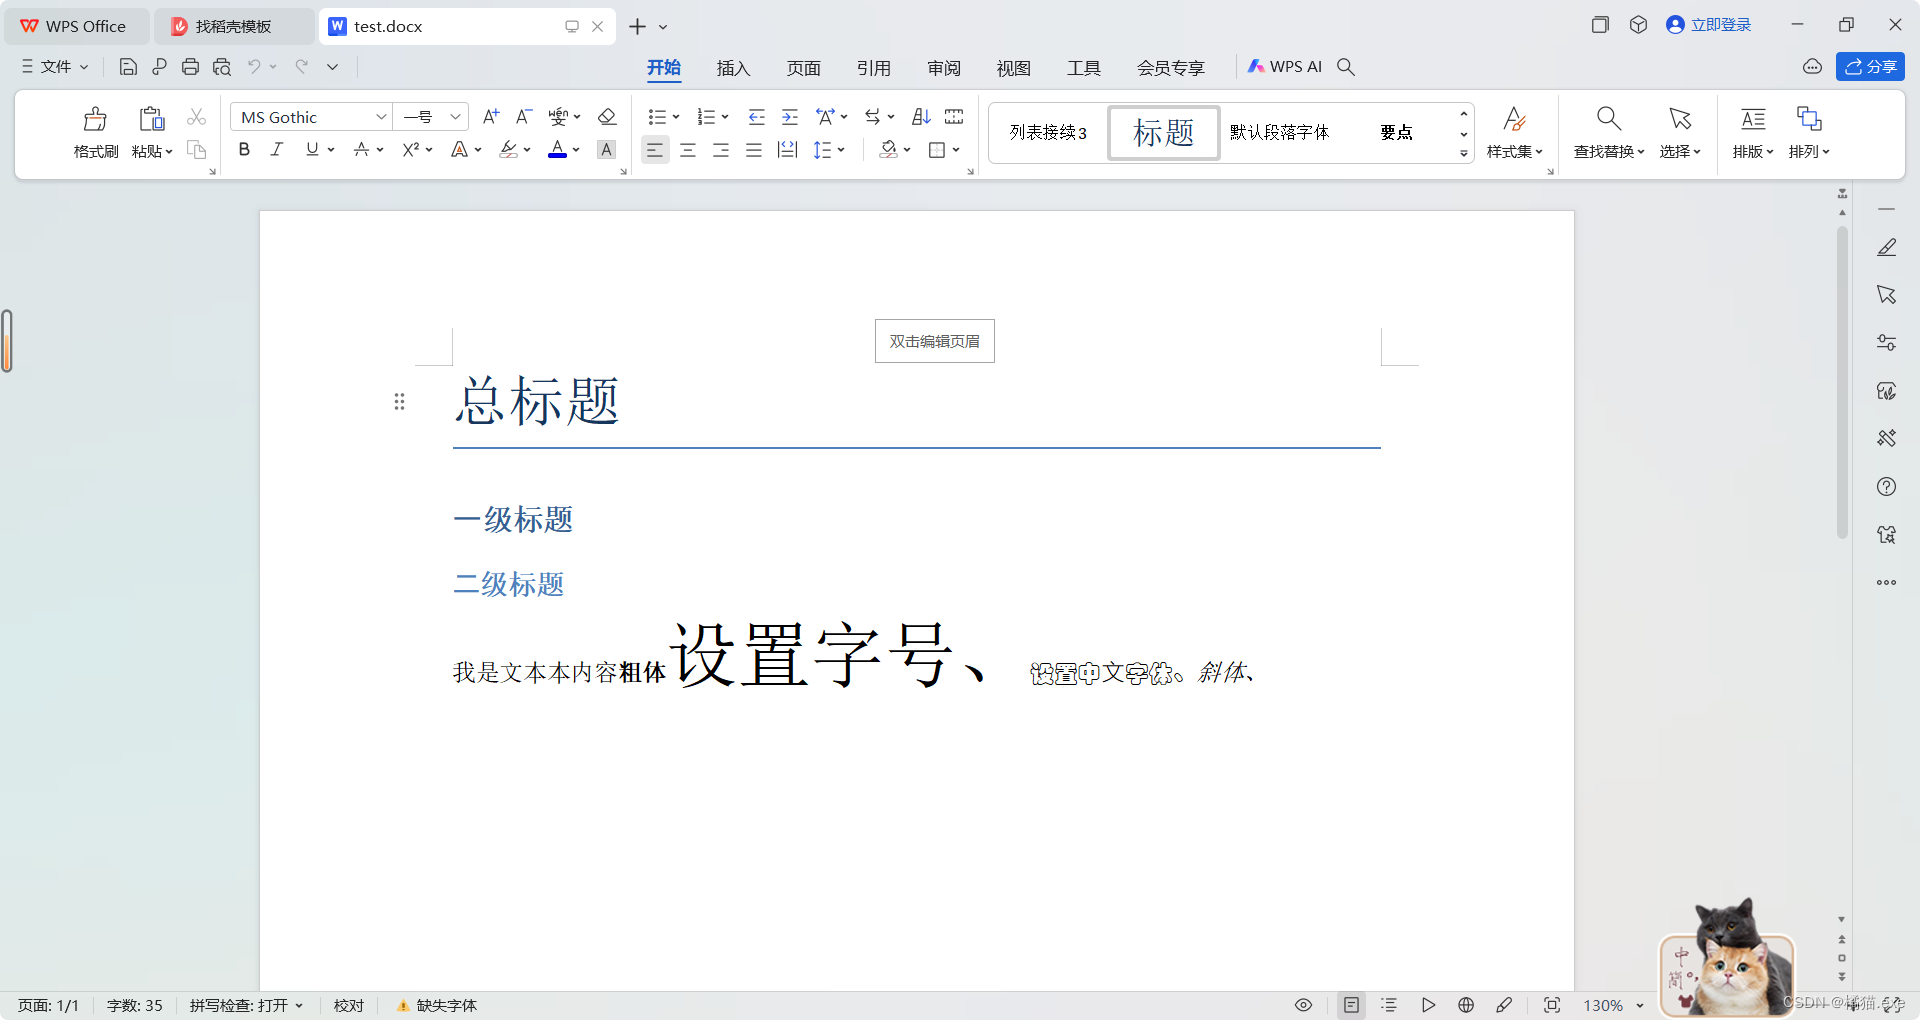
from docx import Document
from docx.oxml.ns import qn
from docx.shared import Ptdocument = Document()# 添加标题
document.add_heading('总标题', 0)
document.add_heading('一级标题', 1)
document.add_heading('二级标题', 2)paragraph = document.add_paragraph('我是文本本内容')
paragraph.add_run('粗体').bold = Truerun = paragraph.add_run('设置字号、')
run.font.size = Pt(34)
run = paragraph.add_run('设置中⽂字体、')
run.font.name = '华文彩云'
r = run._element
r.rPr.rFonts.set(qn('w:eastAsia'), '华文彩云')run = paragraph.add_run('斜体、')
run.italic = Truedocument.save('test.docx')
插曲3:实战演示
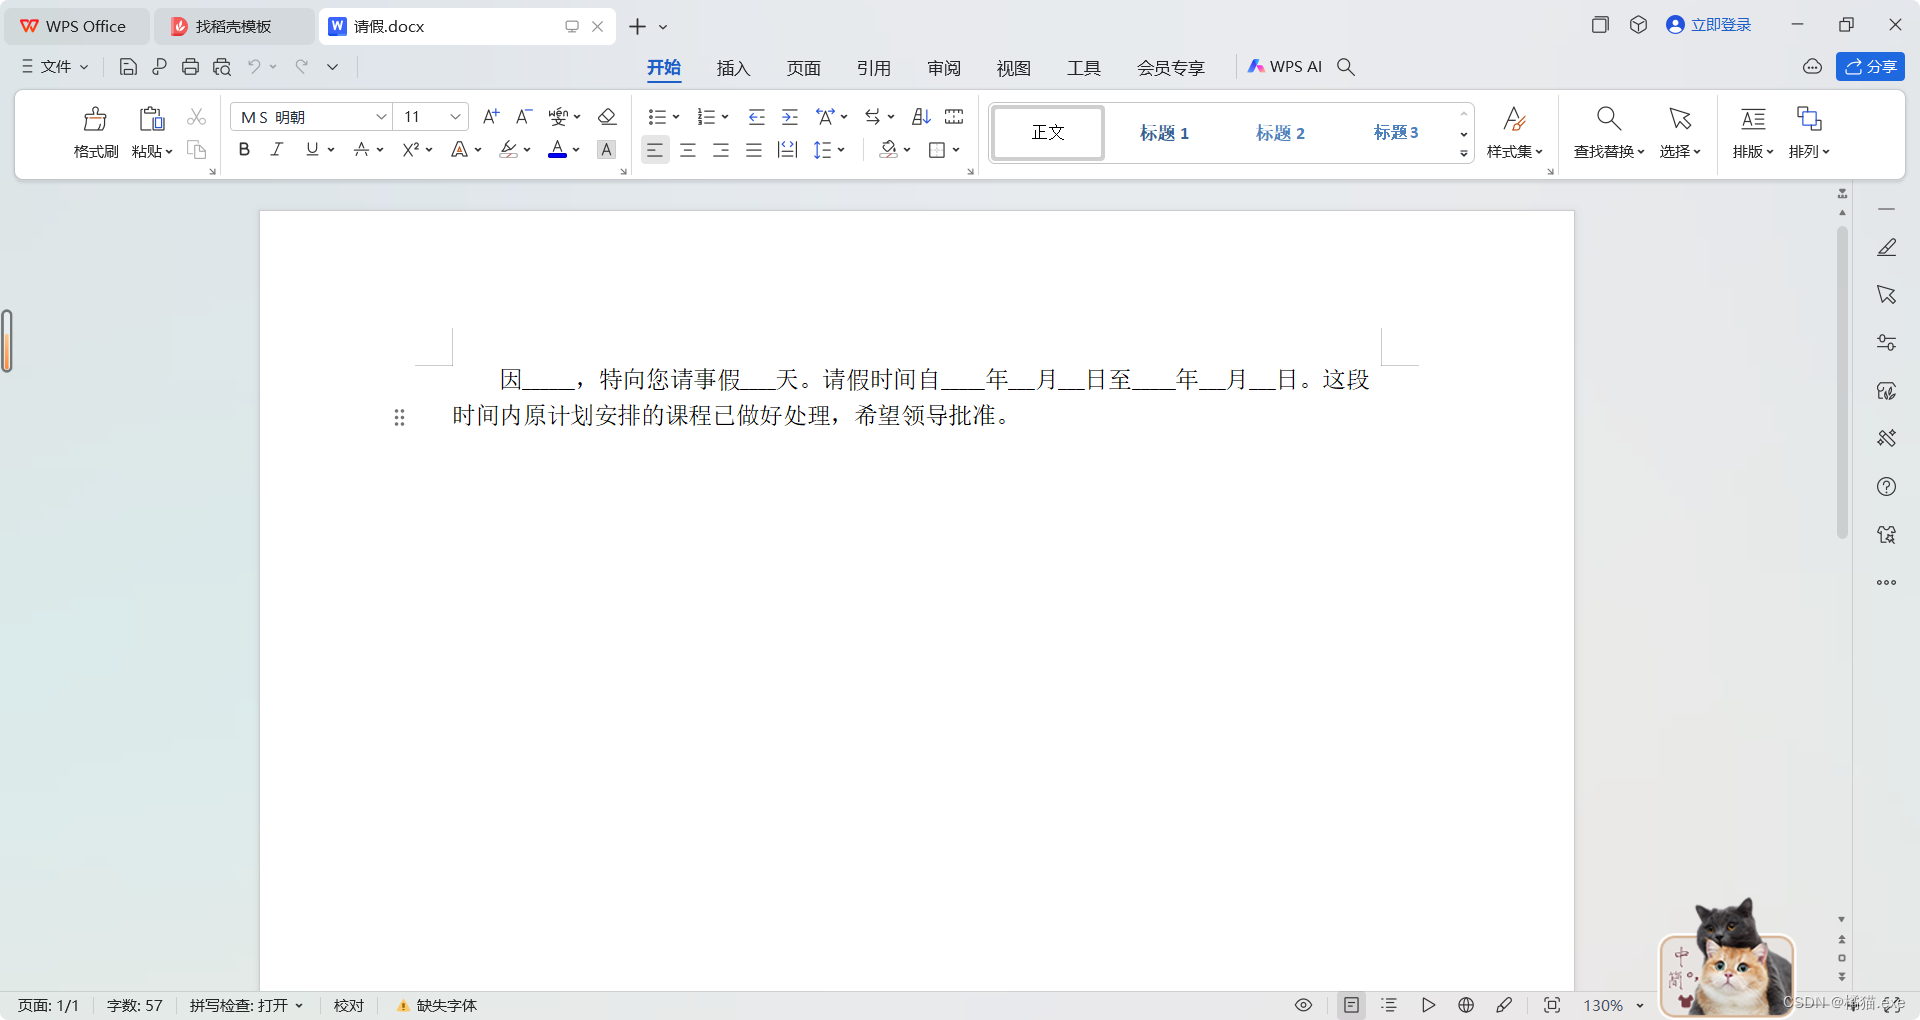
from docx import Document
from docx.shared import Inchesdoc = Document()
paragraph = doc.add_paragraph()
paragraph.add_run('因______,特向您请事假____天。请假时间自_____年___月___日至_____年___月___日。这段时间内原计划安排的课程已做好处理,希望领导批准。' )article2_format = paragraph.paragraph_format
article2_format.first_line_indent = Inches(0.3) #英寸单位
doc.save('请假.docx')
3.9 对⻬⽅式
| 名称 | 属性 |
|---|---|
| 左对⻬ | LEFT |
| 居中 | CENTER |
| 右对⻬ | RIGHT |
| ⽂本两端对⻬ | JUSTIFY |
插曲4:实战演示
from docx import Document
from docx.enum.text import
WD_PARAGRAPH_ALIGNMENT
doc = Document()
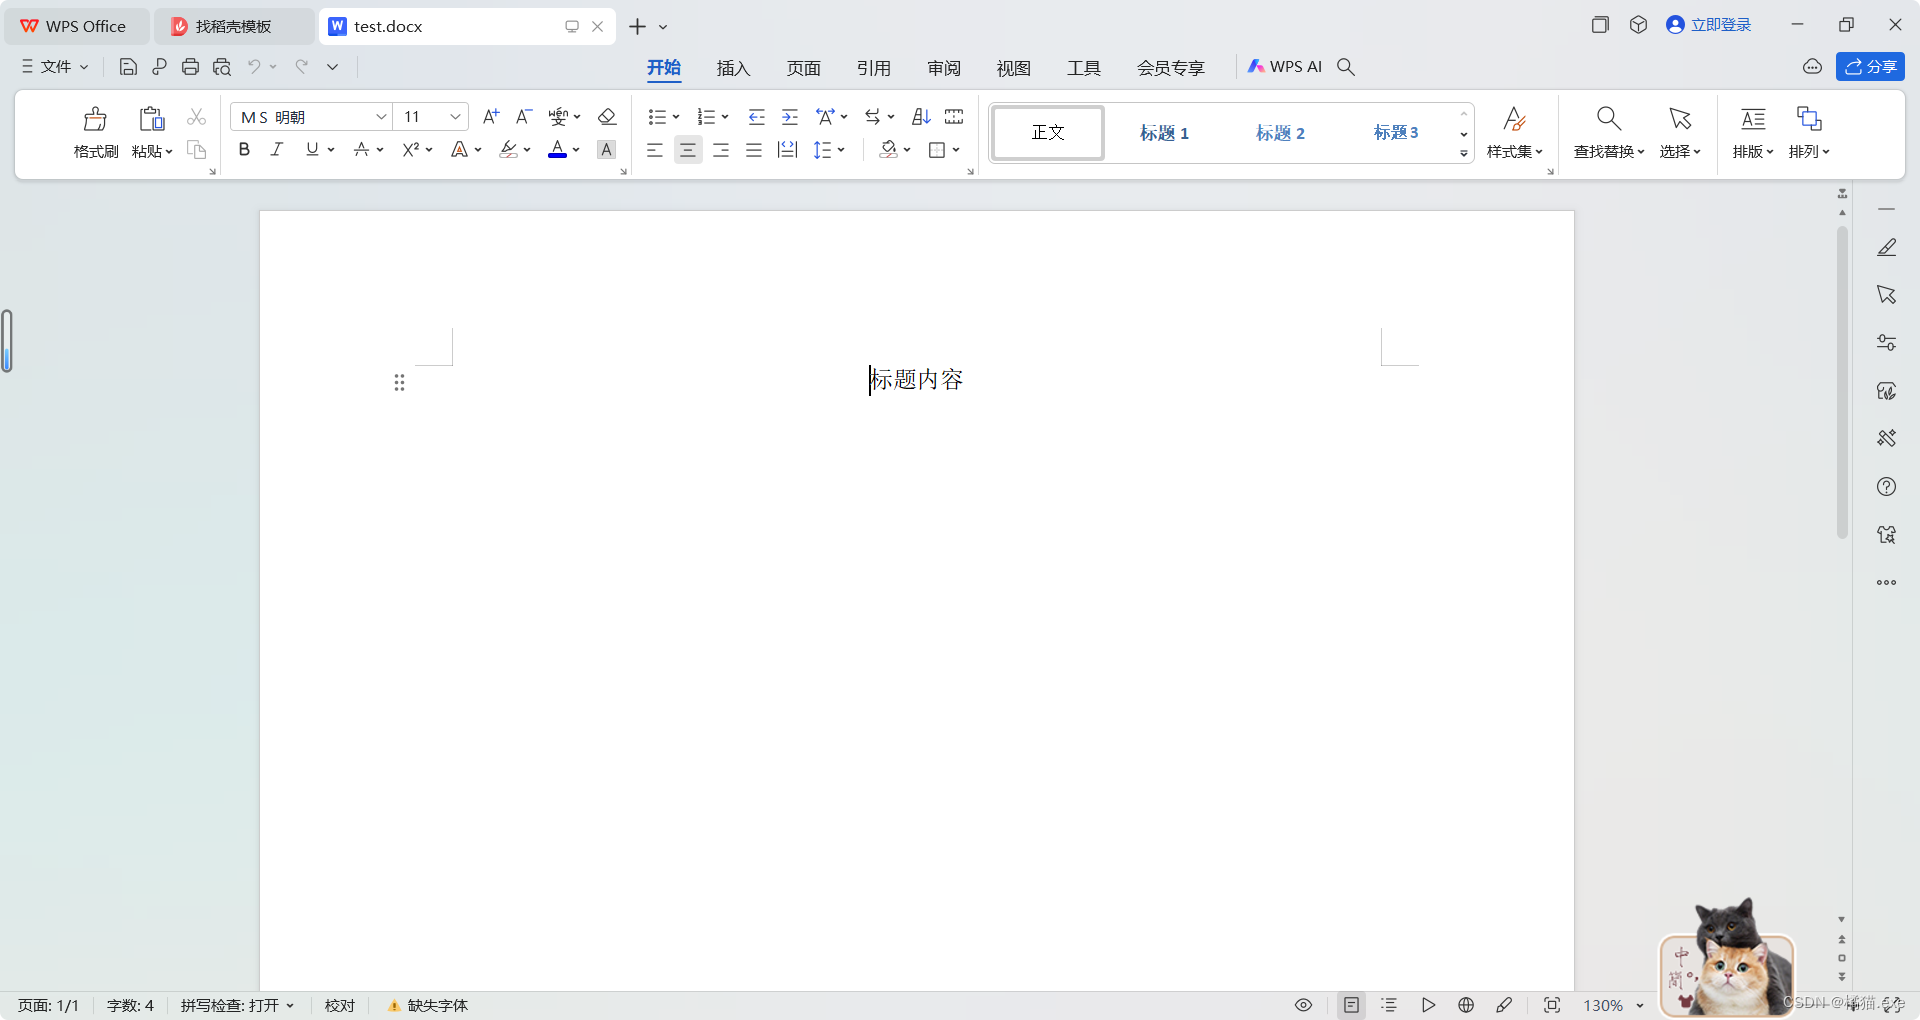
title = doc.add_paragraph()
a2 = title.add_run('标题内容')
title.alignment =
WD_PARAGRAPH_ALIGNMENT.CENTER # 居中
doc.save('test.docx')
3.10 增加列表
from docx import Document
document = Document()
document.add_paragraph('⽆序列表元素1', style='List Bullet')
document.add_paragraph('⽆序列表元素2', style='List Bullet')
document.add_paragraph('⽆序列表元素3', style='List Bullet')document.add_paragraph('有序列表元素1', style='List Number')
document.add_paragraph('有序列表元素2', style='List Number')
document.add_paragraph('有序列表元素3', style='List Number')document.save('列表.docx')

3.11 增加图片
png为图⽚名称(必须与代码⽂件在同⼀个⽂件夹内)
document.add_picture('1.png',width=Inches(1.35)
3.12 增加表格
table = document.add_table(rows=1, cols=3)
hdr_cells = table.rows[0].cells
hdr_cells[0].text = 'Name'
hdr_cells[1].text = 'Id'
hdr_cells[2].text = 'Desc'
插曲5:实战演示
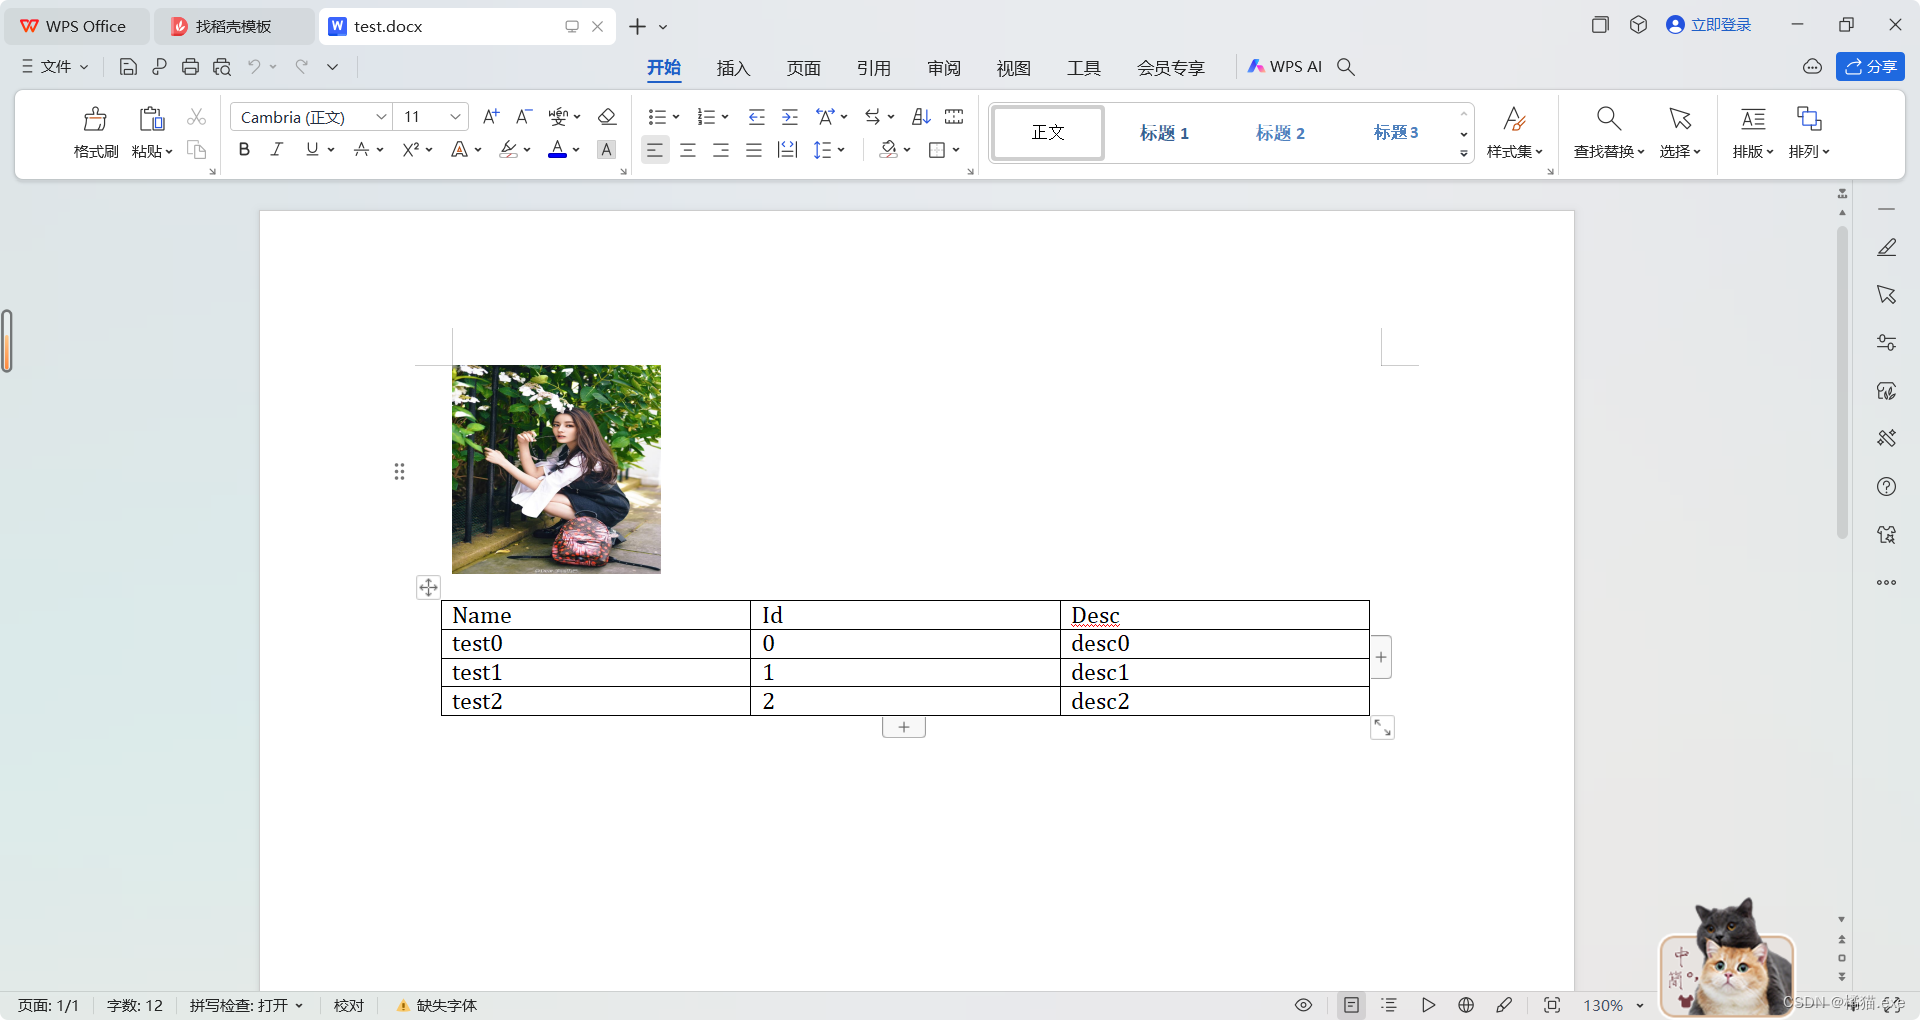
from docx import Document
from docx.shared import Inchesdoc = Document()
# doc.add_picture('dlrb.jpeg', width=Inches(1.35))
doc.add_picture('dlrb.jpeg', width=Inches(1.35), height=Inches(1.35))table = doc.add_table(rows=1, cols=3, style="Table Grid")
hdr_cells = table.rows[0].cells
hdr_cells[0].text = 'Name'
hdr_cells[1].text = 'Id'
hdr_cells[2].text = 'Desc'
for i in range(3):row_cells = table.add_row().cellsrow_cells[0].text = 'test'+str(i)row_cells[1].text = str(i)row_cells[2].text = 'desc'+str(i)
doc.save('test.docx')
运行效果:
3.13 再增加3行表格元素
for i in range(3):row_cells = table.add_row().cellsrow_cells[0].text = 'test'+str(i)row_cells[1].text = str(i)row_cells[2].text = 'desc'+str(i)
3.14 增加分页
document.add_page_break()
3.15 保存文件
document.save('测试.docx')
3.16 完整代码
from docx import Document
from docx.shared import Pt
from docx.shared import Inches
from docx.oxml.ns import qn
document = Document()
document.add_heading(u'MS WORD写⼊测试',0)
document.add_heading('⼀级标题',1)
document.add_heading('⼆级标题',2)
paragraph = document.add_paragraph('我们在做⽂
本测试!')
run = paragraph.add_run('设置字号、')
run.font.size = Pt(34)
run = paragraph.add_run('设置中⽂字体、')
run.font.name = '宋体'
r = run._element
r.rPr.rFonts.set(qn('w:eastAsia'), '宋体')
run = paragraph.add_run('斜体、')
run.italic = True
paragraph.add_run('粗体').bold = True
document.add_paragraph('Intense quote',
style='Intense Quote')
document.add_paragraph('⽆序列表元素1', style='List Bullet'
)
document.add_paragraph('⽆序列表元素3', style='List Bullet'
)
document.add_paragraph('有序列表元素1', style='List Number'
)
document.add_paragraph('有序列表元素3', style='List Number'
)document.add_picture('dlrb.jpeg',width=Inches(1.35))
table = document.add_table(rows=1, cols=3)
hdr_cells = table.rows[0].cells
hdr_cells[0].text = 'Name'
hdr_cells[1].text = 'Id'
hdr_cells[2].text = 'Desc'
for i in range(3):row_cells = table.add_row().cellsrow_cells[0].text = 'test'+str(i)row_cells[1].text = str(i)row_cells[2].text = 'desc'+str(i)
document.add_page_break()
document.save('测试.docx')
3.17 获取文档操作
from docx import Documentdoc = Document('test.docx')
paragraphs = doc.paragraphs
# print(len(paragraphs))
for paragraph in paragraphs:print(paragraph.text)
test.tocx
运行结果:

3.18 获取段落数量
# 段落数量
print(len(doc.paragraphs ))
4、案例
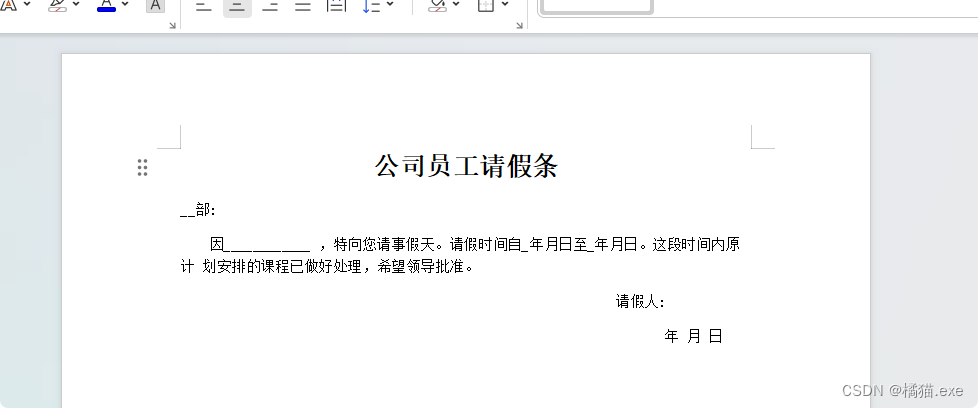
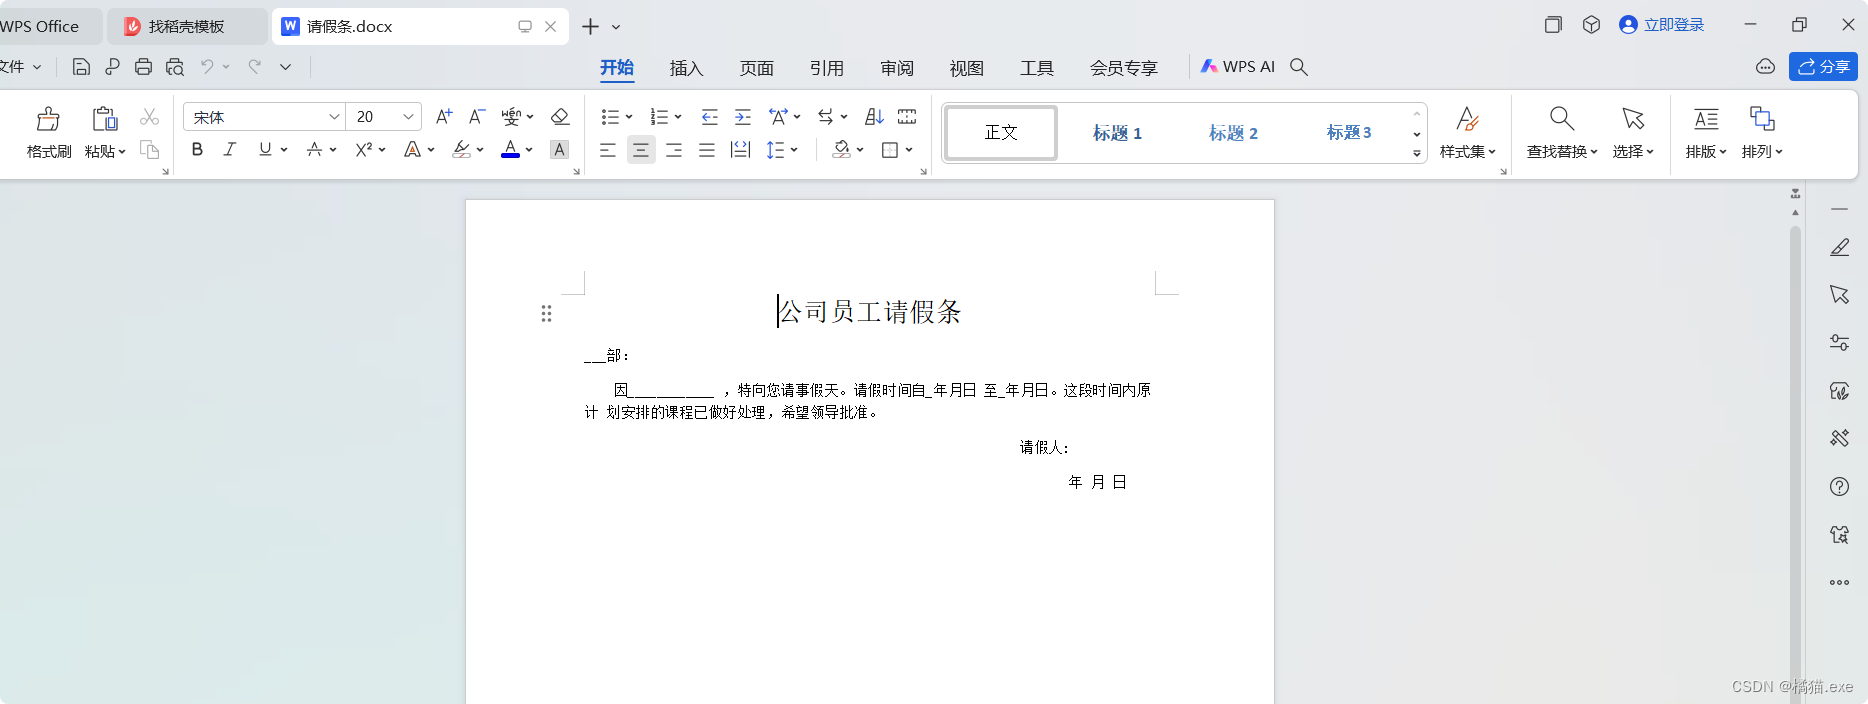
4.1 请假条
from docx import Document
from docx.oxml.ns import qn
from docx.shared import Pt, Inches
from docx.enum.text import WD_PARAGRAPH_ALIGNMENTdoc = Document()
# 全局字体设置
doc.styles['Normal'].font.name = '宋体'
doc.styles['Normal']._element.rPr.rFonts.set(qn('w:eastAsia'), u'宋体')# 创建标题
title = doc.add_paragraph()
title1 = title.add_run('公司员工请假条')
title1.font.size = Pt(20)
title1.blod = True
title.alignment = WD_PARAGRAPH_ALIGNMENT.CENTER# 正文
article1 = doc.add_paragraph()
article2 = article1.add_run('___部:')article3 = doc.add_paragraph()
article4 = article3.add_run('因____________ ,特向您请事假天。请假时间自_年月日 至_年月日。这段时间内原计 划安排的课程已做好处理,希望领导批准。')# ⾸⾏缩进 负值表示悬挂缩进
article3_format = article3.paragraph_format
article3_format.first_line_indent = Inches(0.3)article3 = doc.add_paragraph()
a3 = article3.add_run('请假人:') # 内容
article3.alignment = WD_PARAGRAPH_ALIGNMENT.RIGHT
article3_format = article3.paragraph_format
article3_format.right_indent = Inches(0.9)nowData = doc.add_paragraph()
n3 = nowData.add_run('年 月 日') # 内容
nowData.alignment = WD_PARAGRAPH_ALIGNMENT.RIGHT
nowData_format = nowData.paragraph_format
nowData_format.right_indent = Inches(0.3)doc.save('请假条.docx')
4.2 Excel转换为word
import xlrd
from docx import Document
from docx.enum.section import WD_ORIENTATION
from docx.enum.text import WD_PARAGRAPH_ALIGNMENT
from docx.shared import Pt, Cm, RGBColor
from docx.oxml.ns import qn
from docx.enum.table import WD_CELL_VERTICAL_ALIGNMENTdef read_excel():"""读取Excel"""book = xlrd.open_workbook('test.xlsx')sheet = book.sheet_by_name(book.sheet_names()[0])nrows = sheet.nrows # 行数ncols = sheet.ncols # 列数datas = [] # 存放数据# 第一列 标题keys = sheet.row_values(0)for row in range(1, nrows):data = {} # 每一行数据for col in range(0, ncols):value = sheet.cell_value(row, col) # 取出每一个单元格的数据# 替换到特殊字符value = value.replace('<', '').replace('>', '').replace('$', '')data[keys[col]] = value# 截取第一列元素if col == 0:first = '' # 截取元素 第1second = '' # 截取元素 第2third = '' # 截取元素 第3arrs = value.lstrip('/').split('/') # 去掉第一个/ 然后再以/分组if len(arrs) > 0:if len(arrs) == 1:first = arrs[0]second = firstthird = secondelif len(arrs) == 2:first = arrs[0]second = arrs[1]third = secondelif len(arrs) == 3:first = arrs[0]second = arrs[1]third = arrs[2]else:first = arrs[0]second = arrs[1]third = arrs[2]else:first = value.ltrip('/')second = firstthird = seconddata['first'] = firstdata['second'] = seconddata['third'] = third# 截取第一列结束datas.append(data)return datasdef write_word(datas):"""生成word文件"""if len(datas) < 1:print('Excel没有内容')return# 定义word文档对象doc = Document()# 添加横向section = doc.sections[0] # doc.add_section(start_type=WD_SECTION_START.CONTINUOUS) # 添加横向页的连续节section.orientation = WD_ORIENTATION.LANDSCAPEpage_h, page_w = section.page_width, section.page_heightsection.page_width = page_w # 设置横向纸的宽度section.page_height = page_h # 设置横向纸的高度# 设置字体doc.styles['Normal'].font.name = u'宋体'doc.styles['Normal']._element.rPr.rFonts.set(qn('w:eastAsia'), u'宋体')# 获取第3部分(部门) 并去重data_third = []for data in datas:third = data['third']if data_third.count(third) == 0:data_third.append(third)for third in data_third:h2 = doc.add_heading(third, level=2) # 写入部门,二级标题run = h2.runs[0] # 可以通过add_run来设置文字,也可以通过数组来获取run.font.color.rgb = RGBColor(0, 0, 0)run.font.name = u'宋体'doc.add_paragraph(text='', style=None) # 增加空白行 换行# 开始获取模板data_template = []for data in datas:if data['third'] == third:template = {'first': data['first'], '模板名称': data['模板名称']}if data_template.count(template) == 0:data_template.append(template)# 获取模板完成# 遍历模板for template in data_template:h3 = doc.add_heading(template['模板名称'], level=3) # 插入模板名称,三级标题run = h3.runs[0] # 可以通过add_run来设置文字,也可以通过数组来获取run.font.color.rgb = RGBColor(0, 0, 0)run.font.name = u'宋体'doc.add_paragraph(text='', style=None) # 换行data_table = filter(lambda data: data['third'] == third and data['模板名称'] == template['模板名称'] and data['first'] ==template['first'], datas)data_table = list(data_table)# 新增表格 4行5列doc_table = doc.add_table(rows=4, cols=5)doc_table.style = "Table Grid"doc_table.style.font.size = Pt(9)doc_table.style.font.name = '宋体'# 合并单元格 赋值doc_table.rows[0].cells[1].merge(doc_table.rows[0].cells[4])doc_table.rows[1].cells[1].merge(doc_table.rows[1].cells[4])doc_table.rows[2].cells[1].merge(doc_table.rows[2].cells[4])doc_table.rows[0].cells[0].text = '流程名称:'doc_table.rows[0].cells[1].text = data_table[0]['模板名称']doc_table.rows[1].cells[0].text = '使用人:'doc_table.rows[1].cells[1].text = data_table[0]['first']doc_table.rows[2].cells[0].text = '流程说明:'doc_table.rows[2].cells[1].text = data_table[0]['流程说明']# 设置标题head_cells = doc_table.rows[3].cells # 前面还有三行,特殊处理head_cells[0].text = '节点'head_cells[1].text = '节点名'head_cells[2].text = '处理人员'head_cells[3].text = '处理方式'head_cells[4].text = '跳转信息'# 设置列宽head_cells[0].width = Cm(1.9)head_cells[1].width = Cm(4.83)head_cells[2].width = Cm(8.25)head_cells[3].width = Cm(2.54)head_cells[4].width = Cm(5.64)# 第1 列水平居中,并设置行高,所有单元格内容垂直居中for i in range(0, 4):# 水平居中p = doc_table.rows[i].cells[0].paragraphs[0]p.alignment = WD_PARAGRAPH_ALIGNMENT.CENTERdoc_table.rows[i].height = Cm(0.6) # 行高# 垂直居中for j in range(0, 5):doc_table.rows[i].cells[j].vertical_alignment = WD_CELL_VERTICAL_ALIGNMENT.CENTER# 生成表格并填充内容row_num = 0for data in data_table:row = doc_table.add_row()row_cells = row.cellsrow_cells[0].text = str(row_num + 1) # 序号,需要转换成字符串row_cells[1].text = data['节点名称']row_cells[2].text = data['审批人员']row_cells[3].text = data['审批方式']row_cells[4].text = ''# 水平居中p = row_cells[0].paragraphs[0]p.alignment = WD_PARAGRAPH_ALIGNMENT.CENTERrow.height = Cm(0.6) # 行高# 垂直居中for j in range(0, 5):row_cells[j].vertical_alignment = WD_CELL_VERTICAL_ALIGNMENT.CENTERrow_num = row_num + 1doc.add_paragraph(text='', style=None) # 换行doc.save('test.docx')print(write_word(read_excel()))
这篇关于【Python办公自动化之Word】的文章就介绍到这儿,希望我们推荐的文章对编程师们有所帮助!


