本文主要是介绍Boost 网络库,希望对大家解决编程问题提供一定的参考价值,需要的开发者们随着小编来一起学习吧!
asio
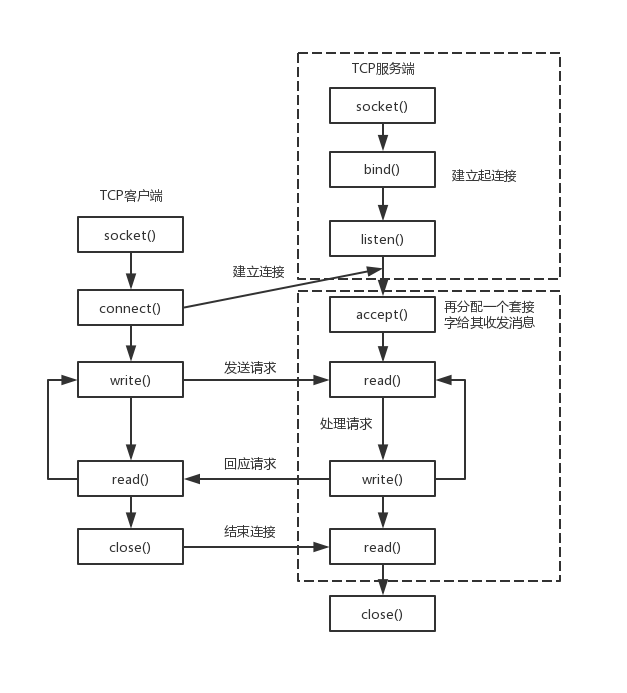
- 网络编程的基本流程
- 创建 socket
- 绑定acceptor
- 连接指定的端点
- 服务器接受连接
网络编程的基本流程
- 服务端
1)socket----创建socket对象。
2)bind----绑定本机ip+port。
3)listen----监听来电,若在监听到来电,则建立起连接。
4)accept----再创建一个socket对象给其收发消息。原因是现实中服务端都是面对多个客户端,那么为了区分各个客户端,则每个客户端都需再分配一个socket对象进行收发消息。
5)read、write----收发消息
- 客户端
1)socket----创建socket对象。
2)connect----根据服务端ip+port,发起连接请求。
3)write、read----建立连接后,就可发收消息了
创建 socket
创建socket分为4步,创建上下文iocontext,选择协议,生成socket,打开socket。
int create_tcp_socket() {// Step 1. An instance of 'io_service' class is required by// socket constructor. asio::io_context  ios;// Step 2. Creating an object of 'tcp' class representing// a TCP protocol with IPv4 as underlying protocol.asio::ip::tcp protocol = asio::ip::tcp::v4();// Step 3. Instantiating an active TCP socket object.asio::ip::tcp::socket sock(ios);// Used to store information about error that happens// while opening the socket.boost::system::error_code ec;// Step 4. Opening the socket.sock.open(protocol, ec);if (ec.value() != 0) {// Failed to open the socket.std::cout<< "Failed to open the socket! Error code = "<< ec.value() << ". Message: " << ec.message();return ec.value();}return 0;
}
上述socket只是通信的socket,如果是服务端,我们还需要生成一个acceptor的socket,用来接收新的连接。
int  create_acceptor_socket() {// Step 1. An instance of 'io_service' class is required by// socket constructor. asio::io_context ios;// Step 2. Creating an object of 'tcp' class representing// a TCP protocol with IPv6 as underlying protocol.asio::ip::tcp protocol = asio::ip::tcp::v6();// Step 3. Instantiating an acceptor socket object.asio::ip::tcp::acceptor acceptor(ios);// Used to store information about error that happens// while opening the acceptor socket.boost::system::error_code ec;// Step 4. Opening the acceptor socket.acceptor.open(protocol, ec);if (ec.value() != 0) {// Failed to open the socket.std::cout<< "Failed to open the acceptor socket!"<< "Error code = "<< ec.value() << ". Message: " << ec.message();return ec.value();}return 0;
}
绑定acceptor
对于acceptor类型的socket,服务器要将其绑定到指定的端口,所有连接这个端口的连接都可以被接收到。
int  bind_acceptor_socket() {// Step 1. Here we assume that the server application has// already obtained the protocol port number.unsigned short port_num = 3333;// Step 2. Creating an endpoint.asio::ip::tcp::endpoint ep(asio::ip::address_v4::any(),port_num);// Used by 'acceptor' class constructor.asio::io_context  ios;// Step 3. Creating and opening an acceptor socket.asio::ip::tcp::acceptor acceptor(ios, ep.protocol());boost::system::error_code ec;// Step 4. Binding the acceptor socket.acceptor.bind(ep, ec);// Handling errors if any.if (ec.value() != 0) {// Failed to bind the acceptor socket. Breaking// execution.std::cout << "Failed to bind the acceptor socket."<< "Error code = " << ec.value() << ". Message: "<< ec.message();return ec.value();}return 0;
}
连接指定的端点
作为客户端可以连接服务器指定的端点进行连接
int  connect_to_end() {// Step 1. Assume that the client application has already// obtained the IP address and protocol port number of the// target server.std::string raw_ip_address = "127.0.0.1";unsigned short port_num = 3333;try {// Step 2. Creating an endpoint designating // a target server application.asio::ip::tcp::endpointep(asio::ip::address::from_string(raw_ip_address),port_num);asio::io_context ios;// Step 3. Creating and opening a socket.asio::ip::tcp::socket sock(ios, ep.protocol());// Step 4. Connecting a socket.sock.connect(ep);// At this point socket 'sock' is connected to // the server application and can be used// to send data to or receive data from it.}// Overloads of asio::ip::address::from_string() and // asio::ip::tcp::socket::connect() used here throw// exceptions in case of error condition.catch (system::system_error& e) {std::cout << "Error occured! Error code = " << e.code()<< ". Message: " << e.what();return e.code().value();}
}
服务器接受连接
int accept_new_connection(){// The size of the queue containing the pending connection// requests.const int BACKLOG_SIZE = 30;// Step 1. Here we assume that the server application has// already obtained the protocol port number.unsigned short port_num = 3333;// Step 2. Creating a server endpoint.asio::ip::tcp::endpoint ep(asio::ip::address_v4::any(),port_num);asio::io_context  ios;try {// Step 3. Instantiating and opening an acceptor socket.asio::ip::tcp::acceptor acceptor(ios, ep.protocol());// Step 4. Binding the acceptor socket to the // server endpint.acceptor.bind(ep);// Step 5. Starting to listen for incoming connection// requests.acceptor.listen(BACKLOG_SIZE);// Step 6. Creating an active socket.asio::ip::tcp::socket sock(ios);// Step 7. Processing the next connection request and // connecting the active socket to the client.acceptor.accept(sock);// At this point 'sock' socket is connected to //the client application and can be used to send data to// or receive data from it.}catch (system::system_error& e) {std::cout << "Error occured! Error code = " << e.code()<< ". Message: " << e.what();return e.code().value();}
}
这篇关于Boost 网络库的文章就介绍到这儿,希望我们推荐的文章对编程师们有所帮助!


