本文主要是介绍emacs verilog-mode方式实现verilog实例化集成,希望对大家解决编程问题提供一定的参考价值,需要的开发者们随着小编来一起学习吧!
文章目录
- 背景介绍
- AUTOINST和AUTOWIRE的应用
- 推荐使用方法
- auto_template命令总结
- [],中括号,里面没内容。表示auto_inst时,会显示[3:0]类似内容
- @,常用于相同module,多次实例化情况。我不常用。这里仅是提一下有这种功能。下面第一段,表示auto_template有一个可选变量,支持正则表达式;如果没有正则表达,@符号就会默认匹配实例化名称里的 **数字字符串** 【可以理解为是第一个 **[0-9]+** 正则表达式字符串】。另外,下面instname表示的是module名称,而非实例化名称,应该是原文手误。
- Regexp Templates。auto_template里的正则表达式,可以定制化例化的连接信号名称。
- Lisp Templates。因为是emacs,脚本叫Lisp语言。其实就是有一套成熟脚本,方便实现auto_template里的常见功能。
- Ignoring Hookup。即忽略自动化连线名称。不想使用autowire或者auto_template等自动连线方式。
- 教程里的简单操作,也贴一下
背景介绍
emacs默认自带verilog-mode插件,不仅仅支持语法高亮、代码段自动补全等功能,核心应用还有/*AUTOXXX*/。
IC顶层集成,最常见的工作就是实例化和端口线网的连接。可以利用/*AUTOINST*/和/*AUTOWIRE*/节省很多工作量,减少出错可能性。
AUTOINST和AUTOWIRE的应用
下面是示例。用到的技巧包括:
- ctrl+c ctrl+a是把
/*AUTOINST*/等关键词展开;得到实例化等代码段。连续操作,可以更新。 - ctrl+c ctrl+k是把
/*AUTOINST*/等关键词收起; - AUTOWIRE,是把output变量进行wire类型声明。理论上verilog,只需要对output设置wire类型定义即可,输入必然来自某一个输出信号。
- AUTOINST,默认的线网连接名称与端口名称相同;如对此有要求,可以利用AUTO_TEMPLATE。
- 实例化代码和设计代码可以不放在一个文件里,利用verilog-library-files变量设置。
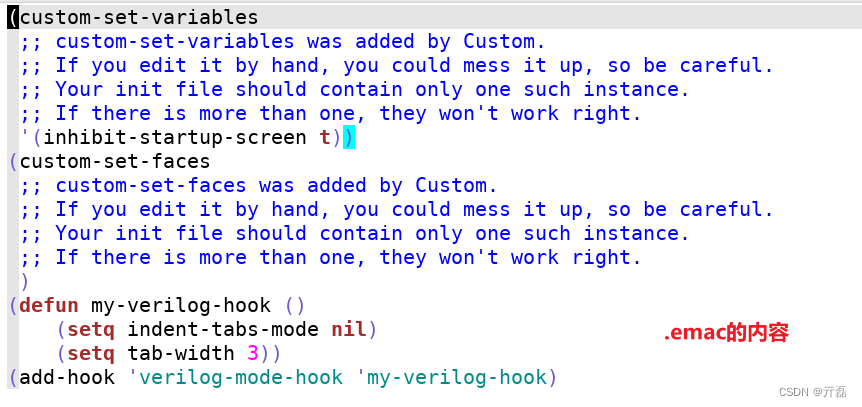
- 另外就是tab缩进和指定列,输出autoinst内容。后面有图形,利用几个变量设置。
- 下图有几个emac --batch命令,是为了不打开emac编辑器,脚本操作autoinst等命令的。
推荐使用方法


auto_template命令总结
参考官网:https://www.veripool.org/verilog-mode/help/#verilog-auto-inst
[],中括号,里面没内容。表示auto_inst时,会显示[3:0]类似内容
For example:/* InstModule AUTO_TEMPLATE (.ptl_bus (ptl_busnew[]),);*/InstModule ms2m (/*AUTOINST*/);Typing M-x verilog-auto will make this into:InstModule ms2m (/*AUTOINST*/// Outputs.NotInTemplate (NotInTemplate),.ptl_bus (ptl_busnew[3:0]),....
@,常用于相同module,多次实例化情况。我不常用。这里仅是提一下有这种功能。下面第一段,表示auto_template有一个可选变量,支持正则表达式;如果没有正则表达,@符号就会默认匹配实例化名称里的 数字字符串 【可以理解为是第一个 [0-9]+ 正则表达式字符串】。另外,下面instname表示的是module名称,而非实例化名称,应该是原文手误。
- 下面这段
sig2里。注释:第1个@"xxx"表示把xxx当做lisp脚本命令执行,第2个@表示实例化名字里匹配到的第一组数字字符串。
/* InstName AUTO_TEMPLATE <optional "REGEXP"> (.sig1 (sigx[@]),.sig2 (sigy[@"(% (+ 1 @) 4)"]),);*/
For example:/* InstModule AUTO_TEMPLATE (.ptl_mapvalidx          (ptl_mapvalid[@]),.ptl_mapvalidp1x        (ptl_mapvalid[@"(% (+ 1 @) 4)"]), );*/InstModule ms2m (/*AUTOINST*/);Typing M-x verilog-auto will make this into:InstModule ms2m (/*AUTOINST*/// Outputs.ptl_mapvalidx              (ptl_mapvalid[2]),.ptl_mapvalidp1x            (ptl_mapvalid[3]));
Note the @ character was replaced with the 2 from "ms2m".Alternatively, using a regular expression for @:/* InstModule AUTO_TEMPLATE "_\([a-z]+\)" (.ptl_mapvalidx          (@_ptl_mapvalid),.ptl_mapvalidp1x        (ptl_mapvalid_@),);*/InstModule ms2_FOO (/*AUTOINST*/);InstModule ms2_BAR (/*AUTOINST*/);Typing M-x verilog-auto will make this into:InstModule ms2_FOO (/*AUTOINST*/// Outputs.ptl_mapvalidx              (FOO_ptl_mapvalid),.ptl_mapvalidp1x            (ptl_mapvalid_FOO));InstModule ms2_BAR (/*AUTOINST*/// Outputs.ptl_mapvalidx              (BAR_ptl_mapvalid),.ptl_mapvalidp1x            (ptl_mapvalid_BAR));
Regexp Templates。auto_template里的正则表达式,可以定制化例化的连接信号名称。
- 下面一段举例不太好看,
pci_reqxx_l,注意后缀是下划线L,不是下划线数字1。 \1,和\\(xxxxx\\),配合在一起,表示匹配一个正则表达式组1。方便把匹配到的内容,复制到例化信号线名称定义里。
Regexp Templates:A template entry of the form.pci_req\([0-9]+\)_l      (pci_req_jtag_[\1]),
will apply an Emacs style regular expression search for any port beginning in pci_req followed by numbers and ending in _l and connecting that to the pci_req_jtag_[] net, with the bus subscript coming from what matches inside the first set of \( \). Thus pci_req2_l becomes pci_req_jtag_[2].
Since \([0-9]+\) is so common and ugly to read, a @ in the port name does the same thing. (Note a @ in the connection/replacement text is completely different -- still use \1 there!) Thus this is the same as the above template:.pci_req@_l         (pci_req_jtag_[\1]),
Here's another example to remove the _l, useful when naming conventions specify _ alone to mean active low. Note the use of [] to keep the bus subscript:.\(.*\)_l         (\1_[]),
Lisp Templates。因为是emacs,脚本叫Lisp语言。其实就是有一套成熟脚本,方便实现auto_template里的常见功能。
- 如果在连接线中找到语法
@“(…)”,则引号中的表达式将被计算为Lisp表达式,其中。上面的MAPVALIDP1X示例将@将被实例化编号替换@+1模4放入括号中。用前导反斜杠(\“…\”)引用表达式中的所有双引号;或者,如果Lisp模板也是regexp模板,则反斜杠引号(\\“…\\”)。
vl-name Name portion of the input/output port.端口名称vl-bits Bus bits portion of the input/output port (`[2:0]').一位数组vl-mbits Multidimensional array bits for port (`[2:0][3:0]').二维数组vl-width Width of the input/output port (`3' for [2:0]).端口信号的位宽May be a (...) expression if bits isn't a constant.vl-dir Direction of the pin input/output/inout/interface.端口的方向vl-memory The unpacked array part of the I/O port (`[5:0]').vl-modport The modport, if an interface with a modport.vl-cell-type Module name/type of the cell (`InstModule').module模块名称vl-cell-name Instance name of the cell (`instName').inst实例化名称
Ignoring Hookup。即忽略自动化连线名称。不想使用autowire或者auto_template等自动连线方式。
- 没实践过。感觉还是把不期望自动化的连线信号,写在
/*autoinst*/之前,更简单直观,而且容易debug。
.pci_req_l (pci_req_not_to_wire), //AUTONOHOOKUP
教程里的简单操作,也贴一下
下面有两段代码,第一段代码,按键ctrl+c ctrl+a之后,会自动生成第二段代码。
==================================
module noc(output        z1,output        z2,output [31:0] z3,input         a1,input         a2,input [31:0]  a3);
endmodule
module noc1(output        z1,output        z2,output [31:0] z3,output        a1,output        a2,output [31:0] a3);
endmodule
module a;/*AUTOWIRE*/noc u_noc(/*AUTOINST*/);
endmodule
module a;/*AUTOWIRE*/noc1 u_noc1(/*AUTOINST*/);
endmodule
module a;/*AUTOWIRE*//* noc AUTO_TEMPLATE(.z1 (output1),.z2 (output2),.z3 (output3),.a3 (input3),);*/noc u_noc(/*AUTOINST*/);
endmodule===========================================================
module noc(output        z1,output        z2,output [31:0] z3,input         a1,input         a2,input [31:0]  a3);
endmodule
module noc1(output        z1,output        z2,output [31:0] z3,output        a1,output        a2,output [31:0] a3);
endmodule
module a;/*AUTOWIRE*/// Beginning of automatic wires (for undeclared instantiated-module outputs)wire                 output1;                // From u_noc of noc.vwire                 output2;                // From u_noc of noc.vwire                 output3;                // From u_noc of noc.v// End of automaticsnoc u_noc(/*AUTOINST*/// Outputs.z1                        (output1),               // Templated.z2                        (output2),               // Templated.z3                        (output3),               // Templated// Inputs.a1                        (a1),.a2                        (a2),.a3                        (input3));                // Templated
endmodule
module a;/*AUTOWIRE*/// Beginning of automatic wires (for undeclared instantiated-module outputs)wire                 a1;                     // From u_noc1 of noc1.vwire                 a2;                     // From u_noc1 of noc1.vwire [31:0]          a3;                     // From u_noc1 of noc1.vwire                 z1;                     // From u_noc1 of noc1.vwire                 z2;                     // From u_noc1 of noc1.vwire [31:0]          z3;                     // From u_noc1 of noc1.v// End of automaticsnoc1 u_noc1(/*AUTOINST*/// Outputs.z1                      (z1),.z2                      (z2),.z3                      (z3[31:0]),.a1                      (a1),.a2                      (a2),.a3                      (a3[31:0]));
endmodule
module a;/*AUTOWIRE*/// Beginning of automatic wires (for undeclared instantiated-module outputs)wire                 output1;                // From u_noc of noc.vwire                 output2;                // From u_noc of noc.vwire                 output3;                // From u_noc of noc.v// End of automatics/* noc AUTO_TEMPLATE(.z1 (output1),.z2 (output2),.z3 (output3),.a3 (input3),);*/noc u_noc(/*AUTOINST*/// Outputs.z1                        (output1),               // Templated.z2                        (output2),               // Templated.z3                        (output3),               // Templated// Inputs.a1                        (a1),.a2                        (a2),.a3                        (input3));                // Templated
endmodule
这篇关于emacs verilog-mode方式实现verilog实例化集成的文章就介绍到这儿,希望我们推荐的文章对编程师们有所帮助!


