本文主要是介绍flutter开发实战-创建一个微光加载效果,希望对大家解决编程问题提供一定的参考价值,需要的开发者们随着小编来一起学习吧!
flutter开发实战-创建一个微光加载效果
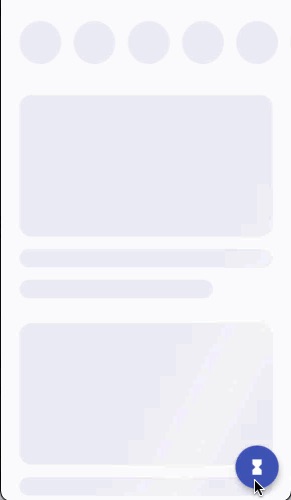
当加载数据的时候,loading是必不可少的。从用户体验(UX)的角度来看,最重要的是向用户展示加载正在进行。向用户传达数据正在加载的一种流行方法是在与正在加载的内容类型近似的形状上显示带有微光动画的铬色。
微光加载效果需要用到的是ShaderMask.
一、引入ShaderMask
将[着色器]生成的遮罩应用于其子对象的小部件。
ShaderMask(shaderCallback: (Rect bounds) {return RadialGradient(center: Alignment.topLeft,radius: 1.0,colors: <Color>[Colors.yellow, Colors.deepOrange.shade900],tileMode: TileMode.mirror,).createShader(bounds);},child: const Text('I’m burning the memories'),
)
二、微光加载效果
使用ShaderMask微光加载效果,通过gradient.createShader控制微光的范围
return ShaderMask(blendMode: BlendMode.srcATop,shaderCallback: (bounds) {return gradient.createShader(Rect.fromLTWH(-offsetWithinShimmer.dx,-offsetWithinShimmer.dy,shimmerSize.width,shimmerSize.height,),);},child: widget.child,);创建一个微光加载效果完整代码如下
const _shimmerGradient = LinearGradient(colors: [Color(0xFFEBEBF4),Color(0xFFF4F4F4),Color(0xFFEBEBF4),],stops: [0.1,0.3,0.4,],begin: Alignment(-1.0, -0.3),end: Alignment(1.0, 0.3),tileMode: TileMode.clamp,
);class ExampleUiLoadingAnimation extends StatefulWidget {const ExampleUiLoadingAnimation({super.key,});@overrideState<ExampleUiLoadingAnimation> createState() =>_ExampleUiLoadingAnimationState();
}class _ExampleUiLoadingAnimationState extends State<ExampleUiLoadingAnimation> {bool _isLoading = true;void _toggleLoading() {setState(() {_isLoading = !_isLoading;});}@overrideWidget build(BuildContext context) {return Scaffold(body: Shimmer(linearGradient: _shimmerGradient,child: ListView(physics: _isLoading ? const NeverScrollableScrollPhysics() : null,children: [const SizedBox(height: 16),_buildTopRowList(),const SizedBox(height: 16),_buildListItem(),_buildListItem(),_buildListItem(),],),),floatingActionButton: FloatingActionButton(onPressed: _toggleLoading,child: Icon(_isLoading ? Icons.hourglass_full : Icons.hourglass_bottom,),),);}Widget _buildTopRowList() {return SizedBox(height: 72,child: ListView(physics: _isLoading ? const NeverScrollableScrollPhysics() : null,scrollDirection: Axis.horizontal,shrinkWrap: true,children: [const SizedBox(width: 16),_buildTopRowItem(),_buildTopRowItem(),_buildTopRowItem(),_buildTopRowItem(),_buildTopRowItem(),_buildTopRowItem(),],),);}Widget _buildTopRowItem() {return ShimmerLoading(isLoading: _isLoading,child: const CircleListItem(),);}Widget _buildListItem() {return ShimmerLoading(isLoading: _isLoading,child: CardListItem(isLoading: _isLoading,),);}
}class Shimmer extends StatefulWidget {static ShimmerState? of(BuildContext context) {return context.findAncestorStateOfType<ShimmerState>();}const Shimmer({super.key,required this.linearGradient,this.child,});final LinearGradient linearGradient;final Widget? child;@overrideShimmerState createState() => ShimmerState();
}class ShimmerState extends State<Shimmer> with SingleTickerProviderStateMixin {late AnimationController _shimmerController;@overridevoid initState() {super.initState();_shimmerController = AnimationController.unbounded(vsync: this)..repeat(min: -0.5, max: 1.5, period: const Duration(milliseconds: 1000));}@overridevoid dispose() {_shimmerController.dispose();super.dispose();}LinearGradient get gradient => LinearGradient(colors: widget.linearGradient.colors,stops: widget.linearGradient.stops,begin: widget.linearGradient.begin,end: widget.linearGradient.end,transform:_SlidingGradientTransform(slidePercent: _shimmerController.value),);bool get isSized =>(context.findRenderObject() as RenderBox?)?.hasSize ?? false;Size get size => (context.findRenderObject() as RenderBox).size;Offset getDescendantOffset({required RenderBox descendant,Offset offset = Offset.zero,}) {final shimmerBox = context.findRenderObject() as RenderBox?;return descendant.localToGlobal(offset, ancestor: shimmerBox);}Listenable get shimmerChanges => _shimmerController;@overrideWidget build(BuildContext context) {return widget.child ?? const SizedBox();}
}class _SlidingGradientTransform extends GradientTransform {const _SlidingGradientTransform({required this.slidePercent,});final double slidePercent;@overrideMatrix4? transform(Rect bounds, {TextDirection? textDirection}) {return Matrix4.translationValues(bounds.width * slidePercent, 0.0, 0.0);}
}class ShimmerLoading extends StatefulWidget {const ShimmerLoading({super.key,required this.isLoading,required this.child,});final bool isLoading;final Widget child;@overrideState<ShimmerLoading> createState() => _ShimmerLoadingState();
}class _ShimmerLoadingState extends State<ShimmerLoading> {Listenable? _shimmerChanges;@overridevoid didChangeDependencies() {super.didChangeDependencies();if (_shimmerChanges != null) {_shimmerChanges!.removeListener(_onShimmerChange);}_shimmerChanges = Shimmer.of(context)?.shimmerChanges;if (_shimmerChanges != null) {_shimmerChanges!.addListener(_onShimmerChange);}}@overridevoid dispose() {_shimmerChanges?.removeListener(_onShimmerChange);super.dispose();}void _onShimmerChange() {if (widget.isLoading) {setState(() {// Update the shimmer painting.});}}@overrideWidget build(BuildContext context) {if (!widget.isLoading) {return widget.child;}// Collect ancestor shimmer info.final shimmer = Shimmer.of(context)!;if (!shimmer.isSized) {// The ancestor Shimmer widget has not laid// itself out yet. Return an empty box.return const SizedBox();}final shimmerSize = shimmer.size;final gradient = shimmer.gradient;final offsetWithinShimmer = shimmer.getDescendantOffset(descendant: context.findRenderObject() as RenderBox,);return ShaderMask(blendMode: BlendMode.srcATop,shaderCallback: (bounds) {return gradient.createShader(Rect.fromLTWH(-offsetWithinShimmer.dx,-offsetWithinShimmer.dy,shimmerSize.width,shimmerSize.height,),);},child: widget.child,);}
}//----------- List Items ---------
class CircleListItem extends StatelessWidget {const CircleListItem({super.key});@overrideWidget build(BuildContext context) {return Padding(padding: const EdgeInsets.symmetric(horizontal: 8, vertical: 8),child: Container(width: 54,height: 54,decoration: const BoxDecoration(color: Colors.black,shape: BoxShape.circle,),child: ClipOval(child: Image.network('https://docs.flutter.dev/cookbook''/img-files/effects/split-check/Avatar1.jpg',fit: BoxFit.cover,),),),);}
}class CardListItem extends StatelessWidget {const CardListItem({super.key,required this.isLoading,});final bool isLoading;@overrideWidget build(BuildContext context) {return Padding(padding: const EdgeInsets.symmetric(horizontal: 24, vertical: 16),child: Column(crossAxisAlignment: CrossAxisAlignment.start,children: [_buildImage(),const SizedBox(height: 16),_buildText(),],),);}Widget _buildImage() {return AspectRatio(aspectRatio: 16 / 9,child: Container(width: double.infinity,decoration: BoxDecoration(color: Colors.black,borderRadius: BorderRadius.circular(16),),child: ClipRRect(borderRadius: BorderRadius.circular(16),child: Image.network('https://docs.flutter.dev/cookbook''/img-files/effects/split-check/Food1.jpg',fit: BoxFit.cover,),),),);}Widget _buildText() {if (isLoading) {return Column(crossAxisAlignment: CrossAxisAlignment.start,children: [Container(width: double.infinity,height: 24,decoration: BoxDecoration(color: Colors.black,borderRadius: BorderRadius.circular(16),),),const SizedBox(height: 16),Container(width: 250,height: 24,decoration: BoxDecoration(color: Colors.black,borderRadius: BorderRadius.circular(16),),),],);} else {return const Padding(padding: EdgeInsets.symmetric(horizontal: 8),child: Text('Lorem ipsum dolor sit amet, consectetur adipiscing elit, sed do ''eiusmod tempor incididunt ut labore et dolore magna aliqua.',),);}}
}
三、小结
flutter开发实战-创建一个微光加载效果
学习记录,每天不停进步。
这篇关于flutter开发实战-创建一个微光加载效果的文章就介绍到这儿,希望我们推荐的文章对编程师们有所帮助!


