本文主要是介绍(13)muduo_base库源码分析:Thread类实现,希望对大家解决编程问题提供一定的参考价值,需要的开发者们随着小编来一起学习吧!
文章目录
- 1.线程标识符
- 2.Thread类图
- 3.Thread类相关代码学习
- 4.相关测试
- 5.多线程多进程的死锁案例
1.线程标识符
- Linux中,每个进程有一个pid,类型pid_t,由getpid()取得。Linux下的POSIX线程也有一个id,类型 pthread_t,由pthread_self()取得,该id由线程库维护,其id空间是各个进程独立的(即不同进程中的线程可能有相同的id)。
Linux中的POSIX线程库实现的线程其实也是一个进程(LWP),只是该进程与主进程(启动线程的进程)共享一些资源而已,比如代码段,数据段等。 - 有时候我们可能需要知道线程的真实pid。比如进程P1要向另外一个进程P2中的某个线程发送信号时,既不能使用P2的pid,更不能使用线程的pthread id,而只能使用该线程的真实pid,称为tid。
- 有一个函数gettid()可以得到tid,但glibc并没有实现该函数,只能通过Linux的系统调用syscall来获取。
return syscall(SYS_gettid)
2.Thread类图
- typedef boost::function<void ()> ThreadFunc;

- __thread,gcc内置的线程局部存储设施
(1)__thread只能修饰POD类型
POD类型(plain old data),与C兼容的原始数据,例如,结构和整型等C语言中的类型是 POD 类型(初始化只能是编译期常量),
但带有用户定义的构造函数或虚函数的类则不是
__thread string t_obj1(“cppcourse”);	// 错误,不能调用对象的构造函数
__thread string* t_obj2 = new string;	// 错误,初始化只能是编译期常量,指针类型是POD类型,但是new也是需要调用构造函数的,
不能是运行期的
__thread string* t_obj3 = NULL;	// 正确(2)非POD类型,也希望每个线程只有1份,该怎么办?
可以用线程特定数据tsd
3.Thread类相关代码学习
- 13\jmuduo\muduo\base\Thread.h
// Use of this source code is governed by a BSD-style license
// that can be found in the License file.
//
// Author: Shuo Chen (chenshuo at chenshuo dot com)#ifndef MUDUO_BASE_EXCEPTION_H
#define MUDUO_BASE_EXCEPTION_H#include <muduo/base/Types.h>
#include <exception>namespace muduo
{class Exception : public std::exception
{public:explicit Exception(const char* what);explicit Exception(const string& what);virtual ~Exception() throw();virtual const char* what() const throw();const char* stackTrace() const throw();private:void fillStackTrace();string demangle(const char* symbol);string message_;string stack_;
};}#endif // MUDUO_BASE_EXCEPTION_H- 13\jmuduo\muduo\base\Thread.cc
// Use of this source code is governed by a BSD-style license
// that can be found in the License file.
//
// Author: Shuo Chen (chenshuo at chenshuo dot com)#include <muduo/base/Thread.h>
#include <muduo/base/CurrentThread.h>
#include <muduo/base/Exception.h>
//#include <muduo/base/Logging.h>#include <boost/static_assert.hpp>
#include <boost/type_traits/is_same.hpp>#include <errno.h>
#include <stdio.h>
#include <unistd.h>
#include <sys/syscall.h>
#include <sys/types.h>
#include <linux/unistd.h>namespace muduo
{
namespace CurrentThread
{// __thread修饰的变量是线程局部存储的。多个线程并不会去共享他,每个线程都有1份__thread int t_cachedTid = 0;		// 线程真实pid(tid)的缓存,// 是为了减少::syscall(SYS_gettid)系统调用的次数// 提高获取tid的效率__thread char t_tidString[32];	// 这是tid的字符串表示形式__thread const char* t_threadName = "unknown";//线程的名称const bool sameType = boost::is_same<int, pid_t>::value;//boost::is_same作用:若int和pid_t是相同类型的,则返回是trueBOOST_STATIC_ASSERT(sameType);
}namespace detail
{pid_t gettid()
{return static_cast<pid_t>(::syscall(SYS_gettid));
}void afterFork()
{muduo::CurrentThread::t_cachedTid = 0;//子进程中当前线程的tid=0muduo::CurrentThread::t_threadName = "main";CurrentThread::tid();//缓存一下tid// no need to call pthread_atfork(NULL, NULL, &afterFork);
}/*
(1)namespace detail中的pthread_atfork意义在于:
fork可能是在主线程中调用,也可能是在子线程中调用,
fork得到一个新进程,新进程中只有1个执行序列,只有1个线程(调用fork的线程被继承下来)(2)实际上,对于编写多线程程序来说,我们最好不要调用fork,不要编写多线程多进程程序,
要么是用多进程,要么用多线程
*/class ThreadNameInitializer
{public:ThreadNameInitializer(){muduo::CurrentThread::t_threadName = "main";//主线程的名称为mainCurrentThread::tid();//缓存当前线程的tid到t_cachedTid中pthread_atfork(NULL, NULL, &afterFork);//若调用成功,则子进程则会调用afterFork}
};ThreadNameInitializer init;//在detail名称空间中,先于main函数
}
}using namespace muduo;void CurrentThread::cacheTid()
{if (t_cachedTid == 0){t_cachedTid = detail::gettid();//detail名称空间的gettid()int n = snprintf(t_tidString, sizeof t_tidString, "%5d ", t_cachedTid);assert(n == 6); (void) n;//(void) n作用:防止release版本编译不通过,因为release版本编译的时候,assert(n == 6)这条语句//相当于没有,那么上一条语句的n相当于没用}
}bool CurrentThread::isMainThread()
{return tid() == ::getpid();
}AtomicInt32 Thread::numCreated_;Thread::Thread(const ThreadFunc& func, const string& n): started_(false),pthreadId_(0),tid_(0),func_(func),name_(n)
{numCreated_.increment();//原子操作,线程个数+1
}Thread::~Thread()
{// no join
}void Thread::start()
{assert(!started_);started_ = true;errno = pthread_create(&pthreadId_, NULL, &startThread, this);if (errno != 0){//LOG_SYSFATAL << "Failed in pthread_create";}
}int Thread::join()
{assert(started_);return pthread_join(pthreadId_, NULL);
}//线程的入口函数,this指针传递进来
void* Thread::startThread(void* obj)
{Thread* thread = static_cast<Thread*>(obj);thread->runInThread();return NULL;
}void Thread::runInThread()
{tid_ = CurrentThread::tid();//获取线程tidmuduo::CurrentThread::t_threadName = name_.c_str();try{func_();//调用回调函数muduo::CurrentThread::t_threadName = "finished";}catch (const Exception& ex){muduo::CurrentThread::t_threadName = "crashed";fprintf(stderr, "exception caught in Thread %s\n", name_.c_str());fprintf(stderr, "reason: %s\n", ex.what());fprintf(stderr, "stack trace: %s\n", ex.stackTrace());abort();}catch (const std::exception& ex){muduo::CurrentThread::t_threadName = "crashed";fprintf(stderr, "exception caught in Thread %s\n", name_.c_str());fprintf(stderr, "reason: %s\n", ex.what());abort();}catch (...){muduo::CurrentThread::t_threadName = "crashed";fprintf(stderr, "unknown exception caught in Thread %s\n", name_.c_str());throw; // rethrow}
}- 13\jmuduo\muduo\base\CurrentThread.h
// Use of this source code is governed by a BSD-style license
// that can be found in the License file.
//
// Author: Shuo Chen (chenshuo at chenshuo dot com)#ifndef MUDUO_BASE_CURRENTTHREAD_H
#define MUDUO_BASE_CURRENTTHREAD_Hnamespace muduo
{
namespace CurrentThread
{// internalextern __thread int t_cachedTid;extern __thread char t_tidString[32];extern __thread const char* t_threadName;void cacheTid();inline int tid(){if (t_cachedTid == 0)//若没缓存tid,则获取tid{cacheTid();}return t_cachedTid;//缓存好后,直接将tid返回}inline const char* tidString() // for logging{return t_tidString;}inline const char* name(){return t_threadName;}bool isMainThread();
}
}#endif
4.相关测试
- 13\jmuduo\muduo\base\tests\Thread_test.cc
#include <muduo/base/Thread.h>
#include <muduo/base/CurrentThread.h>#include <string>
#include <boost/bind.hpp>
#include <stdio.h>void threadFunc()
{printf("tid=%d\n", muduo::CurrentThread::tid());
}void threadFunc2(int x)
{printf("tid=%d, x=%d\n", muduo::CurrentThread::tid(), x);
}class Foo
{public:explicit Foo(double x): x_(x){}void memberFunc(){printf("tid=%d, Foo::x_=%f\n", muduo::CurrentThread::tid(), x_);}void memberFunc2(const std::string& text){printf("tid=%d, Foo::x_=%f, text=%s\n", muduo::CurrentThread::tid(), x_, text.c_str());}private:double x_;
};int main()
{printf("pid=%d, tid=%d\n", ::getpid(), muduo::CurrentThread::tid());//获取进程pid,获取线程tidmuduo::Thread t1(threadFunc);t1.start();t1.join();muduo::Thread t2(boost::bind(threadFunc2, 42),"thread for free function with argument");//"thread for free function with argument"可以不传到构造函数,因为有默认值t2.start();t2.join();Foo foo(87.53);//调用不带参数的成员函数memberFuncmuduo::Thread t3(boost::bind(&Foo::memberFunc, &foo),"thread for member function without argument");t3.start();t3.join();//调用带参数的成员函数memberFunc2//等价于:muduo::Thread t4(boost::bind(&Foo::memberFunc2, &foo, std::string("Shuo Chen")));muduo::Thread t4(boost::bind(&Foo::memberFunc2, boost::ref(foo), std::string("Shuo Chen")));t4.start();t4.join();printf("number of created threads %d\n", muduo::Thread::numCreated());
}- 相关目录如下

13\jmuduo\muduo\base\CMakeLists.txt
set(base_SRCSException.ccThread.cc  ##新增Timestamp.cc)
..........
===============================================
13\jmuduo\muduo\base\tests\CMakeLists.txt
.........
##新增
add_executable(thread_test Thread_test.cc)
target_link_libraries(thread_test muduo_base)
##新增
........
- 执行结果如下所示:

5.多线程多进程的死锁案例
- 目录如下:

13\jmuduo\tests\CMakeLists.txt##新增
add_executable(deadlock_test Deadlock_test.cc)
target_link_libraries(deadlock_test pthread)add_executable(deadlock_test2 Deadlock_test2.cc)
target_link_libraries(deadlock_test2 pthread)add_executable(pthread_atfork_test Pthread_atfork_test.cc)
target_link_libraries(pthread_atfork_test pthread)
##新增- 死锁eg代码:13\jmuduo\tests\Deadlock_test.cc
// 一个在多线程程序里fork造成死锁的例子
// 一个输出示例:
/*pid = 19445 Entering main ...
pid = 19445 begin doit ...
pid = 19447 begin doit ...
pid = 19445 end doit ...
pid = 19445 Exiting main ...父进程在创建了一个线程,并对mutex加锁,
父进程创建一个子进程,在子进程中调用doit,由于子进程会复制父进程的内存,这时候mutex处于锁的状态,
父进程在复制子进程的时候,只会复制当前线程的执行状态,其它线程不会复制。因此子进程会处于死锁的状态。
*/
#include <stdio.h>
#include <time.h>
#include <pthread.h>
#include <unistd.h>pthread_mutex_t mutex = PTHREAD_MUTEX_INITIALIZER;void* doit(void* arg)
{printf("pid = %d begin doit ...\n",static_cast<int>(getpid()));pthread_mutex_lock(&mutex);//已经是锁了,又调用了lock函数会造成死锁,2次加锁struct timespec ts = {2, 0};//等待2snanosleep(&ts, NULL);pthread_mutex_unlock(&mutex);printf("pid = %d end doit ...\n",static_cast<int>(getpid()));return NULL;
}int main(void)
{printf("pid = %d Entering main ...\n", static_cast<int>(getpid()));pthread_t tid;pthread_create(&tid, NULL, doit, NULL);//会先调用doit函数,然后睡眠2sstruct timespec ts = {1, 0};//等待1snanosleep(&ts, NULL);if (fork() == 0)//fork后,子进程会拷贝父进程所有的内存,mutex也会被拷贝一份,子进程拷贝下来就已经处于加锁状态{doit(NULL);//子进程运行到这里}pthread_join(tid, NULL);//父进程运行到这里printf("pid = %d Exiting main ...\n",static_cast<int>(getpid()));return 0;
}-
执行deadlock_test后,该进程不会退出,处于死锁状态

-
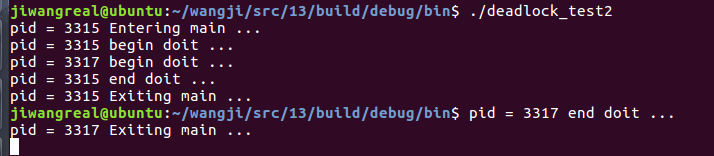
不死锁的代码eg:13\jmuduo\tests\Deadlock_test2.cc
利用pthread_atfork解决
#include <stdio.h>
#include <time.h>
#include <pthread.h>
#include <unistd.h>pthread_mutex_t mutex = PTHREAD_MUTEX_INITIALIZER;void* doit(void* arg)
{printf("pid = %d begin doit ...\n",static_cast<int>(getpid()));pthread_mutex_lock(&mutex);struct timespec ts = {2, 0};nanosleep(&ts, NULL);pthread_mutex_unlock(&mutex);printf("pid = %d end doit ...\n",static_cast<int>(getpid()));return NULL;
}void prepare(void)
{pthread_mutex_unlock(&mutex);
}void parent(void)
{pthread_mutex_lock(&mutex);
}int main(void)
{pthread_atfork(prepare, parent, NULL);printf("pid = %d Entering main ...\n", static_cast<int>(getpid()));pthread_t tid;pthread_create(&tid, NULL, doit, NULL);struct timespec ts = {1, 0};nanosleep(&ts, NULL);if (fork() == 0)//子进程首先会调用prepare,使得mutex处于解锁状态,所以子进程拷贝的是解锁状态mutex{doit(NULL);//调用doit,再加锁,解锁}//由于子进程先调用prepare函数,导致mutex为解锁状态,那么父进程再调用parent函数,进行mutex加锁,则不会造成死锁pthread_join(tid, NULL);printf("pid = %d Exiting main ...\n",static_cast<int>(getpid()));return 0;
}- 结果如下:
这篇关于(13)muduo_base库源码分析:Thread类实现的文章就介绍到这儿,希望我们推荐的文章对编程师们有所帮助!


