本文主要是介绍最小值滤波 (C 语言实现),希望对大家解决编程问题提供一定的参考价值,需要的开发者们随着小编来一起学习吧!
最小值滤波 (C 语言实现)
遇到最小值滤波的问题,小白不知道,一个程序写了三天,终于今天傍晚出来了。。。
很简单的for循环,但是没有理解最小值滤波,怎么写都是错啊~
这是我见过做好的描述,关于最小值滤波:
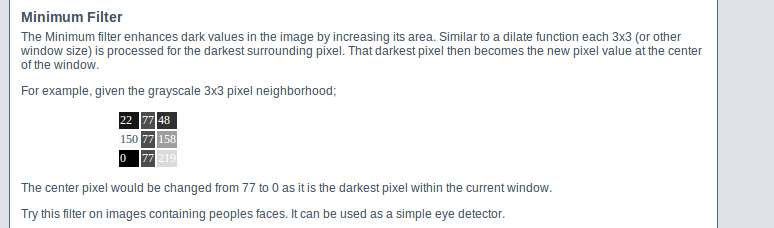
3*3的像素点阵,对于中心点做最小值滤波的话,它的值将从77变换到0
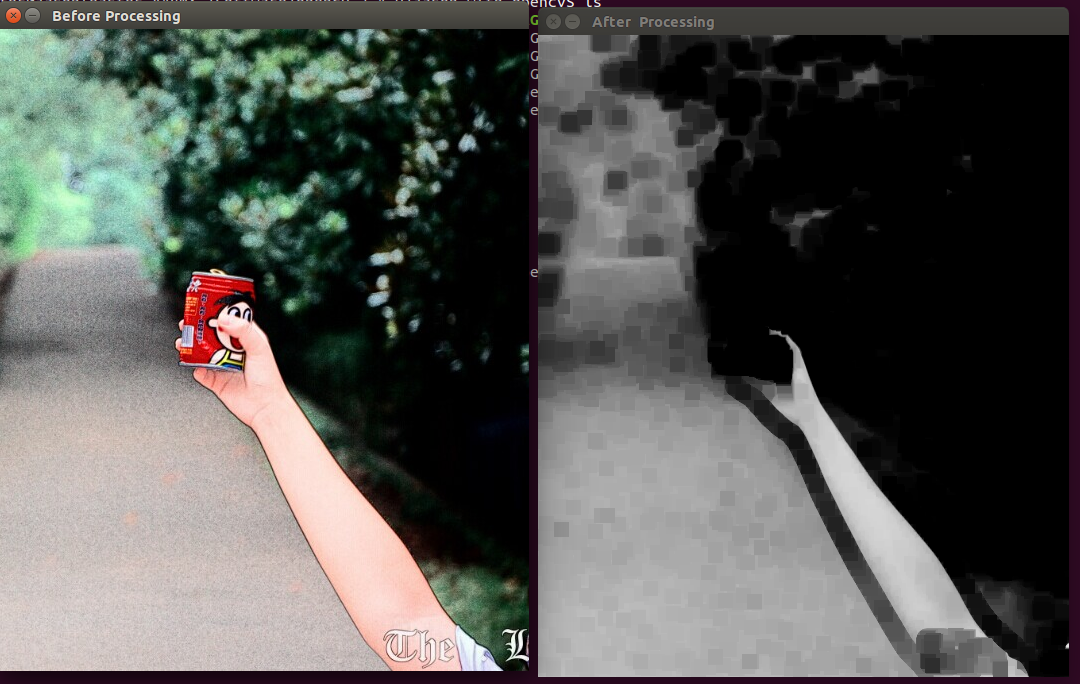
处理结果图:
我一直支持也坚持开源分享的原则,为大家更好的相互学习,给出源代码
/******************************************************************
code writer : EOF
code date : 2014.08.07
e-mail  : jasonleaster@gmail.com jasonleaster@163.comcode purpose:This demo is coded for mininum value filter.
If you find something wrong with my code, please touch me by e-mail.
Thank you.*******************************************************************/#include "opencv2/highgui/highgui_c.h"
#include "opencv2/imgproc/imgproc_c.h"#include <stdio.h>/*------------------------------------------------------------------------------This two Macro are used for debugging, if you are begginer with OpenCV,
it will help you to know and test what inside of the data struture in OpenCV-------------------------------------------------------------------------------*///#define RGB_TEST_DEBUG
//#define CHANNEL_TEST_DEBUG	/* the offset of three channel RGB */
#define RED_BIT   2
#define GREEN_BIT 1
#define BLUE_BIT  0#define SQUARE_LENGTH 15int get_dark_imagine(IplImage* const img_origin,IplImage* const img_win_dark);int main(int argc,char* argv[])
{char* win_name_bf = "Before Processing";char* win_name_af = "After  Processing";CvSize size;IplImage* img_origin = cvLoadImage(argv[1],CV_LOAD_IMAGE_COLOR);size.height = img_origin->height;size.width  = img_origin->width;IplImage* img_win_dark = cvCreateImage(size,IPL_DEPTH_8U,1);//single channelget_dark_imagine(img_origin,img_win_dark);cvNamedWindow(win_name_bf,CV_WINDOW_AUTOSIZE);//cvNamedWindow is a function which would help you to creat a window.cvShowImage(win_name_bf,img_origin);//Obviously, show the picture that you inputed.cvNamedWindow(win_name_af,CV_WINDOW_AUTOSIZE);//cvNamedWindow is a function which would help you to creat a window.cvShowImage(win_name_af,img_win_dark);//Obviously, show the picture that you inputed.cvWaitKey(0);//pause and let the user see the picture.cvReleaseImage(&img_origin);cvReleaseImage(&img_win_dark);//Finally, release the struture, otherwise, memory leak !return 0;
}int get_dark_imagine(IplImage* const img_origin,IplImage* const img_win_dark)
{/*Varible description:@img_origin  : A pointer which point to the original picture's IplImage-structure.@img_win_dark: A pointer which point to the dark-window's IplImage-structure.*/if(img_origin == NULL || img_win_dark == NULL){printf("Error! img_origin or img_win_dark is NULL\n");return 1;}int height_origin = img_origin->height ;int width_origin  = img_origin->width ;//the search band width.unsigned char *  const ptr_array_origin    = (unsigned char*)img_origin->imageData;unsigned char *  const ptr_array_win_dark  = (unsigned char*)img_win_dark->imageData;unsigned char* ptr_header_origin    = NULL;int row = 0;int col = 0;int square_row = 0;int square_col = 0;int min    = 0;int T_min  = 0;int temp_R = 0;int temp_G = 0;int temp_B = 0;int temp   = 0;int search_win_start = SQUARE_LENGTH/2;/*define two varible -- height_origin & width_origin for up band-width of the search-window*/int search_win_height_end  = img_win_dark->height - SQUARE_LENGTH/2;int search_win_width_end   = img_win_dark->width   - SQUARE_LENGTH/2;//initializition of the picture's data that 'ptr_array_win_dark' point to.for(row = 0; row < height_origin; row++){for(col = 0; col < width_origin ;col++){*(ptr_array_win_dark + col + row*(img_win_dark->widthStep)) = 255;}}//Mininum value filter for(row = search_win_start; row < search_win_height_end; row++){for(col = search_win_start; col < search_win_width_end ;col++){ptr_header_origin = ptr_array_origin + (row)*(img_origin->widthStep) + (col)*3;temp_B = *(ptr_header_origin + BLUE_BIT  );temp_G = *(ptr_header_origin + GREEN_BIT );temp_R = *(ptr_header_origin + RED_BIT   );min = (temp_G < temp_B) ? temp_G :  temp_B;min = (min    < temp_R) ? min    :  temp_R;T_min = min;for(square_row = (row - search_win_start); square_row < (row + search_win_start + 1);square_row++){for(square_col = (col - search_win_start); square_col < (col+search_win_start + 1);square_col++){min = *(ptr_array_win_dark + square_col + square_row*(img_win_dark->widthStep));if (min > T_min){*(ptr_array_win_dark + square_col + square_row*(img_win_dark->widthStep)) = (T_min);}}}}}return 0;
}
如有错误,欢迎交流指正
—— EOF
update : 2014.10.05
写了一个matlab版本的最小滤波算法框架
Img_filted = dark_channel;
for row = 1 :  heightfor col = 1 : width            min_value =  dark_channel(row,col);for patch_row = (row  -floor(search_win_height/2)) : (row + floor(search_win_height/2))for patch_col = (col - floor(search_win_width/2)) : (col   + floor(search_win_width/2))if patch_row > 0  &&  patch_col > 0 && patch_row <= height && patch_col <= widthif  min_value < Img_filted(patch_row,patch_col)Img_filted(patch_row,patch_col) = min_value;endendendendend
end
这篇关于最小值滤波 (C 语言实现)的文章就介绍到这儿,希望我们推荐的文章对编程师们有所帮助!


