本文主要是介绍TFLite: TFLiteCameraDemo代码分析,希望对大家解决编程问题提供一定的参考价值,需要的开发者们随着小编来一起学习吧!
综述
分析TFliteCameraDemo的目的是分析怎么在手机上使用TFLite,使用TFLite reference的流程是:
根据模型文件创建Interpreter,获得Interpreter的输入,提供输出结果保存的地方,最后运行Interpreter.

tflite提供的java接口很简单:构建Interpeter, 运行Interpreter得到结果。
demo运行效果图:
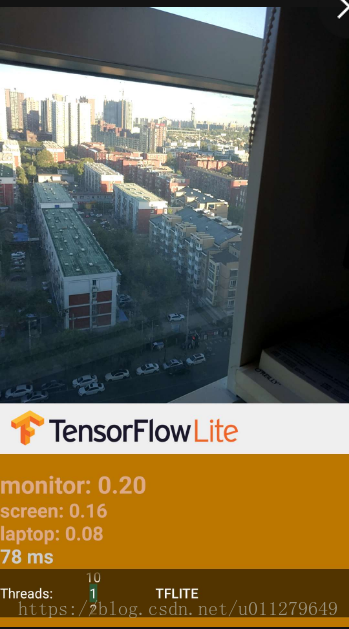
从上图的layout可以看到:textureView(预览窗口),textView(识别结果显示区域)
 toggleButton(TFLITE/NNAPI选择),numberPicker(Threads:选择)
分析APK的入口点:AndroidManifest.xml
AndroidManifest.xml -> 可视化APP都有LAUNCHER -> 所在的activity:
activity android:name="com.example.android.tflitecamerademo.CameraActivity"
找到对应文件:CameraActivity.java
CameraActivity.java
分析CameraActivity.java -> activity的实现通过Camera2BasicFragment.newInstance()
找到文件Camera2BasicFragment.java
/** Main {@code Activity} class for the Camera app. */
public class CameraActivity extends Activity {@Overrideprotected void onCreate(Bundle savedInstanceState) {super.onCreate(savedInstanceState);setContentView(R.layout.activity_camera);// layout文件if (null == savedInstanceState) {getFragmentManager().beginTransaction()// Fragment不能单独存在,通过container引入.replace(R.id.container, Camera2BasicFragment.newInstance()).commit();}}
}
Camera2BasicFragment.java
其中public static所以CameraActivity.java可通过类名访问
public static Camera2BasicFragment newInstance() {return new Camera2BasicFragment();
}
//即使没有构造函数的实现也很调用基类的构造函数,创建成员变量和方法等
/** Basic fragments for the Camera. */
public class Camera2BasicFragment extends Fragmentimplements FragmentCompat.OnRequestPermissionsResultCallback {}
Fragment是什么?
Fragment 表示 Activity 中的行为或用户界面部分。您可以将多个片段组合在一个 Activity 中来构建多窗格 UI,
以及在多个 Activity 中重复使用某个片段。您可以将片段视为 Activity 的模块化组成部分,它具有自己的生命周期,
能接收自己的输入事件,并且您可以在 Activity 运行时添加或移除片段(有点像您可以在不同 Activity 中重复使用的“子 Activity”
Fragment生命周期
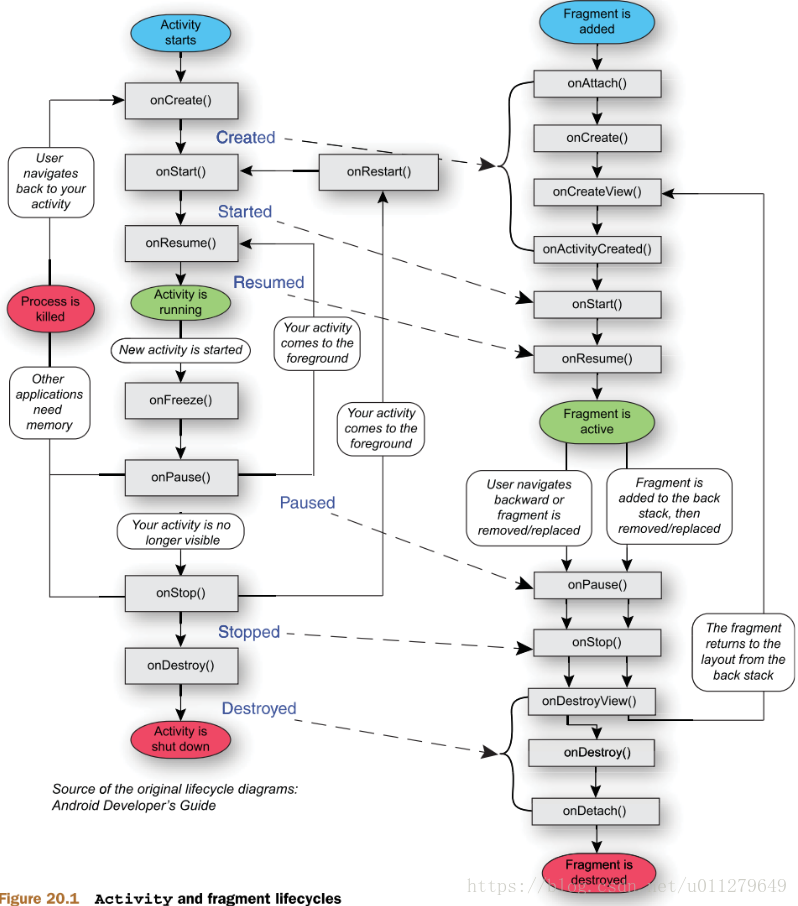
Fragment生命周期的回调函数实现
onCreateView:Layout the preview and buttons
 /** Layout the preview and buttons. */
   @Override
   public View onCreateView(
       LayoutInflater inflater, ViewGroup container, Bundle savedInstanceState) {
     return inflater.inflate(R.layout.fragment_camera2_basic, container, false);
   }
onActivityCreated:Load the model and labels
  /** Load the model and labels. */
   @Override
   public void onActivityCreated(Bundle savedInstanceState) {
     super.onActivityCreated(savedInstanceState);
     try {
       // create either a new ImageClassifierQuantizedMobileNet or
      //an ImageClassifierFloatInception
       classifier = new ImageClassifierQuantizedMobileNet(getActivity());
     } catch (IOException e) {
       Log.e(TAG, "Failed to initialize an image classifier.", e);
     }
     startBackgroundThread();
   }
ImageClassifierQuantizedMobileNet
ImageClassifierQuantizedMobileNet是ImageClassifier的派生类,另一个是ImageClassifierFloatInception,根据使用的model进行区分(一个浮点、一个定点),主要的实现在基类ImageClassifier。
/**
  * This classifier works with the quantized MobileNet model.
  */
 public class ImageClassifierQuantizedMobileNet extends ImageClassifier {
  /**
    * An array to hold inference results, to be feed into Tensorflow Lite as outputs.
    * This isn't part of the super class, because we need a primitive array here.
    */
   private byte[][] labelProbArray = null;
  /**
    * Initializes an {@code ImageClassifier}.
    *
    * @param activity
    */
   ImageClassifierQuantizedMobileNet(Activity activity) throws IOException {
     super(activity);
     labelProbArray = new byte[1][getNumLabels()];
   }
  ---
 }
通过super(activity)调用了基类的构造函数ImageClassifier
 /** An instance of the driver class to run model inference with Tensorflow Lite. */
 protected Interpreter tflite;
/** The loaded TensorFlow Lite model. flatbuffers格式化的文件*/
 private MappedByteBuffer tfliteModel;
/** Labels corresponding to the output of the vision model. */
 private List<String> labelList;
/** A ByteBuffer to hold image data, to be feed into Tensorflow Lite as inputs. */
 protected ByteBuffer imgData = null;
  ImageClassifier(Activity activity) throws IOException {
     tfliteModel = loadModelFile(activity);
     tflite = new Interpreter(tfliteModel);
     labelList = loadLabelList(activity);
     imgData =
         ByteBuffer.allocateDirect(
             DIM_BATCH_SIZE
                 * getImageSizeX()
                 * getImageSizeY()
                 * DIM_PIXEL_SIZE
                 * getNumBytesPerChannel());
     imgData.order(ByteOrder.nativeOrder());
     filterLabelProbArray = new float[FILTER_STAGES][getNumLabels()];
     Log.d(TAG, "Created a Tensorflow Lite Image Classifier.");
   }
startBackgroundThread
  /** Starts a background thread and its {@link Handler}. */
   private void startBackgroundThread() {
     backgroundThread = new HandlerThread(HANDLE_THREAD_NAME);
     backgroundThread.start();
     backgroundHandler = new Handler(backgroundThread.getLooper());
     synchronized (lock) {
       runClassifier = true;
     }
     backgroundHandler.post(periodicClassify);
   }
Takes photos and classify them periodically
private Runnable periodicClassify =
new Runnable() {
@Override
public void run() {
synchronized (lock) {
if (runClassifier) {
classifyFrame();
}
}
backgroundHandler.post(periodicClassify);
}
};
/** Classifies a frame from the preview stream. */
private void classifyFrame() {
SpannableStringBuilder textToShow = new SpannableStringBuilder();
//从 textureView中获得Bitmap(获得待处理的图像)
Bitmap bitmap = textureView.getBitmap(classifier.getImageSizeX(), classifier.getImageSizeY());
classifier.classifyFrame(bitmap, textToShow);
bitmap.recycle();
showToast(textToShow);
}
/** Classifies a frame from the preview stream. */
void classifyFrame(Bitmap bitmap, SpannableStringBuilder builder) {
// 转换bitmap到imgData
convertBitmapToByteBuffer(bitmap);
// Here's where the magic happens!!!
long startTime = SystemClock.uptimeMillis();
runInference();
long endTime = SystemClock.uptimeMillis();
Log.d(TAG, "Timecost to run model inference: " + Long.toString(endTime - startTime));
// Smooth the results across frames.
applyFilter();
// Print the results.
printTopKLabels(builder);
long duration = endTime - startTime;
SpannableString span = new SpannableString(duration + " ms");
span.setSpan(new ForegroundColorSpan(android.graphics.Color.LTGRAY), 0, span.length(), 0);
builder.append(span);
}
/** Writes Image data into a {@code ByteBuffer}. */
private void convertBitmapToByteBuffer(Bitmap bitmap) {imgData.rewind();bitmap.getPixels(intValues, 0, bitmap.getWidth(), 0, 0, bitmap.getWidth(), bitmap.getHeight());// Convert the image to floating point.int pixel = 0;long startTime = SystemClock.uptimeMillis();for (int i = 0; i < getImageSizeX(); ++i) {for (int j = 0; j < getImageSizeY(); ++j) {final int val = intValues[pixel++];addPixelValue(val);}}long endTime = SystemClock.uptimeMillis();Log.d(TAG, "Timecost to put values into ByteBuffer: " + Long.toString(endTime - startTime));
}
@Override
protected void addPixelValue(int pixelValue) {imgData.put((byte) ((pixelValue >> 16) & 0xFF));imgData.put((byte) ((pixelValue >> 8) & 0xFF));imgData.put((byte) (pixelValue & 0xFF));
} @Override
protected void runInference() {
tflite.run(imgData, labelProbArray);
}
哪里打开了camera
有两个地方可能打开camera, Fragment的onResume和TextureView的onSurfaceTextureAvailable。
@Override
public void onResume() {
super.onResume();
startBackgroundThread();
// When the screen is turned off and turned back on, the SurfaceTexture is already
// available, and "onSurfaceTextureAvailable" will not be called. In that case, we can open
// a camera and start preview from here (otherwise, we wait until the surface is ready in
// the SurfaceTextureListener).
if (textureView.isAvailable()) {
openCamera(textureView.getWidth(), textureView.getHeight());
} else {
textureView.setSurfaceTextureListener(surfaceTextureListener);
}
}
/**
* {@link TextureView.SurfaceTextureListener} handles several lifecycle events on a {@link
* TextureView}.
*/
private final TextureView.SurfaceTextureListener surfaceTextureListener =
new TextureView.SurfaceTextureListener() {
@Override
public void onSurfaceTextureAvailable(SurfaceTexture texture, int width, int height) {
openCamera(width, height);
}
@Override
public void onSurfaceTextureSizeChanged(SurfaceTexture texture, int width, int height) {
configureTransform(width, height);
}
@Override
public boolean onSurfaceTextureDestroyed(SurfaceTexture texture) {
return true;
}
@Override
public void onSurfaceTextureUpdated(SurfaceTexture texture) {}
};
openCamera引入camera相关的回调函数
/** Opens the camera specified by {@link Camera2BasicFragment#cameraId}. */
private void openCamera(int width, int height) {
if (!checkedPermissions && !allPermissionsGranted()) {
FragmentCompat.requestPermissions(this, getRequiredPermissions(), PERMISSIONS_REQUEST_CODE);
return;
} else {
checkedPermissions = true;
}
setUpCameraOutputs(width, height);
configureTransform(width, height);
Activity activity = getActivity();
CameraManager manager = (CameraManager) activity.getSystemService(Context.CAMERA_SERVICE);
try {
if (!cameraOpenCloseLock.tryAcquire(2500, TimeUnit.MILLISECONDS)) {
throw new RuntimeException("Time out waiting to lock camera opening.");
}
manager.openCamera(cameraId, stateCallback, backgroundHandler);
}
}
这篇关于TFLite: TFLiteCameraDemo代码分析的文章就介绍到这儿,希望我们推荐的文章对编程师们有所帮助!


