本文主要是介绍图片加载框架Picasso解析,希望对大家解决编程问题提供一定的参考价值,需要的开发者们随着小编来一起学习吧!
picasso是Square公司开源的一个Android图形缓存库
主要有以下一些特性:
在adapter中回收和取消当前的下载;
使用最少的内存完成复杂的图形转换操作;
自动的内存和硬盘缓存;
图形转换操作,如变换大小,旋转等,提供了接口来让用户可以自定义转换操作;
加载载网络或本地资源;
Picasso.class
他有一个内部类,一般是通过他来创建实例的:
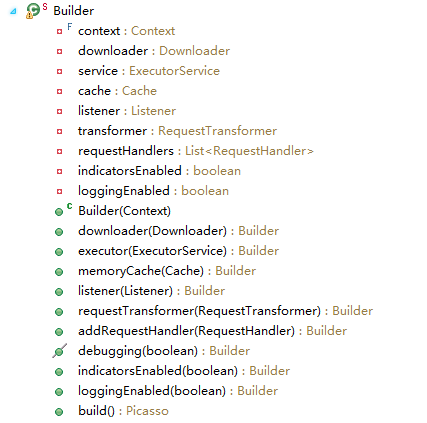
downloader(Downloader downloader) :
容许使用自定义的下载器,可以用okhttp或者volley,必须实现Downloader接口。
executor(ExecutorService executorService):
容许使用自己的线程池来进行下载
memoryCache(Cache memoryCache):
容许使用自己的缓存类,必须实现Cache接口。
requestTransformer(RequestTransformer transformer):
listener(Listener listener):
addRequestHandler(RequestHandler requestHandler):
indicatorsEnabled(boolean enabled):设置图片来源的指示器。
loggingEnabled(boolean enabled):
再来看build()方法:
/** Create the {@link Picasso} instance. */public Picasso build() {Context context = this.context;if (downloader == null) {downloader = Utils.createDefaultDownloader(context);}if (cache == null) {cache = new LruCache(context);}if (service == null) {service = new PicassoExecutorService();}if (transformer == null) {transformer = RequestTransformer.IDENTITY;}Stats stats = new Stats(cache);Dispatcher dispatcher = new Dispatcher(context, service, HANDLER, downloader, cache, stats);return new Picasso(context, dispatcher, cache, listener, transformer,requestHandlers, stats, indicatorsEnabled, loggingEnabled);}一般情况下,如果不需要自定义bulid里的这些方法,可以使用Picasso.with(context)默认方法来获得单例对象:
public static Picasso with(Context context) {if (singleton == null) {synchronized (Picasso.class) {if (singleton == null) {singleton = new Builder(context).build();}}}return singleton;}public class SamplePicassoFactory {private static Picasso sPicasso;public static Picasso getPicasso(Context context) {if (sPicasso == null) {sPicasso = new Picasso.Builder(context).downloader(new OkHttpDownloader(context, ConfigConstants.MAX_DISK_CACHE_SIZE)).memoryCache(new LruCache(ConfigConstants.MAX_MEMORY_CACHE_SIZE)).build();}return sPicasso;}
}如果通过以上方法获得对象后,还可以通过Picasso.setSingletonInstance(Picasso picasso)方法设置对象到Picasso中,这样以后还是通过Picasso.with(context)来调用。
接着就可以通过以下方式设置加载源:
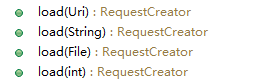
可以是uri地址,file文件,res资源drawable。
最终都是通过以下方法来创建一个RequestCreator对象:
public RequestCreator load(Uri uri) {return new RequestCreator(this, uri, 0);}RequestCreator(Picasso picasso, Uri uri, int resourceId) {if (picasso.shutdown) {throw new IllegalStateException("Picasso instance already shut down. Cannot submit new requests.");}this.picasso = picasso;this.data = new Request.Builder(uri, resourceId); }
noPlaceholder():设置没有加载等待图片
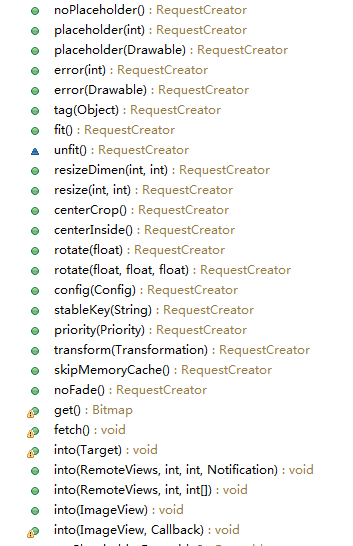
placeholder(int placeholderResId):设置加载等待图片
placeholder(Drawable placeholderDrawable):设置加载等待图片
error(int errorResId):设置加载出错的图片。
error(Drawable errorDrawable):设置加载出错的图片。
tag(Object tag):设置标记
fit():自适应,下载的图片有多少像素就显示多少像素
resizeDimen(int targetWidthResId, int targetHeightResId):设置图片显示的像素。
resize(int targetWidth, int targetHeight):设置图片显示的像素。
centerCrop():设置ImageView的ScaleType属性.
centerInside():设置ImageView的ScaleType属性.
rotate(float degrees):设置旋转角度。
rotate(float degrees, float pivotX, float pivotY):设置以某个中心点设置某个旋转角度。
config(Bitmap.Config config):设置Bitmap的Config属性
priority(Priority priority):设置请求的优先级。
transform(Transformation transformation):
skipMemoryCache():跳过内存缓存
memoryPolicy(MemoryPolicy policy, MemoryPolicy... additional):
networkPolicy(NetworkPolicy policy, NetworkPolicy... additional):
noFade():没有淡入淡出效果
get():获得bitmap对象
fetch():
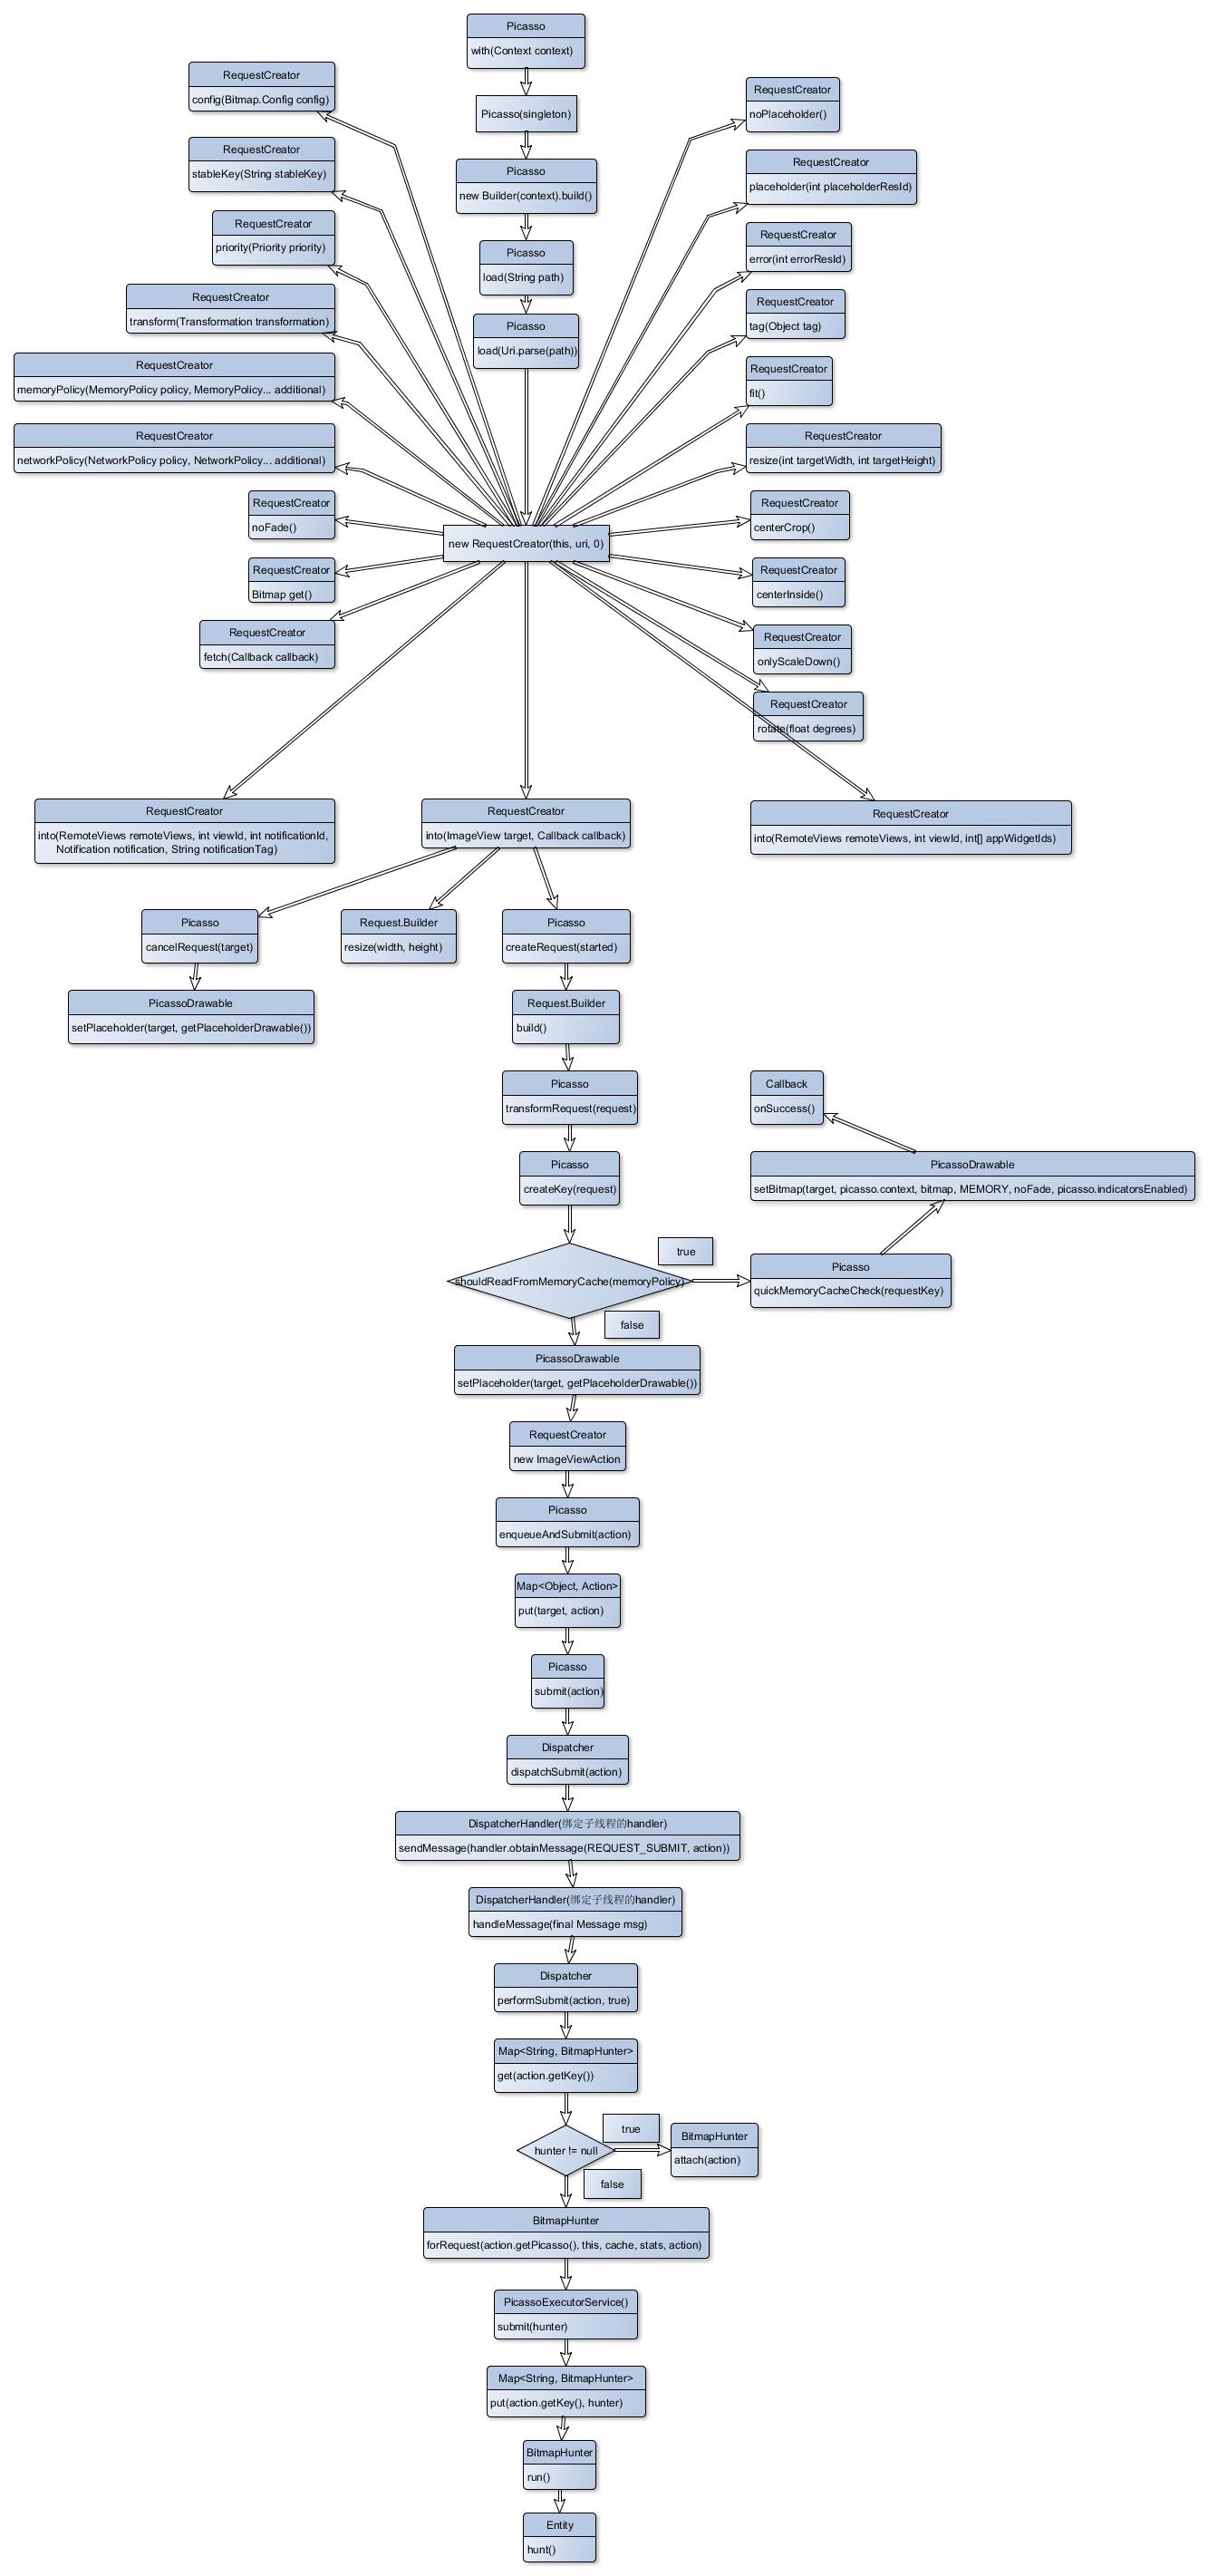
设置完以上一系列属性之后,最关键的就是into方法,现在以into(ImageView target)举例:
public void into(ImageView target) {into(target, null);} public void into(ImageView target, Callback callback) {long started = System.nanoTime();checkMain();if (target == null) {throw new IllegalArgumentException("Target must not be null.");}if (!data.hasImage()) {picasso.cancelRequest(target);if (setPlaceholder) {setPlaceholder(target, getPlaceholderDrawable());}return;}if (deferred) {if (data.hasSize()) {throw new IllegalStateException("Fit cannot be used with resize.");}int width = target.getWidth();int height = target.getHeight();if (width == 0 || height == 0) {if (setPlaceholder) {setPlaceholder(target, getPlaceholderDrawable());}picasso.defer(target, new DeferredRequestCreator(this, target, callback));return;}data.resize(width, height);}Request request = createRequest(started);String requestKey = createKey(request);if (shouldReadFromMemoryCache(memoryPolicy)) {Bitmap bitmap = picasso.quickMemoryCacheCheck(requestKey);if (bitmap != null) {picasso.cancelRequest(target);setBitmap(target, picasso.context, bitmap, MEMORY, noFade, picasso.indicatorsEnabled);if (picasso.loggingEnabled) {log(OWNER_MAIN, VERB_COMPLETED, request.plainId(), "from " + MEMORY);}if (callback != null) {callback.onSuccess();}return;}}if (setPlaceholder) {setPlaceholder(target, getPlaceholderDrawable());}Action action =new ImageViewAction(picasso, target, request, memoryPolicy, networkPolicy, errorResId,errorDrawable, requestKey, tag, callback, noFade);picasso.enqueueAndSubmit(action);}checkMain();首先检查是否是主线程
if (target == null) {throw new IllegalArgumentException("Target must not be null.");}if (!data.hasImage()) {picasso.cancelRequest(target);if (setPlaceholder) {setPlaceholder(target, getPlaceholderDrawable());}return;}if (deferred) {if (data.hasSize()) {throw new IllegalStateException("Fit cannot be used with resize.");}int width = target.getWidth();int height = target.getHeight();if (width == 0 || height == 0) {if (setPlaceholder) {setPlaceholder(target, getPlaceholderDrawable());}picasso.defer(target, new DeferredRequestCreator(this, target, callback));return;}data.resize(width, height);} Request request = createRequest(started);String requestKey = createKey(request);/** Create the request optionally passing it through the request transformer. */private Request createRequest(long started) {int id = nextId.getAndIncrement();Request request = data.build();request.id = id;request.started = started;boolean loggingEnabled = picasso.loggingEnabled;if (loggingEnabled) {log(OWNER_MAIN, VERB_CREATED, request.plainId(), request.toString());}Request transformed = picasso.transformRequest(request);if (transformed != request) {// If the request was changed, copy over the id and timestamp from the original.transformed.id = id;transformed.started = started;if (loggingEnabled) {log(OWNER_MAIN, VERB_CHANGED, transformed.logId(), "into " + transformed);}}return transformed;}
public interface RequestTransformer {/*** Transform a request before it is submitted to be processed.** @return The original request or a new request to replace it. Must not be null.*/Request transformRequest(Request request);/** A {@link RequestTransformer} which returns the original request. */RequestTransformer IDENTITY = new RequestTransformer() {@Override public Request transformRequest(Request request) {return request;}};}if (shouldReadFromMemoryCache(memoryPolicy)) {Bitmap bitmap = picasso.quickMemoryCacheCheck(requestKey);if (bitmap != null) {picasso.cancelRequest(target);setBitmap(target, picasso.context, bitmap, MEMORY, noFade, picasso.indicatorsEnabled);if (picasso.loggingEnabled) {log(OWNER_MAIN, VERB_COMPLETED, request.plainId(), "from " + MEMORY);}if (callback != null) {callback.onSuccess();}return;}}Bitmap quickMemoryCacheCheck(String key) {Bitmap cached = cache.get(key);if (cached != null) {stats.dispatchCacheHit();} else {stats.dispatchCacheMiss();}return cached;} @Override public Bitmap get(String key) {if (key == null) {throw new NullPointerException("key == null");}Bitmap mapValue;synchronized (this) {mapValue = map.get(key);if (mapValue != null) {hitCount++;return mapValue;}missCount++;}return null;}this.map = new LinkedHashMap<String, Bitmap>(0, 0.75f, true);setBitmap(target, picasso.context, bitmap, MEMORY, noFade, picasso.indicatorsEnabled);
如果没有设置内存缓存,或者缓存中的图片已经不存在:
if (setPlaceholder) {setPlaceholder(target, getPlaceholderDrawable());}Action action =new ImageViewAction(picasso, target, request, memoryPolicy, networkPolicy, errorResId,errorDrawable, requestKey, tag, callback, noFade);picasso.enqueueAndSubmit(action);void enqueueAndSubmit(Action action) {Object target = action.getTarget();if (target != null && targetToAction.get(target) != action) {// This will also check we are on the main thread.cancelExistingRequest(target);targetToAction.put(target, action);}submit(action);}void submit(Action action) {dispatcher.dispatchSubmit(action);} void performSubmit(Action action) {performSubmit(action, true);}void performSubmit(Action action, boolean dismissFailed) {if (pausedTags.contains(action.getTag())) {pausedActions.put(action.getTarget(), action);if (action.getPicasso().loggingEnabled) {log(OWNER_DISPATCHER, VERB_PAUSED, action.request.logId(),"because tag '" + action.getTag() + "' is paused");}return;}BitmapHunter hunter = hunterMap.get(action.getKey());if (hunter != null) {hunter.attach(action);return;}if (service.isShutdown()) {if (action.getPicasso().loggingEnabled) {log(OWNER_DISPATCHER, VERB_IGNORED, action.request.logId(), "because shut down");}return;}hunter = forRequest(action.getPicasso(), this, cache, stats, action);hunter.future = service.submit(hunter);hunterMap.put(action.getKey(), hunter);if (dismissFailed) {failedActions.remove(action.getTarget());}if (action.getPicasso().loggingEnabled) {log(OWNER_DISPATCHER, VERB_ENQUEUED, action.request.logId());}}接着线程池就会调用hunter 的run方法,因为这实现了Runnable对象:
@Override public void run() {try {updateThreadName(data);if (picasso.loggingEnabled) {log(OWNER_HUNTER, VERB_EXECUTING, getLogIdsForHunter(this));}result = hunt();if (result == null) {dispatcher.dispatchFailed(this);} else {dispatcher.dispatchComplete(this);}} catch (Downloader.ResponseException e) {if (!e.localCacheOnly || e.responseCode != 504) {exception = e;}dispatcher.dispatchFailed(this);} catch (NetworkRequestHandler.ContentLengthException e) {exception = e;dispatcher.dispatchRetry(this);} catch (IOException e) {exception = e;dispatcher.dispatchRetry(this);} catch (OutOfMemoryError e) {StringWriter writer = new StringWriter();stats.createSnapshot().dump(new PrintWriter(writer));exception = new RuntimeException(writer.toString(), e);dispatcher.dispatchFailed(this);} catch (Exception e) {exception = e;dispatcher.dispatchFailed(this);} finally {Thread.currentThread().setName(Utils.THREAD_IDLE_NAME);}}Bitmap hunt() throws IOException {Bitmap bitmap = null;if (shouldReadFromMemoryCache(memoryPolicy)) {bitmap = cache.get(key);if (bitmap != null) {stats.dispatchCacheHit();loadedFrom = MEMORY;if (picasso.loggingEnabled) {log(OWNER_HUNTER, VERB_DECODED, data.logId(), "from cache");}return bitmap;}}data.networkPolicy = retryCount == 0 ? NetworkPolicy.OFFLINE.index : networkPolicy;RequestHandler.Result result = requestHandler.load(data, networkPolicy);if (result != null) {loadedFrom = result.getLoadedFrom();exifRotation = result.getExifOrientation();bitmap = result.getBitmap();// If there was no Bitmap then we need to decode it from the stream.if (bitmap == null) {InputStream is = result.getStream();try {bitmap = decodeStream(is, data);} finally {Utils.closeQuietly(is);}}}if (bitmap != null) {if (picasso.loggingEnabled) {log(OWNER_HUNTER, VERB_DECODED, data.logId());}stats.dispatchBitmapDecoded(bitmap);if (data.needsTransformation() || exifRotation != 0) {synchronized (DECODE_LOCK) {if (data.needsMatrixTransform() || exifRotation != 0) {bitmap = transformResult(data, bitmap, exifRotation);if (picasso.loggingEnabled) {log(OWNER_HUNTER, VERB_TRANSFORMED, data.logId());}}if (data.hasCustomTransformations()) {bitmap = applyCustomTransformations(data.transformations, bitmap);if (picasso.loggingEnabled) {log(OWNER_HUNTER, VERB_TRANSFORMED, data.logId(), "from custom transformations");}}}if (bitmap != null) {stats.dispatchBitmapTransformed(bitmap);}}}return bitmap;}@Override public Result load(Request request, int networkPolicy) throws IOException {Response response = downloader.load(request.uri, request.networkPolicy);if (response == null) {return null;}Picasso.LoadedFrom loadedFrom = response.cached ? DISK : NETWORK;Bitmap bitmap = response.getBitmap();if (bitmap != null) {return new Result(bitmap, loadedFrom);}InputStream is = response.getInputStream();if (is == null) {return null;}// Sometimes response content length is zero when requests are being replayed. Haven't found// root cause to this but retrying the request seems safe to do so.if (loadedFrom == DISK && response.getContentLength() == 0) {Utils.closeQuietly(is);throw new ContentLengthException("Received response with 0 content-length header.");}if (loadedFrom == NETWORK && response.getContentLength() > 0) {stats.dispatchDownloadFinished(response.getContentLength());}return new Result(is, loadedFrom);} @Override public Response load(Uri uri, int networkPolicy) throws IOException {if (Build.VERSION.SDK_INT >= Build.VERSION_CODES.ICE_CREAM_SANDWICH) {installCacheIfNeeded(context);}HttpURLConnection connection = openConnection(uri);connection.setUseCaches(true);if (networkPolicy != 0) {String headerValue;if (NetworkPolicy.isOfflineOnly(networkPolicy)) {headerValue = FORCE_CACHE;} else {StringBuilder builder = CACHE_HEADER_BUILDER.get();builder.setLength(0);if (!NetworkPolicy.shouldReadFromDiskCache(networkPolicy)) {builder.append("no-cache");}if (!NetworkPolicy.shouldWriteToDiskCache(networkPolicy)) {if (builder.length() > 0) {builder.append(',');}builder.append("no-store");}headerValue = builder.toString();}connection.setRequestProperty("Cache-Control", headerValue);}int responseCode = connection.getResponseCode();if (responseCode >= 300) {connection.disconnect();throw new ResponseException(responseCode + " " + connection.getResponseMessage(),networkPolicy, responseCode);}long contentLength = connection.getHeaderFieldInt("Content-Length", -1);boolean fromCache = parseResponseSourceHeader(connection.getHeaderField(RESPONSE_SOURCE));return new Response(connection.getInputStream(), fromCache, contentLength);} private static void installCacheIfNeeded(Context context) {// DCL + volatile should be safe after Java 5.if (cache == null) {try {synchronized (lock) {if (cache == null) {cache = ResponseCacheIcs.install(context);}}} catch (IOException ignored) {}}}private static class ResponseCacheIcs {static Object install(Context context) throws IOException {File cacheDir = Utils.createDefaultCacheDir(context);HttpResponseCache cache = HttpResponseCache.getInstalled();if (cache == null) {long maxSize = Utils.calculateDiskCacheSize(cacheDir);cache = HttpResponseCache.install(cacheDir, maxSize);}return cache;}最后返回new Response(connection.getInputStream(), fromCache, contentLength)请求结果。
接着回到上面的hunt()方法的流程继续:
if (result != null) {loadedFrom = result.getLoadedFrom();exifRotation = result.getExifOrientation();bitmap = result.getBitmap();// If there was no Bitmap then we need to decode it from the stream.if (bitmap == null) {InputStream is = result.getStream();try {bitmap = decodeStream(is, data);} finally {Utils.closeQuietly(is);}}}if (bitmap != null) {if (picasso.loggingEnabled) {log(OWNER_HUNTER, VERB_DECODED, data.logId());}stats.dispatchBitmapDecoded(bitmap);if (data.needsTransformation() || exifRotation != 0) {synchronized (DECODE_LOCK) {if (data.needsMatrixTransform() || exifRotation != 0) {bitmap = transformResult(data, bitmap, exifRotation);if (picasso.loggingEnabled) {log(OWNER_HUNTER, VERB_TRANSFORMED, data.logId());}}if (data.hasCustomTransformations()) {bitmap = applyCustomTransformations(data.transformations, bitmap);if (picasso.loggingEnabled) {log(OWNER_HUNTER, VERB_TRANSFORMED, data.logId(), "from custom transformations");}}}if (bitmap != null) {stats.dispatchBitmapTransformed(bitmap);}}}return bitmap; if (result == null) {dispatcher.dispatchFailed(this);} else {dispatcher.dispatchComplete(this);} static final Handler HANDLER = new Handler(Looper.getMainLooper()) {@Override public void handleMessage(Message msg) {switch (msg.what) {case HUNTER_BATCH_COMPLETE: {@SuppressWarnings("unchecked") List<BitmapHunter> batch = (List<BitmapHunter>) msg.obj;//noinspection ForLoopReplaceableByForEachfor (int i = 0, n = batch.size(); i < n; i++) {BitmapHunter hunter = batch.get(i);hunter.picasso.complete(hunter);}break;} void complete(BitmapHunter hunter) {Action single = hunter.getAction();List<Action> joined = hunter.getActions();boolean hasMultiple = joined != null && !joined.isEmpty();boolean shouldDeliver = single != null || hasMultiple;if (!shouldDeliver) {return;}Uri uri = hunter.getData().uri;Exception exception = hunter.getException();Bitmap result = hunter.getResult();LoadedFrom from = hunter.getLoadedFrom();if (single != null) {deliverAction(result, from, single);}if (hasMultiple) {//noinspection ForLoopReplaceableByForEachfor (int i = 0, n = joined.size(); i < n; i++) {Action join = joined.get(i);deliverAction(result, from, join);}}if (listener != null && exception != null) {listener.onImageLoadFailed(this, uri, exception);}}private void deliverAction(Bitmap result, LoadedFrom from, Action action) {if (action.isCancelled()) {return;}if (!action.willReplay()) {targetToAction.remove(action.getTarget());}if (result != null) {if (from == null) {throw new AssertionError("LoadedFrom cannot be null.");}action.complete(result, from);if (loggingEnabled) {log(OWNER_MAIN, VERB_COMPLETED, action.request.logId(), "from " + from);}} else {action.error();if (loggingEnabled) {log(OWNER_MAIN, VERB_ERRORED, action.request.logId());}}} @Override public void complete(Bitmap result, Picasso.LoadedFrom from) {if (result == null) {throw new AssertionError(String.format("Attempted to complete action with no result!\n%s", this));}ImageView target = this.target.get();if (target == null) {return;}Context context = picasso.context;boolean indicatorsEnabled = picasso.indicatorsEnabled;PicassoDrawable.setBitmap(target, context, result, from, noFade, indicatorsEnabled);if (callback != null) {callback.onSuccess();}}最后一步通过PicassoDrawable.setBitmap来设置,就算大功完成了。
附上部分流程图:
这篇关于图片加载框架Picasso解析的文章就介绍到这儿,希望我们推荐的文章对编程师们有所帮助!


