本文主要是介绍GiantPandaCV | FasterTransformer Decoding 源码分析(六)-CrossAttention介绍,希望对大家解决编程问题提供一定的参考价值,需要的开发者们随着小编来一起学习吧!
本文来源公众号“GiantPandaCV”,仅用于学术分享,侵权删,干货满满。
原文链接:FasterTransformer Decoding 源码分析(六)-CrossAttention介绍
GiantPandaCV | FasterTransformer Decoding 源码分析(一)-整体框架介绍-CSDN博客
GiantPandaCV | FasterTransformer Decoding 源码分析(二)-Decoder框架介绍-CSDN博客
GiantPandaCV | FasterTransformer Decoding 源码分析(三)-LayerNorm介绍-CSDN博客
GiantPandaCV | FasterTransformer Decoding 源码分析(四)-SelfAttention实现介绍-CSDN博客
GiantPandaCV | FasterTransformer Decoding 源码分析(五)-AddBiasResidualLayerNorm介绍-CSDN博客
作者丨进击的Killua
来源丨https://zhuanlan.zhihu.com/p/670739629
编辑丨GiantPandaCV
本文是FasterTransformer Decoding源码分析的第六篇,笔者试图去分析CrossAttention部分的代码实现和优化。由于CrossAttention和SelfAttention计算流程上类似,所以在实现上FasterTransformer使用了相同的底层Kernel函数,因此会有大量重复的概念和优化点,重复部分本文就不介绍了,所以在阅读本文前务必先浏览进击的Killua:FasterTransformer Decoding 源码分析(四)-SelfAttention实现介绍这篇文章,一些共性的地方会在这篇文章中做统一介绍,本文着重介绍区别点。
一、模块介绍
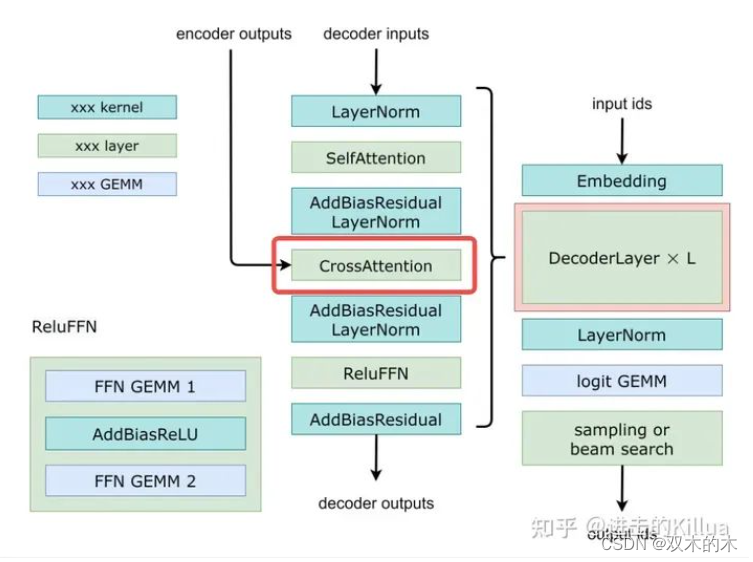
如下图所示,CrossAttention模块位于DecoderLayer的第4个模块,输入为经过LayerNorm后的SelfAttention结果和encoder的outputs,经过该模块处理后进行残差连接再输入LayerNorm中。

CrossAttention在decoder中的位置
CrossAttention模块本质上还是要实现如下几个公式,主要的区别在于其中 CrossAttention 的K, V矩阵不是使用 上一个 Decoder block的输出或inputs计算的,而是使用Encoder 的编码信息矩阵计算的,这里还是把公式放出来展示下。

crossAttention 公式
二、设计&优化
整体Block和Thread的执行模型还是和SelfAttention的保持一致,这里不再赘述,主要介绍一下有一些区别的KV Cache。
1. KV Cache
由于在CrossAttention中K,V矩阵是来自于已经计算完成的Encoder输出,所以KV Cache的程度会更大,即第一次运算把KV计算出来之后,后续只要读取Cache即可,不需要用本step的输入再进行线性变换得到增量的部分K,V,如下图所示。

三、源码分析
1. 方法入口
CrossAttention的调用入口如下,解释下这里的输入和输出,具体逻辑在后面。
输入Tensor
-
input_query:normalize之后的SelfAttention输出,大小是[batch_size,hidden_units_]
-
encoder_output: encoder模块的输出,大小是[batch_size, mem_max_seq_len, memory_hidden_dimension]
-
encoder_sequence_length:每个句子的长度,大小是[batch_size]
-
finished: 解码是否结束的标记,大小是[batch_size]
-
step: 当前解码的步数
输出Tensor
-
hidden_features:CrossAttention的输出feature,大小是[batch_size,hidden_units_],和input_query大小一致。
-
key_cache:CrossAttention中存储key的cache,用于后续step的计算。
-
value_cache: CrossAttention中存储Value的cache,用于后续step的计算。
TensorMap cross_attention_input_tensors{{"input_query", Tensor{MEMORY_GPU, data_type, {batch_size, hidden_units_}, normed_self_attn_output_}},{"encoder_output", input_tensors->at(1)},{"encoder_sequence_length", input_tensors->at(2)},{"finished", input_tensors->at(3)},{"step", input_tensors->at(4)}}; TensorMap cross_attention_output_tensors{{"hidden_features", Tensor{MEMORY_GPU, data_type, {batch_size, hidden_units_}, cross_attn_output_}},{"key_cache",Tensor{MEMORY_GPU,data_type,std::vector<size_t>(output_tensors->at(3).shape.begin() + 1, output_tensors->at(3).shape.end()),output_tensors->at(3).getPtrWithOffset<T>(mem_cache_offset)}},{"value_cache",Tensor{MEMORY_GPU,data_type,std::vector<size_t>(output_tensors->at(4).shape.begin() + 1, output_tensors->at(4).shape.end()),output_tensors->at(4).getPtrWithOffset<T>(mem_cache_offset)}}};cross_attention_layer_->forward(&cross_attention_output_tensors,&cross_attention_input_tensors,&decoder_layer_weight->at(l).cross_attention_weights);2. 主体框架
主体框架代码由三部分构成,分别是该step的QKV生成、output生成和Linear输出。其中第一部分和第三部分都使用了cublas的封装矩阵乘方法gemm,这里就不多介绍了,主要功能逻辑在第二部分output生成。
第一部分:QKV生成

如上所述,代码中Q矩阵是需要每个step生成的,而KV矩阵只有第一个step需要生成,后续步骤读取cache即可。
cublas_wrapper_->Gemm(CUBLAS_OP_N,CUBLAS_OP_N,hidden_units_, // n batch_size,d_model_, // k attention_weights->query_weight.kernel,hidden_units_, // n attention_input,d_model_, // k q_buf_,hidden_units_ /* n */);if (step == 1) {cublas_wrapper_->Gemm(CUBLAS_OP_N,CUBLAS_OP_N,hidden_units_,batch_size * mem_max_seq_len,encoder_output_tensor.shape[2],attention_weights->key_weight.kernel,hidden_units_,encoder_output_tensor.getPtr<T>(),encoder_output_tensor.shape[2],key_mem_cache,hidden_units_);cublas_wrapper_->Gemm(CUBLAS_OP_N,CUBLAS_OP_N,hidden_units_,batch_size * mem_max_seq_len,encoder_output_tensor.shape[2],attention_weights->value_weight.kernel,hidden_units_,encoder_output_tensor.getPtr<T>(),encoder_output_tensor.shape[2],value_mem_cache,hidden_units_);}第二部分:output生成

核心函数调用,这里参数较多不一一介绍了,非常多(像一些has_ia3等参数应该是在不断迭代的过程中加入的),在后面函数实现中会将重点参数进行阐述。
cross_attention_dispatch<T>(q_buf_,attention_weights->query_weight.bias,key_mem_cache,attention_weights->key_weight.bias,value_mem_cache,attention_weights->value_weight.bias,memory_sequence_length,context_buf_,finished,batch_size,batch_size,head_num_,size_per_head_,step,mem_max_seq_len,is_batch_major_cache_,q_scaling_,output_attention_param,has_ia3 ? input_tensors->at("ia3_tasks").getPtr<const int>() : nullptr,has_ia3 ? attention_weights->ia3_key_weight.kernel : nullptr,has_ia3 ? attention_weights->ia3_value_weight.kernel : nullptr,stream_);第三部分:Linear输出

这里就是简单地对上步输出结果乘以一个权重矩阵。
cublas_wrapper_->Gemm(CUBLAS_OP_N,CUBLAS_OP_N,d_model_, // nbatch_size,hidden_units_, // kattention_weights->attention_output_weight.kernel,d_model_, // ncontext_buf_,hidden_units_, // kattention_out,d_model_ /* n */);3. kernel函数调用
上述output生成步骤中会调用如下代码,这里针对每个head中需要处理的层数进行了分类,这个也是大量优化中的常用方案,针对不同的入参大小选择不同size和配置的kernel函数进行处理,这里有经验的一些成分在里面,我们常用的case是hidden_size_per_head=64(head=8)的情况。
template<typename T, typename KERNEL_PARAMS_TYPE>void multihead_attention_(const KERNEL_PARAMS_TYPE& params, const cudaStream_t& stream){switch (params.hidden_size_per_head) {case 32:mmha_launch_kernel<T, 32, 32, KERNEL_PARAMS_TYPE>(params, stream);break;case 48:mmha_launch_kernel<T, 48, 64, KERNEL_PARAMS_TYPE>(params, stream);break;case 64:mmha_launch_kernel<T, 64, 64, KERNEL_PARAMS_TYPE>(params, stream);break;case 80:mmha_launch_kernel<T, 80, 128, KERNEL_PARAMS_TYPE>(params, stream);break;case 96:mmha_launch_kernel<T, 96, 128, KERNEL_PARAMS_TYPE>(params, stream);break;case 112:mmha_launch_kernel<T, 112, 128, KERNEL_PARAMS_TYPE>(params, stream);break;case 128:mmha_launch_kernel<T, 128, 128, KERNEL_PARAMS_TYPE>(params, stream);break;case 144:mmha_launch_kernel<T, 144, 256, KERNEL_PARAMS_TYPE>(params, stream);break;case 160:mmha_launch_kernel<T, 160, 256, KERNEL_PARAMS_TYPE>(params, stream);break;case 192:mmha_launch_kernel<T, 192, 256, KERNEL_PARAMS_TYPE>(params, stream);break;case 224:mmha_launch_kernel<T, 224, 256, KERNEL_PARAMS_TYPE>(params, stream);break;case 256:mmha_launch_kernel<T, 256, 256, KERNEL_PARAMS_TYPE>(params, stream);break;default:assert(false);}}4. kernel函数实现
这个函数和SelfAttention中的kernel函数是同一个,流程如图所示,这里只介绍下区别点。

1. CrossAttention中只有第一个step需要将KV存入Cache,其他step不需要。
const bool handle_kv = !DO_CROSS_ATTENTION || (DO_CROSS_ATTENTION && params.timestep == 0);if (handle_kv) {// Trigger the stores to global memory. if (Dh == Dh_MAX || co < Dh / QK_ELTS_IN_16B) {*reinterpret_cast<Qk_vec_m*>(¶ms.k_cache[offset]) = vec_conversion<Qk_vec_m, Qk_vec_k>(k);}}2. 处理本轮step的KV时,也是从cache中取得KV,无需进行本轮计算得到增量KV。
if (DO_CROSS_ATTENTION) {// The 16B chunk written by the thread. int co = tidx / QK_VECS_IN_16B;// The position of the thread in that 16B chunk. int ci = tidx % QK_VECS_IN_16B * QK_VEC_SIZE;// Two chunks are separated by L * x elements. A thread write QK_VEC_SIZE elements. int offset = bhi * params.memory_max_len * Dh + co * params.memory_max_len * QK_ELTS_IN_16B +// params.timestep*QK_ELTS_IN_16B + tlength * QK_ELTS_IN_16B + ci;k = !is_masked && (Dh == Dh_MAX || tidx * QK_VEC_SIZE < Dh) ?vec_conversion<Qk_vec_k, Qk_vec_m>(*reinterpret_cast<const Qk_vec_m*>(¶ms.k_cache[offset])) :k;}else {if (params.int8_mode == 2) {using Packed_Int8_t = typename packed_type<int8_t, num_elems<Qk_vec_m>::value>::type;using Packed_Float_t = typename packed_type<float, num_elems<Qk_vec_m>::value>::type;const auto k_scaling = params.qkv_scale_out[1];const auto k_quant =*reinterpret_cast<const Packed_Int8_t*>(&reinterpret_cast<const int8_t*>(params.k)[qk_offset]);convert_from_float(k, mul<Packed_Float_t, float>(k_scaling, float_from_int8(k_quant)));}else {k = !is_masked && (Dh == Dh_MAX || tidx * QK_VEC_SIZE < Dh) ?vec_conversion<Qk_vec_k, Qk_vec_m>(*reinterpret_cast<const Qk_vec_m*>(¶ms.k[qk_offset])) :k;}}if (DO_CROSS_ATTENTION) {v = vec_conversion<V_vec_k, V_vec_m>(*reinterpret_cast<const V_vec_m*>(&v_cache[tlength * Dh]));}四、总结
本文相对简单,分析了FasterTransformer中CrossAttention模块的设计方法和代码实现,和SelfAttention基本一致,只是对KV Cache的处理细节上有一点区别,整体上看缓存的使用会比SelfAttention多一些,所以速度应该还会快一点。
THE END !
文章结束,感谢阅读。您的点赞,收藏,评论是我继续更新的动力。大家有推荐的公众号可以评论区留言,共同学习,一起进步。
这篇关于GiantPandaCV | FasterTransformer Decoding 源码分析(六)-CrossAttention介绍的文章就介绍到这儿,希望我们推荐的文章对编程师们有所帮助!


