本文主要是介绍CALayer的简单使用,希望对大家解决编程问题提供一定的参考价值,需要的开发者们随着小编来一起学习吧!
原文地址:http://www.raywenderlich.com/2502/calayers-tutorial-for-ios-introduction-to-calayers-tutorial
如果你已经在iPhone上做过开发,你可能对UIView和它的子类-Button,text,slider等,非常熟悉。
但你可能不了解UIView是建立在CALayers之上的,至少我曾经有段时间不知道。
了解CALayers是有用的,因为你可以使用它们轻松地去创造一些纯视觉效果,它们对理解使用将在未来教程中讨论的Core Animation也很重要。
在CALayers的教程中,你将通过做创造一个层并实验它的效果的简单APP去学习基本的层的使用,在这个过程中,你将学到层是什么,一些能设置的纯属性和如何将图像和自定义内容放入层里。
这个层的教程假设你基本熟悉iPhone编程,如果你是新手,可以从如何创建一个简单的iPhone App开始。
让我们开始吧
什么是层?
层是表现一个在屏幕上的包含可视内容的矩形的简单类。
“等一下”,你可能说,“这是UIView的定义”,是这样的,但这儿有个把戏:每一个UIView包含一个用于绘制的根层,你可以使用下面的代码访问这个自动创造的层:(CALayer是UIView的根基)
CALayer * myLayer = myView.layer;
CALayer类包含了很多可设置的影响外观显示的属性,例如:
层的尺寸和位置
层的背景颜色
层的内容(图像或者使用Core Graphics绘制的)
是否是圆角层
在层的边缘应用边框
更多内容
你可以使用这些属性去创造一些效果,例如你想拿一副图片,放在白色的边框,应用一个阴影效果,使其更为逼真,而不是拿出Photoshop或写一堆Core Graphicsdaima代码,你可以使用层的代码。
另外层的属性,多数是可以动画的,例如,你可以开始用圆角图片,点击按钮,有个动画效果,圆角变回直角,使用起来是非常方便简单的。
你可以直接使用层类,或者你可以使用一个 它的子类,例如CAGradientLayer, CATextLayer, CAShapeLayer,和其他。UIView默认的层类是CALayer类,这个是教程的重点。
开始
这儿去了解层的使用的最好方法是自己动手,所以启动Xcode,选择File\New Project,选择 iOS\Application\View-Based Application,点"Choose",起名工程"Layer
Fun",点保存(就是创建个测试Layer的工程)。
添加QuzatCore,做下列改动到LayerFunViewController.m:
- // Import QuartzCore.h at the top of the file
- #import <QuartzCore/QuartzCore.h>
- // Uncomment viewDidLoad and add the following lines
- self.view.layer.backgroundColor = [UIColor orangeColor].CGColor;
- self.view.layer.cornerRadius = 20.0;
- self.view.layer.frame = CGRectInset(self.view.layer.frame, 20, 20);
让我们一步一步回顾这些新东西
为了得到view的层,你可以使用self.view.layer,记住,你可以使用self.view获得view controller 的根视图,你一旦得到视图,你可以使用view.layer获得默认的层(自动创建的),默认层是一个CALayer的类(不是子类)。
下一步你设置层的背景色为橙色,注意背景色属性实际是CGColor类型,但可以使用CGColor属性从UIColor到CGColor转换。
下一步你设置圆角的弧度,设置的这个值是制造圆角的圆的半径,20是一个漂亮的圆角边缘。
最终,你使用CGRectInset的功能,收缩一点frame,方便看到效果。CGRectInset函数收缩X和Y的坐标,返回一个新的Frame。
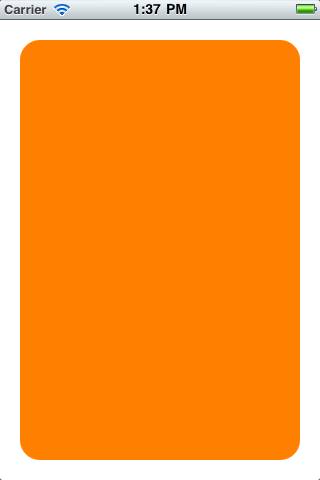
编译执行你的代码,你可以在屏幕中央看到一个圆角橙色矩形。
层和子层
就像UIView可以有自视图,CALayers可以也可以用子层,你可以使用下面的代码创建一个新的层:
CALayer * sublayer = [ CALayer layer ] ;
一旦你拥有一个层,你可以在上面设置任何你想要的属性,但是记住这儿有一个属性你一定要设置:它是frame(或者bounds/ position)。毕竟,层需要去知道它有多大(在什么位置),才能画出自己。当你完成了,你可以把新的层当作子层添加到另一个层中,通过下面的代码:
[ myLayer addSublayer : sublayer ] ;
好了,现在试着自己添加一个简单的子层到view的层中,添加下面的代码在viewDidLoad函数内之前添加代码的后面:
- CALayer *sublayer = [CALayer layer];
- sublayer.backgroundColor = [UIColor blueColor].CGColor;
- sublayer.shadowOffset = CGSizeMake(0, 3);
- sublayer.shadowRadius = 5.0;
- sublayer.shadowColor = [UIColor blackColor].CGColor;
- sublayer.shadowOpacity = 0.8;
- sublayer.frame = CGRectMake(30, 30, 128, 192);
- [self.view.layer addSublayer:sublayer];
这创建了一个新的层,并且设置了一些属性,包括一些之前没设置过的阴影属性,你可以看到在层上设置阴影是多么简单,通过这样,可以用一点工作量完成令人惊奇的效果。(就是简单、方便、有效果)
在设置了这些属性,需要设置层的frame并且把它加到view的层中,记住这些坐标是相对于父层的frame(父层坐标体系的坐标)如果父层位于(20,20),子层设置偏移(30,30),子层在屏幕的位置将会是(50,50).
编译执行你的代码,你将看到一个蓝色子层在屏幕上。

设置层的图像内容
CALayers可以包含更多的内容除了纯颜色,它非常容易包含图片内容,例如:
先将一张名为“BattleMapSplashScreen.jpg”的图片包含进项目
然后添加以下代码:
- sublayer.contents = (id) [UIImage imageNamed:@"BattleMapSplashScreen.jpg"].CGImage;
- sublayer.borderColor = [UIColor blackColor].CGColor;
- sublayer.borderWidth = 2.0;
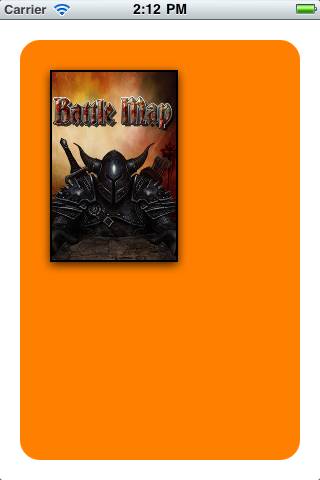
这里设置了内容为图片的层,并且使用边界的颜色和宽度设置了一圈黑色的边界,演示了它如何工作。
编译执行你的代码,你可以看到蓝色层的内容被图片替换调了。
圆角半径和图片内容的注意点
现在你可能想通过cornerRadius把图片也设置成圆角效果。
然而问题超过了咱们之前学的范围,如果你在层上设置了图片内容,图像将仍然画出圆角的边界(该属性起不了作用),你可以通过设置子层的masksToBounds为Yes,但如果你这样做,阴影效果将不会出现因为他们被盖掉了。
我找到一个创造两个层的方法,在外的层是有边框和阴影带颜色的层,里面的层包含圆角图像和设置mask,这样在外的层绘制阴影,在里的层包含图像。
试着使用下面的替换创建子层的代码:
- CALayer *sublayer = [CALayer layer];
- sublayer.backgroundColor = [UIColor blueColor].CGColor;
- sublayer.shadowOffset = CGSizeMake(0, 3);
- sublayer.shadowRadius = 5.0;
- sublayer.shadowColor = [UIColor blackColor].CGColor;
- sublayer.shadowOpacity = 0.8;
- sublayer.frame = CGRectMake(30, 30, 128, 192);
- sublayer.borderColor = [UIColor blackColor].CGColor;
- sublayer.borderWidth = 2.0;
- sublayer.cornerRadius = 10.0;
- [self.view.layer addSublayer:sublayer];
- CALayer *imageLayer = [CALayer layer];
- imageLayer.frame = sublayer.bounds;
- imageLayer.cornerRadius = 10.0;
- imageLayer.contents = (id) [UIImage imageNamed:@"BattleMapSplashScreen.jpg"].CGImage;
- imageLayer.masksToBounds = YES;
- [sublayer addSublayer:imageLayer];
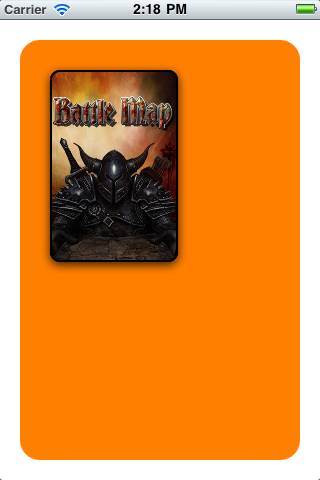
编译运行代码,现在你的图像将有圆角
层和自定义绘画内容
如果你想使用Core Graphics替代图片绘制自定义的层,也是很容易的。
方法是你设置一个类作为层的代理对象,这个类实现名为drawLayer:inContext的方法,里面包含你想绘制内容的Core Graphics代码。
让我们试着添加一个新的层,在里面画一个图案,你把层的代理指向view controller的对象,实现drawLayer:inContext的方法去画图案。
在你的viewDidLoad添加以下代码建立一个新层:
- CALayer *customDrawn = [CALayer layer];
- customDrawn.delegate = self;
- customDrawn.backgroundColor = [UIColor greenColor].CGColor;
- customDrawn.frame = CGRectMake(30, 250, 128, 40);
- customDrawn.shadowOffset = CGSizeMake(0, 3);
- customDrawn.shadowRadius = 5.0;
- customDrawn.shadowColor = [UIColor blackColor].CGColor;
- customDrawn.shadowOpacity = 0.8;
- customDrawn.cornerRadius = 10.0;
- customDrawn.borderColor = [UIColor blackColor].CGColor;
- customDrawn.borderWidth = 2.0;
- customDrawn.masksToBounds = YES;
- [self.view.layer addSublayer:customDrawn];
- [customDrawn setNeedsDisplay];
这里的代码,大多数之前都出现过,就有两点是新的:
1 第一 把层的委托设置给self,这以为这个对象(self)将需要实现 drawLayer:inContext去绘制层的内容。
2 在添加层后,需要通过调用setNeedsDisplay通知层去刷新自己(并调用drawLayer:inContext),如果你忘记调用这个,drawLayer:inContext将不会被调用,图案将不出现。
接下来添加代码去实现drawLayer:inContext,如下:
- void MyDrawColoredPattern (void *info, CGContextRef context) {
- CGColorRef dotColor = [UIColor colorWithHue:0 saturation:0 brightness:0.07 alpha:1.0].CGColor;
- CGColorRef shadowColor = [UIColor colorWithRed:1 green:1 blue:1 alpha:0.1].CGColor;
- CGContextSetFillColorWithColor(context, dotColor);
- CGContextSetShadowWithColor(context, CGSizeMake(0, 1), 1, shadowColor);
- CGContextAddArc(context, 3, 3, 4, 0, radians(360), 0);
- CGContextFillPath(context);
- CGContextAddArc(context, 16, 16, 4, 0, radians(360), 0);
- CGContextFillPath(context);
- }
- - (void)drawLayer:(CALayer *)layer inContext:(CGContextRef)context {
- CGColorRef bgColor = [UIColor colorWithHue:0.6 saturation:1.0 brightness:1.0 alpha:1.0].CGColor;
- CGContextSetFillColorWithColor(context, bgColor);
- CGContextFillRect(context, layer.bounds);
- static const CGPatternCallbacks callbacks = { 0, &MyDrawColoredPattern, NULL };
- CGContextSaveGState(context);
- CGColorSpaceRef patternSpace = CGColorSpaceCreatePattern(NULL);
- CGContextSetFillColorSpace(context, patternSpace);
- CGColorSpaceRelease(patternSpace);
- CGPatternRef pattern = CGPatternCreate(NULL,
- layer.bounds,
- CGAffineTransformIdentity,
- 24,
- 24,
- kCGPatternTilingConstantSpacing,
- true,
- &callbacks);
- CGFloat alpha = 1.0;
- CGContextSetFillPattern(context, pattern, &alpha);
- CGPatternRelease(pattern);
- CGContextFillRect(context, layer.bounds);
- CGContextRestoreGState(context);
- }
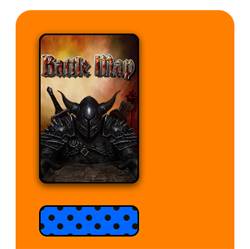
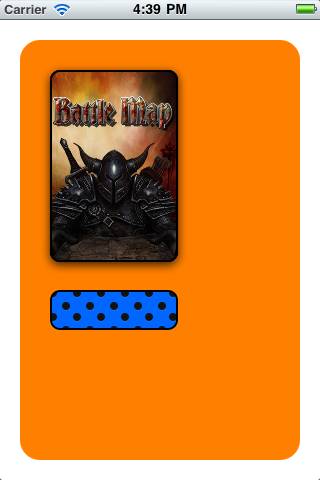
就是这样,运行代码,你将在图片下面看到一个蓝色的图案
将来
下载源代码点击,
这篇关于CALayer的简单使用的文章就介绍到这儿,希望我们推荐的文章对编程师们有所帮助!


