本文主要是介绍使用OpenCV dnn c++加载YOLOv8生成的onnx文件进行目标检测,希望对大家解决编程问题提供一定的参考价值,需要的开发者们随着小编来一起学习吧!
在网上下载了60多幅包含西瓜和冬瓜的图像组成melon数据集,使用 LabelMe 工具进行标注,然后使用 labelme2yolov8 脚本将json文件转换成YOLOv8支持的.txt文件,并自动生成YOLOv8支持的目录结构,包括melon.yaml文件,其内容如下:
path: ../datasets/melon # dataset root dir
train: images/train # train images (relative to 'path')
val: images/val  # val images (relative to 'path')
test: # test images (optional)# Classes
names:0: watermelon1: wintermelon
使用以下python脚本进行训练生成onnx文件:
import argparse
import colorama
from ultralytics import YOLOdef parse_args():parser = argparse.ArgumentParser(description="YOLOv8 object detect")parser.add_argument("--yaml", required=True, type=str, help="yaml file")parser.add_argument("--epochs", required=True, type=int, help="number of training")args = parser.parse_args()return argsdef train(yaml, epochs):model = YOLO("yolov8n.pt") # load a pretrained modelresults = model.train(data=yaml, epochs=epochs, imgsz=640) # train the modelmetrics = model.val() # It'll automatically evaluate the data you trained, no arguments needed, dataset and settings rememberedmodel.export(format="onnx") #, dynamic=True) # export the model, cannot specify dynamic=True, opencv does not support# model.export(format="onnx", opset=12, simplify=True, dynamic=False, imgsz=640)model.export(format="torchscript") # libtorchif __name__ == "__main__":colorama.init()args = parse_args()train(args.yaml, args.epochs)print(colorama.Fore.GREEN + "====== execution completed ======")
使用OpenCV 4.9.0库,生成库的shell脚本build.sh如下:windows上包括cpu和gpu,cuda版本为11.8,cudnn版本为对应的v8.9.7版本,将cudnn的bin, include, lib/x64三个目录内容分别拷贝对应cuda 11.8相应目录下
#! /bin/bashif [ $# != 2 ]; thenecho "Error: requires two parameters: 1: windows windows_cuda or linux; 2: relese or debug"echo "For example: $0 windows debug"exit -1
fiif [ $1 != "windows" ] && [ $1 != "windows_cuda" ] && [ $1 != "linux" ]; thenecho "Error: the first parameter can only be windows or linux"exit -1
fiif [ $2 != "release"  ] && [ $2 != "debug" ]; thenecho "Error: the second parameter can only be release or debug"exit -1
fiif [[ ! -d "build" ]]; thenmkdir buildcd build
elsecd build
fiif [ $2 == "release" ]; thenbuild_type="Release"
elsebuild_type="Debug"
fi# copy the contents of the bin,include,lib/x64 cudnn directories to the corresponding CUDA directories
if [ $1 == "windows_cuda" ]; thencuda_options="-DWITH_CUDA=ON \-DWITH_CUDNN=ON \-DCUDA_FAST_MATH=ON \-DWITH_CUBLAS=ON"
elsecuda_options=""
fiif [ $1 == "windows" ] || [ $1 == "windows_cuda" ]; thencmake \-G"Visual Studio 17 2022" -A x64 \${cuda_options} \-DCMAKE_BUILD_TYPE=${build_type} \-DCMAKE_CONFIGURATION_TYPES=${build_type} \-DBUILD_SHARED_LIBS=ON \-DBUILD_opencv_world=ON \-DBUILD_PERF_TESTS=OFF \-DBUILD_TESTS=OFF \-DCMAKE_INSTALL_PREFIX=../install \-DOPENCV_EXTRA_MODULES_PATH=../../opencv_contrib/modules \..cmake --build . --target install --config $2
fiif [ $1 == "linux" ]; thencmake \-DCMAKE_C_COMPILER=/usr/bin/gcc \-DCMAKE_CXX_COMPILER=/usr/bin/g++ \-DCMAKE_BUILD_TYPE=${build_type} \-DBUILD_SHARED_LIBS=ON \-DBUILD_opencv_world=ON \-DBUILD_PERF_TESTS=OFF \-DBUILD_TESTS=OFF \-DCMAKE_INSTALL_PREFIX=../install \-DOPENCV_EXTRA_MODULES_PATH=../../opencv_contrib/modules \..make -j2make install
firc=$?
if [[ ${rc} != 0 ]]; thenecho -e "\033[0;31mError: there are some errors in the above operation, please check: ${rc}\033[0m"exit ${rc}
fi
以下是使用opencv dnn接口加载onnx文件进行目标检测的实现代码:由变量cuda_enabled指定是执行cpu还是gpu
namespace {constexpr bool cuda_enabled{ false };
constexpr int image_size[2]{ 640, 640 }; // {height,width}, input shape (1, 3, 640, 640) BCHW and output shape(s) (1, 6, 8400)
constexpr float model_score_threshold{ 0.45 }; // confidence threshold
constexpr float model_nms_threshold{ 0.50 }; // iou threshold#ifdef _MSC_VER
constexpr char* onnx_file{ "../../../data/best.onnx" };
constexpr char* torchscript_file{ "../../../data/best.torchscript" };
constexpr char* images_dir{ "../../../data/images/predict" };
constexpr char* result_dir{ "../../../data/result" };
constexpr char* classes_file{ "../../../data/images/labels.txt" };
#else
constexpr char* onnx_file{ "data/best.onnx" };
constexpr char* torchscript_file{ "data/best.torchscript" };
constexpr char* images_dir{ "data/images/predict" };
constexpr char* result_dir{ "data/result" };
constexpr char* classes_file{ "data/images/labels.txt" };
#endifcv::Mat modify_image_size(const cv::Mat& img)
{auto max = std::max(img.rows, img.cols);cv::Mat ret = cv::Mat::zeros(max, max, CV_8UC3);img.copyTo(ret(cv::Rect(0, 0, img.cols, img.rows)));return ret;
}std::vector<std::string> parse_classes_file(const char* name)
{std::vector<std::string> classes;std::ifstream file(name);if (!file.is_open()) {std::cerr << "Error: fail to open classes file: " << name << std::endl;return classes;}std::string line;while (std::getline(file, line)) {auto pos = line.find_first_of(" ");classes.emplace_back(line.substr(0, pos));}file.close();return classes;
}auto get_dir_images(const char* name)
{std::map<std::string, std::string> images; // image name, image path + image namefor (auto const& dir_entry : std::filesystem::directory_iterator(name)) {if (dir_entry.is_regular_file())images[dir_entry.path().filename().string()] = dir_entry.path().string();}return images;
}void draw_boxes(const std::vector<std::string>& classes, const std::vector<int>& ids, const std::vector<float>& confidences,const std::vector<cv::Rect>& boxes, const std::string& name, cv::Mat& frame)
{if (ids.size() != confidences.size() || ids.size() != boxes.size() || confidences.size() != boxes.size()) {std::cerr << "Error: their lengths are inconsistent: " << ids.size() << ", " << confidences.size() << ", " << boxes.size() << std::endl;return;}std::cout << "image name: " << name << ", number of detections: " << ids.size() << std::endl;std::random_device rd;std::mt19937 gen(rd());std::uniform_int_distribution<int> dis(100, 255);for (auto i = 0; i < ids.size(); ++i) {auto color = cv::Scalar(dis(gen), dis(gen), dis(gen));cv::rectangle(frame, boxes[i], color, 2);std::string class_string = classes[ids[i]] + ' ' + std::to_string(confidences[i]).substr(0, 4);cv::Size text_size = cv::getTextSize(class_string, cv::FONT_HERSHEY_DUPLEX, 1, 2, 0);cv::Rect text_box(boxes[i].x, boxes[i].y - 40, text_size.width + 10, text_size.height + 20);cv::rectangle(frame, text_box, color, cv::FILLED);cv::putText(frame, class_string, cv::Point(boxes[i].x + 5, boxes[i].y - 10), cv::FONT_HERSHEY_DUPLEX, 1, cv::Scalar(0, 0, 0), 2, 0);}cv::imshow("Inference", frame);cv::waitKey(-1);std::string path(result_dir);path += "/" + name;cv::imwrite(path, frame);
}} // namespaceint test_yolov8_detect_opencv()
{// reference: ultralytics/examples/YOLOv8-CPP-Inferencenamespace fs = std::filesystem;auto net = cv::dnn::readNetFromONNX(onnx_file);if (net.empty()) {std::cerr << "Error: there are no layers in the network: " << onnx_file << std::endl;return -1;}if (cuda_enabled) {net.setPreferableBackend(cv::dnn::DNN_BACKEND_CUDA);net.setPreferableTarget(cv::dnn::DNN_TARGET_CUDA);} else {net.setPreferableBackend(cv::dnn::DNN_BACKEND_OPENCV);net.setPreferableTarget(cv::dnn::DNN_TARGET_CPU);}if (!fs::exists(result_dir)) {fs::create_directories(result_dir);}auto classes = parse_classes_file(classes_file);if (classes.size() == 0) {std::cerr << "Error: fail to parse classes file: " << classes_file << std::endl;return -1;}std::cout << "classes: ";for (const auto& val : classes) {std::cout << val << " ";}std::cout << std::endl;for (const auto& [key, val] : get_dir_images(images_dir)) {cv::Mat frame = cv::imread(val, cv::IMREAD_COLOR);if (frame.empty()) {std::cerr << "Warning: unable to load image: " << val << std::endl;continue;}cv::Mat bgr = modify_image_size(frame);cv::Mat blob;cv::dnn::blobFromImage(bgr, blob, 1.0 / 255.0, cv::Size(image_size[1], image_size[0]), cv::Scalar(), true, false);net.setInput(blob);std::vector<cv::Mat> outputs;net.forward(outputs, net.getUnconnectedOutLayersNames());int rows = outputs[0].size[1];int dimensions = outputs[0].size[2];// yolov5 has an output of shape (batchSize, 25200, num classes+4+1) (Num classes + box[x,y,w,h] + confidence[c])// yolov8 has an output of shape (batchSize, num classes + 4,  8400) (Num classes + box[x,y,w,h])if (dimensions > rows) { // Check if the shape[2] is more than shape[1] (yolov8)rows = outputs[0].size[2];dimensions = outputs[0].size[1];outputs[0] = outputs[0].reshape(1, dimensions);cv::transpose(outputs[0], outputs[0]);}float* data = (float*)outputs[0].data;float x_factor = bgr.cols * 1.f / image_size[1];float y_factor = bgr.rows * 1.f / image_size[0];std::vector<int> class_ids;std::vector<float> confidences;std::vector<cv::Rect> boxes;for (auto i = 0; i < rows; ++i) {float* classes_scores = data + 4;cv::Mat scores(1, classes.size(), CV_32FC1, classes_scores);cv::Point class_id;double max_class_score;cv::minMaxLoc(scores, 0, &max_class_score, 0, &class_id);if (max_class_score > model_score_threshold) {confidences.push_back(max_class_score);class_ids.push_back(class_id.x);float x = data[0];float y = data[1];float w = data[2];float h = data[3];int left = int((x - 0.5 * w) * x_factor);int top = int((y - 0.5 * h) * y_factor);int width = int(w * x_factor);int height = int(h * y_factor);boxes.push_back(cv::Rect(left, top, width, height));}data += dimensions;}std::vector<int> nms_result;cv::dnn::NMSBoxes(boxes, confidences, model_score_threshold, model_nms_threshold, nms_result);std::vector<int> ids;std::vector<float> confs;std::vector<cv::Rect> rects;for (size_t i = 0; i < nms_result.size(); ++i) {ids.emplace_back(class_ids[nms_result[i]]);confs.emplace_back(confidences[nms_result[i]]);rects.emplace_back(boxes[nms_result[i]]);}draw_boxes(classes, ids, confs, rects, key, frame);}return 0;
}
labels.txt文件内容如下:仅2类
watermelon 0
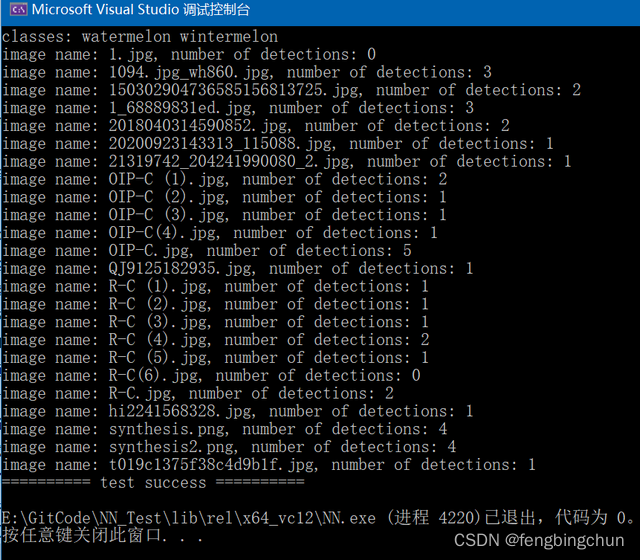
wintermelon 1执行结果如下图所示:
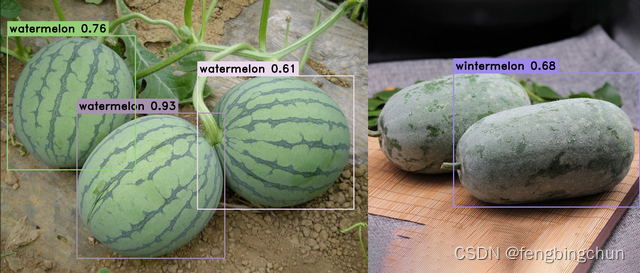
其中一幅图像的检测结果如下图所示:
GitHub:https://github.com/fengbingchun/NN_Test
这篇关于使用OpenCV dnn c++加载YOLOv8生成的onnx文件进行目标检测的文章就介绍到这儿,希望我们推荐的文章对编程师们有所帮助!


